What's new
What's new

Help Repairing Doall ML Trunnion

wordsmith07

Aluminum
Joined
Aug 11, 2018
Location
Athens AL
Tried to find a trunnion on the parts for sale/wanted forum but no response.
In searching this site for repairs there were a couple but they were broken in a slotted arc which in my opinion were less stressful places.
The curved surfaces on arms (to me) don't seem to offer a great place to clamp up for drilling.
My intentions are to bore, thread and countersink one or two cap head screws to hold together and braze around the break.
Tell me if the following is a good idea or not please or advise me how to proceed,

1. Thought I might use high temp JB Weld to hold parts together for drilling procedure. I plan to drill tap size to full CHS depth.
2. Drill clearance hole through top piece.
3.Drill counterbore for head.
4. Grind Vee all around cracks.
5. Silver Braze joints.

High Temp supposedly is good for 1000 or 1300 degrees F depending on product used. One is stated as being "paste" and might create a less than desirable spacing between parts. Would the brazing exceed this temp inside part and vaporize the epoxy and contaminate the brazing?

I can use soft pad clamps to hold until epoxy sets then try and bolt entire assembly to a simple fixture for boring/drilling.
I thought about trying a "U" shaped fixture to hold/align the opposing pins pointing outward but these have flats ground maybe one third into them. V blocks wont help here I think.

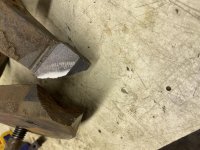
IMG_1785.jpgIMG_1806.jpgE0CB2D6F-5C61-4053-B29A-0EDE6769A2C3.jpg
 
I would get a block of 8620 or such and mill a new part. If not possible, fabricate a fixture to assemble and hold the parts in their home position and braze the fracture.
 
There is some appeal to making the part new from steel rather than CI: a chrom-moly or 8620 part probably won't break!

But it's involved, so if you want to braze... I don't like drilling into the very part of an assembly that just broke. Yes, a SHCS adds some strength but the hole does weaken the casting. Moreover, using a SHCS as your fixture may not preserve pin alignment. Last, the oil and moisture in the casting may make for a poor epoxy joint. It might work but personally I don't like it much though.

So fixturing and work holding is first. The critical goal is to align the pins and have proper spacing. It might make clamping easy to create a part that pushes the pins outward against the fixture.

Make a fixture to hold the pins in the broken parts in alignment. Then make something to push the pins into the holes in the fixture. Drill a hole in a piece of flat scrap clamped to your milling table (with relief - don't drill into your table!). Bore to the exact size of the pins in your part. A snug but sliding fit. Put each piece in, and center drill the back of each pin (not much of a hole is needed). Make two parts each of a piece of all thread, each with a 60° point and wrench flats, and find long hex nut (that is, a piece of hex bar with a hold and threads that match the all-thread). Assemble the nut and all thread pieces.

Make your fixture just to hold the pins in the part with the proper distance separating the flat faces of the arms (the faces the pins holes were drilled in). Put the parts in the fixture, and then put the all-thread gizmo in between the pins and tighten. The fixture holds the arms together, the gizmo holds the parts apart - you should be able to adjust to get the exact distance you want, held rigidly. It should then be a simple thing to put a block under each piece of the arm and use a strap clamp to hold the piece down. Alignment against the blocks is not critical but this setup should actually do pretty well. One guys idea, anyway.
 
Thanks for the inputs! I don't think I have ability to make one from scratch. I am a woodworker that has gotten into repairing and rebuilding metal and woodworking machines. I have a metal lathe and a mill but am lacking in dividing heads and or rotary tables etc.. I will try to build a fixture to hold using all of your suggestions. That is why I asked for help...wondering about an epoxy. Epoxy has served me well in wood :-) Thanks again.
 
The first thing you have to do to an epoxied joint that you are going to braze is remove the epoxy. Glue turns to goo and the braze (or solder) will not flow near the goo- the goo will flow deep into the cast iron. If you have a clean break (no gap) silver solder is really nice (technically a braze but when called solder it is high silver content). you can dill for two small alignment pins, do not go thru effort for bolts and tapping because it can weaken the structure as said earlier. I have had good results with brass and bronze brazing cast iron - it was the standard for many many years before nirod. It still is the go to when you really want low risk of cracking and strong joint. You can give it the smallest tacks (3 at most) with solid wire mig, adjusting position lightly between each tack then go to town brazing, grinding and brazing some more afterwards.
 
If you have no plans to put any stress on that part once it's done, epoxy will work well.

Otherwise, it's a half-ass fix that'll break again.

1) Find another piece that unbroken
2) Use one or two well placed, well sized screws to hold it together, then braze it. Not great, but might last.
3) Make a new one out of steel


One time, I called the Loc-Tite tech line and was talking to the guy there on the ability of epoxy to hold things together. He summed it up pretty well....it's largely an issue of contact area. Epoxy two 4"x4" sheets of aluminum together and they'll never come apart. Epoxy a golf ball to the head of a pin and it'll never stay together. Your part is far closer to the golf ball than the sheet of aluminum example.
 
Thanks for the inputs! I don't think I have ability to make one from scratch. I am a woodworker that has gotten into repairing and rebuilding metal and woodworking machines. I have a metal lathe and a mill but am lacking in dividing heads and or rotary tables etc.
If your going to get into repair work, you'll need to properly tool up the lathe & mill,
as well as your brain.

Micky Mouse repairs won't cut it, and this is a good time to tackle making a new part.
Several members here can walk you thru it, step by step.
 
That might be a good candidate for metal stitching. Local guy near me does some otherwise impossible cast iron repairs with it......Bob
 
With the rust in the crack I expect that part was going to go some time ago. Likely it's under some decent stress.

It looks to me that the broken part would kep pretty well at the break. It might be possible to clamp the 2 parts together long enough to get a SHCS through one into the other to fixture them while brazing. After getting the bolt in it take them apart to bead blast the rusted part of the crack, clean the residue then put them back together. Use a fair amount of preheat and spot 3-4 places around the crack. Let it cool under a blanket and v-groove deeply between the spots, reheat and braze the crap outta the grooves. Cool again, v-groove out the spots and repeat the brazing.

If it's not keying well I'd build a fixture that held the outside pins in relationship as they look to be inline with one another. That should keep the cracked parts in the appropriate relationship and let you get the spot braze on there so you can finish the brazing job.

I wouldn't silver braze that - cost alone would be a killer. I've used silver braze on small "precision" cast iron repairs but regular braze is just as good for something this size.
 
Make a 3d printed model and use that as a pattern for casting either sand or lost wax. Cast in iron or bronze. Check for artists who can cast small stuff in bronze.
Bill D
 
prep w/bevels, preheat, fixture, properly braze, slow cool, done.

That is a braze job. Adding bolts is unnecessary/dumb. Epoxy is not an option.

I've had many machines with large braze repairs. That would be a minor one to do.
 
The bolts are not dumb....that part has at least two, maybe three faces which need to be kept perpendicular to one another. The bolts will (hopefully) allow you to maintain those relationships while you do the brazing. You'd need a pretty healthy brace/clamp to hold that square otherwise. The bolts would allow you to work without a lot of interference and/or bracing.

But again, brazing is a mediocre 'fix' regardless. A new, unbroken part is what a Ninja would use.

The bolts are in the weekest place to keep the joint from moving during brazing. If bolts are done wrong they will pull the hole mess out of alignment.

A heavy fixture for that is a simple job.
 
3A4F063E-FF27-4E87-9036-84BC3522935F.jpgAE00BD42-7A96-4843-9737-FA09F7FFA1B2.jpg607E8A87-7AE2-4E4B-884A-E5549C8B74D4.jpg0A533658-267A-4EFF-8446-60C6B0917175.jpg
Found some magnetic vee blocks I had in a sale box and set on a spare table. The flats on the pins kept it from aligning perfectly but it gave me an idea to start fixturing. I have had good results with aluminum/bronze on cast parts before. is it an option? I know the vee blocks aren’t sufficient with clamps but it gives an idea for cradling or boring end plates.
 
I guess I'd start with a flat fixture plate.
Bolt a piece of straight square "guide bar" to it.
Get two pieces of steel with, say about the size of a 123 block, with the 1x2 side square to the 2x3 side
Clamp the 1x2 sizes to a 90° square. Drill and bore holes for the pins.
Clamp the 123 size block to the straight square bar using a clamp, or drill and screw into both the guide bar and the fixture plate, wiht proper distance.
Install the above discribed gizmo.

the only thing left to do is to use spacers and a strap clamp to get the parts aligned.

This may be brute force - there are likely easier ways - but I'm I'd be pretty sure that this has a good shot at maintaining alignment. Keep the part bolted down until cool, btw.

I guess you could replace my bored end pieces with angle blocks. But you'd want identical ones (harder to make than bored parts I think). That said, bolting the pins down would be easier.

Let us know how the project works out. Good luck.
 
If you decide to have a replacement part cast, a glued-up broken part can serve as the beginning of a pattern. However, this broken part, like almost all, was machined after casting and therefore those surfaces have lost draft and dimension. Draft and dimension can be restored by an experienced pattern maker. There is also the matter of shrinkage, but that should only amount to a bit over 1%. If you are going to be restoring old machines, developing a relationship with a foundry could be a good thing.

I suppose the original broke when the machine fell over.

Denis


Back
Top