What's new
What's new

How To Bevel The Back Side Of A Hole In A Spacer?

gbyoung

Cast Iron
Joined
Feb 2, 2011
Location
Richmond, VA
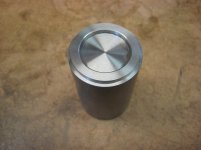
After following a thread on a M/C forum about a local fella’s need for a countershaft sprocket spacer, I did one in the background just to see if I could. Most/all of what I’ve been playing with is aluminum, so turning this out of steel presented new challenges for me and was a good learning experience.

I turned one that was ~2.5mm thick out of a 1.5” dia., 1215 steel rod that was 35mm OD and 25mm ID. After playing with spindle speed (slow via the back gear), I think we got it figured out and it turned out pretty decent.

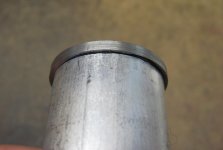
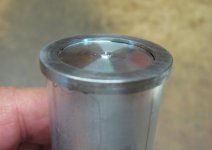
While the full length of the rod was chucked up, it was easy to clean up the spacer’s face, and bevel the inside and outside edges (what you see in the pix). But, how do you do that once you’ve parted the spacer from its host piece of stock?

I can see how you could chamfer the outside edge before you completely part the piece free, but how do you clean up the face of the parted side and chamfer the inside edge of that side’s hole? Trying to get something that thin chucked back up straight is a PITA.

So, how do you professionals do it?

IMG_4110-M.jpg
 
I would use the parallels for my mill and put them against the chuck face, one on the bottom resting against 2 jaws. If you have a 6 jaw chuck slide the other parallel against the top jaws. If you have a 3 jaw you will have to hold the other parallel or use some kind of block to space it. Remove the parallels before turning on the chuck!

If you have a 3 jaw be cautious not to smash the part out of round when you tighten the chuck.
 
Grind your parting tool so the burr stays on the stock not on the part rather than totally straight. burr will be small and 'lapping' it on a piece of emery on the bench will clean it up
 
So, how do you professionals do it?

5C step chucks, Hardinge here, but adapted to 10EE.

This is actually fairly thick. If it were really thin, my Hardinge-branded Walker magnetic chuck.

Thin and non-ferrous, some folks glue or shellac the part to heavier material, release the bond after working it with heat, solvent, or both.

If you do not HAVE any of those goodies, or if you have "many" of these to make, your lathe is used to make a custom-fitted workholding fixture - two probably.

- One clamps your part between two larger, stiffer cylinders with the OD exposed just enough to chamfer it.

- The other one clamps it between two larger cylindrical tubes with the ID edge exposed just enough to chamfer it.

If you need REALLY a lot, progressive die, punch press. This is actually how we did it, late 1930's early 1960's for washers down to 50 thou OD. Early "body instrument" hearing aids, we needed about fifty thousand spring washers a year for tiny assembly screws.

Making the dies was ..challenging. Educational, even!

:)

It would not be done that way for much longer.

Soon after, a Japanese firm proved out a better method in high volume, extreme accuracy, but low cost production of far more complex parts.

Really, really, really thin parts the "machine tool" is acid.

See "chemical milling" - a core driver of Seiko's success in the timepiece bizness.

One of your procedures mentioned gave me an idea...... shellacing(sp?) the piece to a larger piece of material. Could still be an issue centering it up - but, if I cut a shallow step in the original piece whose OD was the same as the ID of the spacer, that would solve the centering up "problem." Shellac/glue it in place, and that would hold it firm to clean up the outside face and also chamfer the OD and ID edges. An extra step, but would take minimal time and easy for this rookie to accomplish.

Below pix is one I took after turning the spacer. Modified with a step, the bar stock could be the foundation for final finishing.

Thank you, and all for your suggestions.

spacer bare.jpg
 
Guess one could have a point-mounted wheel stationed and running..catch the parted to stack in a row so all would be same side up ..then a second operation hand hold (or fixture the parts) to the point mounted wheel (or chanfering tool). Or might run them through a vibrator feed into a CNC drill press.

Still digger doug naild it..QT: [Nick it in with the boring bar after boring, but before the cut off.]
 
One of your procedures mentioned gave me an idea...... shellacing(sp?) the piece to a larger piece of material.
..
Shellacing works, but is a pain in the anatomy, time and nuisance-wise.

Below pix is one I took after turning the spacer. Modified with a step, the bar stock could be the foundation for final finishing.

View attachment 234609

Now you are getting warm. Picture above is the right general shape, but not size.

Think of it with a hole drilled and tapped. One would pick-up on the ID, leaving your part hang-over the OD of the mount. Put the part onto it, followed by a thick "washer", tighten the screw, do your outer bevels.

Move over to its mate. This one with a clearance bore. It would trap the OD of your part.

Your fixture would resemble a pipe nipple with an open nut on the OD threads instead of a pipe-cap. The "nut" has to operate with it's threads much further out so there is room for the part and a shoulder at smaller ID than the nut's threads to support the part. Common pipe and pipe cap, bored-hole prolly doesn't have the needed wall thickness - you have to fab something.
 
Use an ID groover to chamfer the backside of the bore before parting off. This eliminates a 2nd op.
 
Use an ID groover to chamfer the backside of the bore before parting off. This eliminates a 2nd op.

Yes,"pretty much", anyway.

There'd usually be a thin fin, but a swipe on a bench file.. brush/buffer..tumble if "many", etc.

It wouldn't need a 2d op on a lathe that called for fixturing, anyway.

Some things are harder or easier, attractive or less-so, depending on a body's skills as well as his machine and available tooling. Or time.. so.. "lots of ways"..

Exactly, and I have everything I need at my disposal right now - including the time (retired) to wait for the paint to dry.

I think I'm going to go for the stepped approach... leaving it short enough for a thinner spacer (<2mm) I also turned. If that works, we'll clean off the goop and hit the thicker one.

Again, thanks all.
 
LOL!

Just wait 'til you have been retired about 25 years longer!

Finding time for paint to dry won't be the issue.

Finding the gumption to open the damned tin and APPLY the paint becomes the issue!

DAMHIKT!

;)

In 25 years I'll be 100, and if I'm still on top of the grass, I probably won't give a RA about paint or much of anything else.

It is frustrating on much less free time I have now than when I was working full time. I've been trying to ride my bike over along the ridge of the Blue Ridge to explore an abandoned RR tunnel. Been trying to get over there since last fall, but something always came up to get in the way and I didn't make it. Right now, the time is set for the week after next, and I'm gonna get there come hell or high water.

Also want to get HERE too, so may make a big loop and hit them both in one fell swoop.

It's only time.

Vintage 1945, but probably retired longer (1994. The first time)

When we were "working, full time" we were creatures of habit, schedules, planning, and the rationing of our time. Freedom from that includes freedom to fail at "all of the above".

The New and the Gauley - rafted, spring flood - are about the top of the "food chain" for that sport (or madness, more accurately). Friends did those. I gave both a miss.

Rafting the Youghiogheny, spring flood, plus a brownwater river up on a mountain in Borneo was "enough" for a younger me.

Trivia note - they flow in the same geological feature and epoch as Africa's Great Rift Valley they were once connected to. See Pangaea and Gondwanaland.

The Allegheny mountains are some of Earth's oldest, worn-down to mere nubbins from heights that had once surpassed the Himalayas.

"See it while you still can", but not because THEY are going away on any time scale that notices us...

:)
 
After the id is bored tap a sacrificial piece of material into the id
When you part to thickness the inside stub will hold most or all of the burr from forming
 
The conclusion:

The shellac process worked, and my spacer "issue" is a done deal.

Turned out (no pun intended) that I had a piece of aluminum round stock that I was playing with before I started turning the steel for the spacers. I had cut a step on one end, and the OD of that step was an almost perfect fit for the ID of the steel spacer I wanted to bevel the edges on.

Being a little loose, I made a few punch marks around the periphery of the step to tighten things up, applied a few spots of automotive touch up paint (didn’t have any shellac) to the top of the aluminum piece, stuck on the spacer, then set it aside to dry.

This morning the spacer seemed tight, so I chucked it up and cut my bevels. No issue what-so-ever. Used a heat gun to warm things up and the spacer popped right off. A little acetone cleaned the residual paint off the spacer and the piece of aluminum.

This project is over with. Thanks again to all for your suggestions, and glad I found one that worked for me.

spacer 4.jpg
spacer 3.jpg
spacer 1.jpg


Back
Top