What's new
What's new

Jacobs Rubber-Flex Collet Chuck Model 91 Dis-assembly

gjrepesh

Cast Iron
Joined
Aug 30, 2002
Location
Royse City, TX
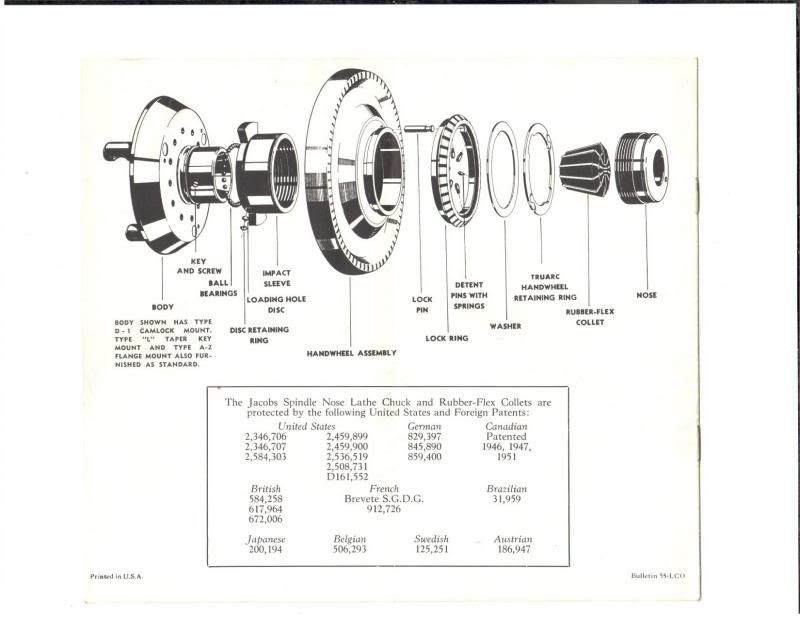
If you have taken apart and reassembled a Jacobs Rubber-Flex Collet Chuck Model 91, I would like your comments. I bought one for my Logan 14" lathe with 2 1/4-8 spindle. It threads on but needs to be fitted so that it will register. I am ok with this so far. I will need to take the chuck apart, though, to do the fitting. I see ball bearings and other assorted pieces in the parts diagram and would like instructions or tips so I don't mess something up. If it is just a matter of don't lose anything, that would be helpful. And tips on reassembly also. Needless to say, I don't have any instructions on this. Thanks.
 
Gary, didn't I email you the .pdf of the Jacobs info?
I sent 2 emails, one of the instructions, and one of the brochure.

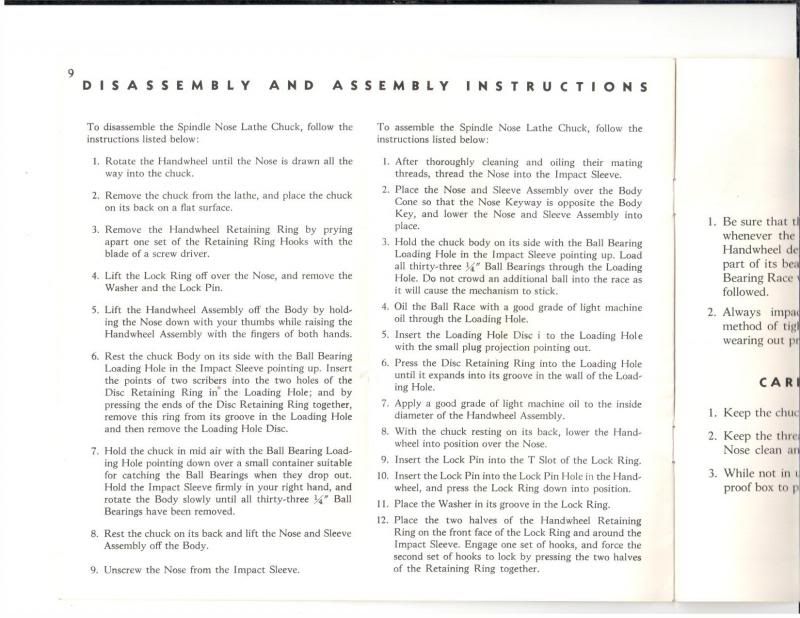
If you got both, see page 9 of the instructions for disassembly/assembly info.
When you get to the ball bearing removal step, have a shallow pan at hand.


Rex
 
and to be on the safe side put a towel in the pan before dis assembly, balls have a habit of bouncing and then the gremlins grab them and there never seen again.
 
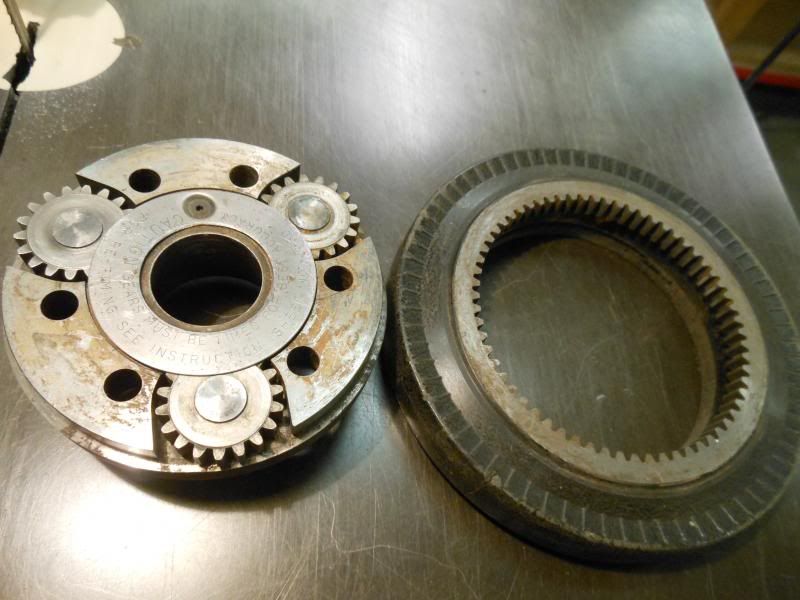
Don't forget to get the gear timing marks aligned when you reassemble. It seems weird that you need to do it for such a simple gear train, but you do, or you either cannot get it together, or it will be bound up.
 
I think he is confusing a #50 with the #91 being written about here. I usually use parallels instead of timing marks to get them back together.
Andy
 
Why didn't you give my that 20 years ago when I took mine apart. :D
It needs again, it's getting a little dry. Seems like every few years it needs to be cleaned and greased. IIRC, the biggest PITA is that damn retaining ring.
JR
 
If the OP is just taking apart to get at the bolt holes to fit to a back plate, there is no need to dis-assemble the impact sleeve where the B-B's are. Nor even remove the locking ring with the springs and plungers,

Just remove the front tru-arc spring & washer, then with thumbs or fingers over the lock ring, keep it pressed to the handwheel, while lifting/sliding the handwheel off the impact sleeve. Set this aside - possibly in a plastic bag in a tray :) Leave the impact parts assembled while fitting the back plate.

smt_jacobschuck3.jpg


smt
 
This sounds like what I really need to do. No sense making extra work out of this process if not necessary.

If the OP is just taking apart to get at the bolt holes to fit to a back plate, there is no need to dis-assemble the impact sleeve where the B-B's are. Nor even remove the locking ring with the springs and plungers,

Just remove the front tru-arc spring & washer, then with thumbs or fingers over the lock ring, keep it pressed to the handwheel, while lifting/sliding the handwheel off the impact sleeve. Set this aside - possibly in a plastic bag in a tray :) Leave the impact parts assembled while fitting the back plate.

smt_jacobschuck3.jpg


smt
 
The locking ring won't "fly off" if it is seated in the closed position and is fairly secure. But do keep your wits about you to not invert it or knock it over on the bench. That part does have the "flying springs waiting to escape" feature if you get clumsy or careless. :)
The impact sleeve is retained by other features including the balls themselves acting on the ball races (like a regular ball bearing) and the disc retaining ring. IOW, you have to decide to take it apart by removing the balls through the ball filling hole, in order to take the impact off.

smt
 
This sounds like what I really need to do. No sense making extra work out of this process if not necessary.


Myself, I would recommend a complete disassembly.
When I took mine apart it was pretty grungy, and a couple of the balls were flaking.
McMaster-Carr supplied a new set of balls (you need 33, they sell a package of 100, #9528K15) for around $5.00.

Andy St, thanx for the pic of the #50, I've never seen one before.


Rex
 
I Hey I know I'm late to this game, but does anybody have the disassembly instructions in the form of a pdf? I can't seem to get the photobucket picture .. thanks
 
I have a Jacobs 91 flex collet chuck, in its previous life it was stored under the lathe and well soaked in cutting oil. It has been unused for years and appears to be frozen tight, I believe just dried oil, not rust. I have it mounted on lathe, which direction should I turn handwheel to loosen the nose? There is currently no collet in it, pretty sure nose is drawn in as mentioned in disassembly step#1 above, should I just start disassembly, or get handwheel/nose freed up and moving first?
 
you have to pull out the "detent ring" then spinning the hand wheel counterclockwise will loosen the collet closer nose that captures the rubber-flex collet.


Back
Top