implmex
Diamond
- Joined
- Jun 23, 2002
- Location
- Vancouver BC Canada
Good morning All:
Well I wasn't feeling much like doing any REAL work this morning so I decided to play a bit today instead.
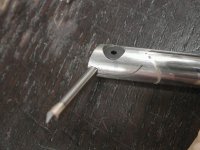
I've always wanted to have some small carbide boring bars that can use broken 1/8" shank carbide end mills to be ground into custom inserts and clamped into the end of the bar.
So here are a pair of home made bars...5/16" diameter x 6" long and 3/8" diameter by 6" long.
They are made from C2 carbide blanks bought from McMaster for 40 bucks each, and some ejector pin cutoffs silver brazed onto the ends so I could put a screw into them to clamp the inserts.
Here are some pictures before the inserts are actually ground.
I plan to use the Deckel single lip cutter grinder to grind the inserts whenever I need one.
They are simple in construction; just a bit of wire work a bit of drilling on the Bridgeport and a bit of silver brazing.
I'm looking forward to trying them out...I've got a set of valve guides to bore 2.5" deep and 0.377" diameter so this will be a good test if the 5/16" bar is rigid enough at that length of stickout.
I will keep you all posted.
Cheers
Marcus
Well I wasn't feeling much like doing any REAL work this morning so I decided to play a bit today instead.
I've always wanted to have some small carbide boring bars that can use broken 1/8" shank carbide end mills to be ground into custom inserts and clamped into the end of the bar.
So here are a pair of home made bars...5/16" diameter x 6" long and 3/8" diameter by 6" long.
They are made from C2 carbide blanks bought from McMaster for 40 bucks each, and some ejector pin cutoffs silver brazed onto the ends so I could put a screw into them to clamp the inserts.
Here are some pictures before the inserts are actually ground.
I plan to use the Deckel single lip cutter grinder to grind the inserts whenever I need one.
They are simple in construction; just a bit of wire work a bit of drilling on the Bridgeport and a bit of silver brazing.
I'm looking forward to trying them out...I've got a set of valve guides to bore 2.5" deep and 0.377" diameter so this will be a good test if the 5/16" bar is rigid enough at that length of stickout.
I will keep you all posted.
Cheers
Marcus