What's new
What's new

Manual Lathe - Parting Threads

Brian.M

Plastic
Joined
May 3, 2021
Relatively new to machining and 100% self taught, P.M. has been a wealth of knowledge for me so far, so I thought I would ask the experts.

I frequently need to cut parts to length, cutting off the length off the threads. Is there a proper tool or method to cut off the threads and clean up the end? I usually use a parting tool to length then change tools and put a 60 angle on the end and hope I don't have to chase the threads with a die after. There has to be a better way. Any help/advice would be appreciated.
 
I plunge a 60° tool down the thread flank rolling the burr toward the cuttoff side, once at the minor diameter I turn a flat spot large enough for my parting tool to fit then part it off. If you plunge the parting tool into the threads sometimes it will catch and rip the insert out and mess up the blade.
 
Relatively new to machining and 100% self taught, P.M. has been a wealth of knowledge for me so far, so I thought I would ask the experts.

I frequently need to cut parts to length, cutting off the length off the threads. Is there a proper tool or method to cut off the threads and clean up the end? I usually use a parting tool to length then change tools and put a 60 angle on the end and hope I don't have to chase the threads with a die after. There has to be a better way. Any help/advice would be appreciated.

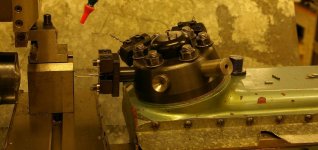
post #2 is good, but you can gang tools together, see attached:
Note, this set-up was facing to length, and nicking in the chamfers on both ends of a simple bushing.

So you could set both the cut-off and a chamfering tool together for your job,
if you don't need to use the method in post #2.
 

Attachments

  • GEDC0384.jpg
    GEDC0384.jpg
    99.5 KB · Views: 465
I had a job once where I had to cut off the threaded end and "bevel" the cut as you described. I had to do about 500 of them and wanted to speed up the operation on my manual lathe. The threaded portion was 1". I ground down a HSS blank to form a cut off portion just over 1/2" long on the far right hand side and ground the left side behind the cut off portion as a form tool. I set a stop on the compound and would just feed it in cutting off the threaded part and forming a nice bevel at the same time. It worked really well and kept me from having to change tool holders.
 
Once you get below the thread root parting off and chamfering the edge, run a Scotch brite wheel against the chamfered edge to remove the rolled over edge. May not remove it completely, but enough a nut will pass. Used to use a 3" OD x 1/8" or 1/4" thick wheel on a air grinder. Ken
 
So many variables here. Material, I have done brass and steel all thread, commercial Allen screws and everything in between. Most often with a 45 degree angle formed just before cutting off. On high production bumping the 45 with a wire wheel was easy. Made little fixtures so the screws could freely spin as they were bumped. With Allen screws that are case hardened single pointing the 45 worked best from the outside to the inside with a sharp insert. More info or photos might help to figure out the best solution. How many, what size, how are the threads made (formed or cut) that are being cut off.
 
I'm familiar with the brass screws that FredC makes, use lots of them in the industry I'm in. They turn out nice with the wire wheel deburring on brass. Ken
 
I had a job once where I had to cut off the threaded end and "bevel" the cut as you described. I had to do about 500 of them and wanted to speed up the operation on my manual lathe. The threaded portion was 1". I ground down a HSS blank to form a cut off portion just over 1/2" long on the far right hand side and ground the left side behind the cut off portion as a form tool. I set a stop on the compound and would just feed it in cutting off the threaded part and forming a nice bevel at the same time. It worked really well and kept me from having to change tool holders.

This was my first thought. Form a cut off and bevel in the same tool. What would be the best way to go about that? With a pivoting head vice and surface grinder would be my method.

So many variables here. Material, I have done brass and steel all thread, commercial Allen screws and everything in between. Most often with a 45 degree angle formed just before cutting off. On high production bumping the 45 with a wire wheel was easy. Made little fixtures so the screws could freely spin as they were bumped. With Allen screws that are case hardened single pointing the 45 worked best from the outside to the inside with a sharp insert. More info or photos might help to figure out the best solution. How many, what size, how are the threads made (formed or cut) that are being cut off.

Various quantities across multiple jobs, 500 at a time is not uncommon; majority of sizes are 1/4-20, 5/18-18, 3/8-16; cut threads, in either 1045 steel or 304/316 stainless.

Parting.jpgBevel.jpgFinish.jpg
 
I'm familiar with the brass screws that FredC makes, use lots of them in the industry I'm in. They turn out nice with the wire wheel deburring on brass. Ken

If you have seen any of our brass screws recently they were done on a CNC and lightly tumbled. In the old days when we did tens of thousands of them on the screw machine, the thread chamfers were formed with high speed tools and not deburred afterwards. The one that was wire brushed was a 5/16 stainless shear screw with a 1/4 dog for Gearhart then Haliburton. I have not made them in 25 years.
 
Ideally, cut to length and chamfer before threading.

For smaller quantities cut to length and chamfered after threading, running a nut onto the thread beforehand, then unscrewing it can tiry ip the burr a bit.
 
Ideally, cut to length and chamfer before threading.

For smaller quantities cut to length and chamfered after threading, running a nut onto the thread beforehand, then unscrewing it can tiry ip the burr a bit.

Parts are brought in by the thousands from China. Easier to have me cut some down than custom make them there.
 
You are ahead in this game already using a machine with a collet. If you have room for another machine look for one with a push pull cross slide. Old Enco 5C turret lathes can be had for a song these days. A good Hardinge would be a smidgeon better but not necessary. Unless required for function a 45 degree chamfer would be as good as an other angle. A lot of high positive inserts like the CPGT3250HP (40 degree) would give you a fairly clean chamfer with little deburring needed. A photo of the tool we used for brushing is attached. We usually did the screw this fixture was used with 10,000 pcs at a time, deburring took a perhaps a 1 second push into the wheel. Yours would only be done on the cutoff corner maybe would need to be spun by hand.
BrushingToolRs.jpg
 
You are ahead in this game already using a machine with a collet. If you have room for another machine look for one with a push pull cross slide. Old Enco 5C turret lathes can be had for a song these days. A good Hardinge would be a smidgeon better but not necessary. Unless required for function a 45 degree chamfer would be as good as an other angle. A lot of high positive inserts like the CPGT3250HP (40 degree) would give you a fairly clean chamfer with little deburring needed. A photo of the tool we used for brushing is attached. We usually did the screw this fixture was used with 10,000 pcs at a time, deburring took a perhaps a 1 second push into the wheel. Yours would only be done on the cutoff corner maybe would need to be spun by hand.
View attachment 320626

Thanks Fred, the collet lathe is still very new to me, was doing this on an old SB 9" with a 6 jaw. 5C with a stop is far easier than measuring every time. I am not familiar with a "push pull cross slide" could you elaborate or provide a link as to what that is?
 
This Enco turret lathe was built by Lin Haun in Taiwan. Just an example of a cheap today turret lathe. The cross slide has a push pull lever so you can go from forming the angle to cutting off in a fraction of a second. You can run cutting oil or coolant which will improve your finish and make your tools last longer. The only photo I could find has the operator side holder removed (It is just like the rear holder but 3/8 inch shorter), but you can see the over head slide with a cutoff blade in it just above the rear tool holder. With the rear tool upside down and on center you do not have to reverse the spindle to go from chamfer to cut off. The cutoff blade will be more rigid mounted on the push/pull slide on the bottom, just the nature of things. Any number of similar machines out there but this one should be cheap and good for what you are doing.

lhtsrs.jpg
Looked at you last post again and you are using a stop, easy enough to mount in the turret. I avoided using more than one tool at a time in the turret to save time indexing. I got creative with using a stop on the back of the cross slide and using step drills or whatever in the turret to eliminate indexing when I could. Many times my cycle time to make a part was less than 10 seconds.
 
Ok, that makes sense now, thank you. Company just bought this lathe so I don't think I should be asking for new toys already! Ill keep it in mind though.
 
Keep your eyes open in case one pops up nearby for real cheap. I know someone that bought one a few years ago for a little over $1000.00. They go for such a low price the pay back in increased productivity would be fast.

It would be more expensive in labor costs but your present lathe could be modified with a rear tool holder. it might mean setting the compound to the side when set up in your case. Some lathes have provision for a rear tool holder built in. From the photos you sent I do not think so in your case. Working the screw back and forth would be a little faster than changing your quick change tools but not nearly as fast as a turret lathe set up for production.
 
Threadcutter1.jpgThreadcutter2.jpg

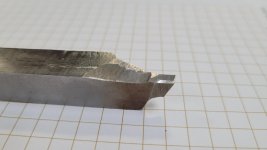
After three or so attempts this is what I came up with, still very rough but it gets the job done.
 
Last edited:


Back
Top