What's new
What's new

Need repair advice for broken cast iron precision part

ironhoarder

Cast Iron
Joined
Oct 9, 2005
Location
Waterford, VA USA
These are pics of the pivot base of a huge woodworking radial arm saw (Monarch Uni-Point) that fell over and suffered damage.

This ring needs to be dead flat, and the center pivot point must be cylindrical with no bumps. I figure I'll take this ring to a local welding guy who is also a machinist' I'm thinking he'll appreciate the need for precision on this repair. I could attempt myself perhaps, but this calls for expert I think.

I'd like opinions on how successful this repair is likely to be, and what technique you would suggest. The primary candidates being brazing or welding with nickel rod. Maybe even silver soldering? It seems to me that one would need to clamp the work to a good flat surface to keep it in alignment, and do plenty of even pre-post heating.

Whatever technique is used, I'll need to be able to grind/file the repair down flush with the adjacent surfaces- particularly in the center pivot point, and along the top edge, where the large round base rides.
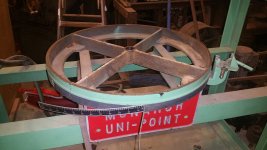
2019-10-27-18.09.jpg2019-10-26-15.30_3.jpg2019-10-26-15.30.jpg2019-10-26-15.30_4.jpg2019-10-26-15.30_2.jpgView attachment 268300
 
Last edited:
Having repaired more than my share of cast iron over the years I'd say your chances of welding that and
keeping it dead flat and true are close to zero. I would think that you're going to need to do some post-weld
machining to true it up. Even keeping a heavy, solid casting straight can be a problem but something that
light and spindly is going to be a bitch...
 
Given the relatively lightweight appearance I guess its not something that has to be super strong. Have you considered adhesive bonding with suitable sheet strengthening glued'n screwed on afterwards?

I know of successful repairs made by first lightly sand blasting and cleaning the areas to be bonded using an appropriate solvent before applying the adhesive and lining up the part on a suitable flat or its mating part. With a suitable parting agent in place so it doesn't become a permanent fixture. Slicone wax and cling film have worked for me. Once the basic bond has been made carefully work some sheet alloy across the surrounding areas to re-enforce things. As its a casting odds are you will need J-B Weld or similar loaded filler to ensure there are no gaps. Devcon or one of the other industrial strength metal loaded fillers would be better but expensive. Finish off with some small screws (or rivets) to ensure nothing peels away.

Worked a time or three for me using one of the Loctite engineering adhesives and Devcon metal loaded filler.

Other folk following my advice have had success by simply wire brushing the bond areas and using ordinary two pack epoxy for the initial gluing. Small stuff tho'.

Clive
 
Last edited:
Or stick it together however, add some "cladding" (for shrink/machining allowance) from whatever the foundry supply uses these days and have another cast from your "pattern" and stress relieved properly prior to final machining

I would say trying to "fix" that one won't turn out anything like what you hope

Or fab up a look alike from burned out plate and the like and have it properly stress relieved before final machining
 
Just a Note:
Some nickel rods deposit a weld that is very abrasion resistant.
Make sure your welding guy is up to speed on selecting the nickel rod.
Doug
 
As John said above. If casting a replacement, have it cast in DUCTILE iron rather than the grey iron it must have originally been cast in. The ductile would not have broken. It might have bent though. I suspect that getting a replacement part welded up will be quicker cheaper than going the casting route.

That is a very nice looking and robust vintage saw
Saw.jpg

I assume the part is located as indicated by the arrow I drew in.

Denis
 
I'm with Clive on the adhesive route. And on the hub, it looks like you've got enough lip/purchase for a milled ring to keep it aligned. Heck, even a narrow-enough hose clamp might suffice.

Ron
 
I modified my original post with a pic of the entire ring, for context. It is abut 24" in diameter. Recasting or fabricating a new one ain't gonna happen- gotta fix this one. I'd have no way of machining something that large, for one thing. Folks over at OWWM suggest that a stitch welding technique would work- involving very short welding bursts with full cool down between each.
 
What a cool old saw! I hope you are successful fixing it. I’m no expert but I have had some pretty good results with some pre-heating and TIG brazing with silicon bronze. I wonder if you can re flatten the base after.
 
As John said above. If casting a replacement, have it cast in DUCTILE iron rather than the grey iron it must have originally been cast in. The ductile would not have broken. It might have bent though. I suspect that getting a replacement part welded up will be quicker cheaper than going the casting route.

That is a very nice looking and robust vintage saw
View attachment 268317

I assume the part is located as indicated by the arrow I drew in.

Denis

Yes- it is the ring that the casting that you point to rotates on.
 
So, trying to deduce the actual function of this part, it looks like the casting has three functions none of which involves true high precision:
1) The center pocket provides a rotational center to the casting that supports the actual saw
2) The upper "bearing" surface of the broken casting keeps that same rotating support casting in a flat plane as it rotates about the center while the broken casting is stationary.
3) The milled front of the broken casting provides a convenient place to locate the angle-indicating scale

None of those features require high precision. I mean if the top of the broken casting circumference were out of flat by 5 thou, that would not matter really and the mounting surface for the scale is not at all critical.

So, to turn this replacement casting or fabrication on a lathe would require a lathe with a 24" swing and operator of no special skills. It should be quite easy to find such at a local a job shop. Welding up and truing replacement part fabricated from a section of pipe or a rolled piece of 1/2" plate for the rim and 1/2" or 5/8 bar for the spokes and gussets would be quite straightforward. Just sayin not to toss that idea because brazing this item is something of a crap shoot with structural integrity very dependent on the skill of the welder. Maybe it will be OK and maybe not. But, almost certainly it will be warped and then it still has to be machined. BUT, you don't have any extra metal in the braze-up like you could allow for in the casting or fabrication.

Finally, if push comes to shove this part could be machined on a milling machine using a 10" or larger rotating table and a little ingenuity. I've done parts like that in that fashion. Much easier on a lathe, of course, but necessity makes for strange bed fellows. Plenty of folks, myself included, have milled ("turned") pieces like that on a mill (probably not OSHA Approved) using only a pivot point and a lever attached to the piece.

I'll sign off here as I feel like I am lobbying too much for casting or fabrication. My apologies. But, I am very concerned that this is not a good candidate for brazing or stitching and hate to see 150 bucks spent on brazing when the end result may not be what you might hope. Maybe folks with a lot of brazing experience will say no worries....

Denis
 
I agree with Denis. If you had that base in a bonfire to get it uniformly hot and have it preped, you might have a chance of brazing. To heat each area separately is asking for disaster.

First I would try would be mechanically stabilize it with strapping and high strength adhesives. After that fabricate a new one with pipe and plate.

Tom
 
I would vee all breaks from both sides down to a 1/8" to 1/16" land, clamp to a heavy plate or heavy angles, heat the whole thing up slowly (2 hours to temp) with multiple propane burners or a bed of charcoal to 1000 deg F or more, and weld.

Oxyacetylene and cast-iron rod, oxyacetylene or TIG and low-fuming bronze, TIG or stick and 55% nickel rod, the process matters little, it is the pre-heat, kept consistent throughout the welding and slow, uniform cooling, plus welding beads no more than 3/4" long and peening before they stop glowing, one here, one there skipping around, that will prevent locked-in stress and cracking, and minimize warpage.
 
...First I would try would be mechanically stabilize it with strapping and high strength adhesives...

Guess you've never used "high strength adhesives" in a situation like this. They're good for some things but certainly aren't going to
be adequate to support the top-heavy weight of that saw. Be prepared to fix more broken parts when it falls down again...

I would vee all breaks from both sides down to a 1/8" to 1/16" land, clamp to a heavy plate or heavy angles, heat the whole thing up slowly (2 hours to temp) with multiple propane burners or a bed of charcoal to 1000 deg F or more, and weld.

Oxyacetylene and cast-iron rod, oxyacetylene or TIG and low-fuming bronze, TIG or stick and 55% nickel rod, the process matters little, it is the pre-heat, kept consistent throughout the welding and slow, uniform cooling, plus welding beads no more than 3/4" long and peening before they stop glowing, one here, one there skipping around, that will prevent locked-in stress and cracking, and minimize warpage.

This is probably the best approach for repairing this casting--and it would work well for a lot of things--but I still think that in this
case there is going to be warpage. I don't see how you can possibly avoid it and that means that there will need to be some
machining performed in the end...
 
Lynn?

What have we all missed?

- It does not rotate at high speed nor even LOW speed.

- balance is not a factor.

- MOST, not ALL of the open space is clear so not an issue with gussets nor "band-aid straps" of ignorant black Iron or steel.

- the shock of the drop as broke it was unusual.

- it isn't all that highly stressed in "normal" use.


No need of arc, gas, fire, nor even machining - perhaps not even the touch of a file.

All you need is some Big Box mild steel flat bar for straps, machine screws, perhaps some lengths of modest allthread for tension members, and a decent drillmotor and drill. Taps optional.

- Make a wooden / steel clamping fixture to hold it in near-as-dammit perfect alignment

- Cinch-band it tight with a ratchet strap.

- Pre-bend your steel "band-aid" straps, reinforcing plate or gussets, clamp them tight

- Drill and set the bolts to pull a tad into a bit of residual bend.

End result is out of public view, anyway.

I'd use soft-iron rivets, actually, but only 'coz I'm USED to them for such "ugly but effective, fast and cheap" redneck farm-boy work.

If no other option, a hardwood replacement with Iron or Steel wear-fittings and plates, and the saw is back in service, soon as the glue dries, good grade of plywood, faster yet. A Mark 7 16"-fifty turret she never was, nor ever will be, after all. Just a clever saw.

God didn't want castings to break when there were crops to put up? She'd never have invented Iron to begin with!
 
I'd go with the thermite approach to band/wire it back together in the original position.

Yah but. That wasn't prep for a repair.

It WAS the repair.

Done.

Vee the cracks out with a die grinder.
Oxy torch with a big cutting nozzle to gently get some pre-heat into it.
Stick weld with the correct rods.

That's my plan A

If it doesn't work, then it's plan B.
ummmm.... :scratchchin:

Now yer fighting the stresses induced bY the repair.

The part is not cosmetic.

The function is served without need of being identical to as-cast.
 
True but...I've been involved in half a dozen repairs like this, and the fab shop that was next door used to repair with this method and it worked every time.
On thinner section they'd braze and on some jobs I'd make sleeves (tube) to hold it together and thus give the part its strength back, and the sleeve would get brazed into position.

Damn engineering, 1001 different ways to get the same result... :D

I'm cheating. As usual.

I've actually seen the specific saw in question!

It can still do what it was designed to do with a patch more structural than pretty.

Resale value? MUCH harder to assess.

First, a potential buyer has to even appreciate its unusual capability at all. THEN recognize they are rare.
 
I think the best repair solution is steel reinforcing pieces bolted in ,possibly with adhesive filling as well..........IMHO ,any heat short of complete furnace soak will result in a musical pinging as the bits break as it cools.....the iron looks kinda weak to me,about stove quality ,I'm thinking.
 
....the iron looks kinda weak to me,about stove quality ,I'm thinking.

Good eye, actually. Thinner webs, though.

It was a reputable maker, but even so, not the most highly stressed of parts "normally", so no better than it needed to be to get the job done. The REST of the machine is far more heavily executed though.

All the wood stoves we ever had were far better than this one part, even so.
Had to be. Hard working critters - very - back in G'mum's day, 60 dozen biscuits alone each day for the krews harvesting off 5,000 cider-apple trees, dollar a day and overly gravy-centric hot meals.

Mind. It WAS in the era of the "gold" dollar.

Market for cider kinda faded, crash of '29 and subsequent, time actual gold coin ceased circulatin'

Rumour had it, G'Dad figured a way to git about the same income outta handling far fewer jugs.

Somethin' that involved copper, deadfall-fueled fires, spring water, "lightning", and the like? All I knowed is what the grownups telled me, older and bigger lying contest days.

You'd have to know West By God Virginia? .. and ingenuity?

:)


Back
Top