What's new
What's new

OT: adding an icemaker to a chest freezer?

JL Sargent

Diamond
Joined
Feb 7, 2005
Location
Birmingham, AL
Our little icemaker cannot keep up with our growing families demands. We are often going out and buying ice at the store. I'm quite frankly, sick of it really. What to do? A nice ice machine can cost thousands. Then I got this idea.

I have bought a 5 cu ft. GE chest freezer and Im gonna install 2 icemakers along the left sidewall back to back and then hopefully fill the thing full of Ice.

If interested in cost, I bought the ice chest for approx. $150.00 and two icemaker kits w/valves, hose, and hardware for $75.00 making my total expenditure of $225.00+ my labor.

Has anybody else done this? Will it work? My understanding is on these new chest freezers the coils are all in the back of the machine. Any suggestions or precautions appreciated!
 
Domestic fridges & freezers do not in my experience have any means of adding extra gas as the ends are crimped after they are filled and have no valves. Will the freezer you have bought have sufficient gas to run 2 ice makers on top of the existing plant?

I'd suggest not using the evaporator for the chest as you only need the insulated storage, Commercial ice machines don't have a refrigerated bin.

If you run too many 'rooms' off of one plant the gas goes to the coldest part therefore you may need a back pressure valves to stop gas migration.

Hope this helps

Al
 
I think it will work.

Except you might want to install the icemakers on opposite sides.

Reason is as they work they'll pile up ice and eventually stop when the little limit switch actuator (wire arm) can't go back down to "home" to start another cycle.

The other consideration were you away for a couple days is sometimes a big pile of ice can get frozen solid, I think it has to do with the self-defrosting feature in the freezer.

So then you have to resort to an ice pick, shank or shiv depending on your living situation ;) .

Also whatever kind of cup or scoop that goes into the ice needs to be regularly cleaned...very easy to get bacterial contamination inside a pile of ice that comes back to haunt later.
 
Al- I don't think the ice makers he will be using actually circulate rerigerant through them as commecial ice makers do. What JL has will probally work OK as they rely on the ice just freezing due to low temperaure in the ice cavity. It probally would be a good idea to have the ice actually dump in a container because when the freezer goes into defrost, it might melt on the floor then refreeze if it does not drain well. I know what you are going thru JL, I myelf have been looking for a commercial ice machine for myself ;) I would verify for certain where the evaporator/lines/condensor is for sure so there are not any holes drilled thru them :rolleyes: would be a good idea to run a large water line to it with two ice makers going otherwise they will be slow filling if they happen to be both in the same cycle of filling maybee at least 3/8 or bigger.
 
Quick answer, buy a small ice maker unit designed for a wet bar or small outdoor kitchen. The units I worked on was basically what you are trying to build. By the time you build your own unit you aren't too far from the price of a unit already made.

What follows is the long story of why you should chalk it up as a good idea but too much crap to deal with.

I've been out of the small appliance repair biz for about 10 years so the information may be dated. I would double check location and routing of the evaporator lines (cooling coils), in most of the small freezer chest units I worked on the evap lines ran on 4 sides embedded into the walls.

There was no real way to really tell just where the line really was inside the wall. Sometimes, there is a sort of layout of the refrigerate lines posted in the handbook or on a sticker pasted the the backside. Many times, there was not. One wrong hole drilled into the cabinate at the wrong place and you are screwed!

Due the embedded design of the evap coils within the walls I doubt that it has a defrost unit installed. For a self-defrost unit it would need to have a heater and timer to induce melting of frost build on the evap coil. Typically a defrost heater is only used with a freezer/refrigerator if there is fan motor used in freezer compartment.

A small chest type freezer should handle freezing of the ice within the ice maker with little problems, perhaps even two ice makers.

A couple of things to bear in mind. There were two types of ice makers on the market when I was in the bus. A flex tray type and a heated mold type. The flex tray used no mold heaters but was hell on trays which needed replacing sometimes as few as every 6-8 months or as long as a couple of years depending on useage and water supply I suppose.

The second was a heated mold that allowed a small heater to turn on at the end of a freeze cycle to loosen the ice in a mold for the rake to remove.

Either version needed a minimum of three wires for proper operation. First was a hot power lead,second a neutral line and third, a control hot power lead to supply the water inlet valve with power when calling to fill the mold. The water inlet valve of course would need to be mounted to the outside of the unit or two units if you are installing two units.

One 1/4 inch supply line is all that is needed for one or two ice makers, the unit typically only uses 6 to 10 oz. of water to fill the tray. As long as you have good water pressure coming through the main 1/4 inch line you will be alright. By the way, most home appliance water-inlet valves need at least 20 pounds of pressure to operate correctly. If lower the diagram will not seat properly and will allow water to seep past it causing a leak.

I must confess to scratching my head about the low cost of the ice makers you seem to be getting as back 10 years ago the wholesale cost of one was about 70 bucks or so for a complete kit. Be that as it may, I would encourage you to get a firm price of a unit before committing too far along. Be a shame to buy a small freezer only to find the ice makers costing you 125.00 a piece.

The ice cubes will more than likely will eventually turn into a massive chunk of ice as time goes along. This due the opening of closing of the door ever time someone needs to get some ice out. I could be wrong about this but its something I would consider.

Ever defrosted a freezer with 50 or so pounds of ice froze together? Quick way, a water hose and a lawn needing a very deep watering. Slow way, a few days and a bucket to dip the water out once it has melted.

Even if you aren't too concerned about the ice buildup or the electrical connections that will need to be made to each ice maker I would forgo the idea due the evap coil placement and the all too possibility of hitting a internal refrigerate line in the wall.

Now if you want to talk about adding a beer keg and tap to an old refrigerator, I might have better news for you.
 
Try making a small Glycol system stored in your Freezer

Use a tank in the bottom of a chest freezer piped out the Freezer to the Ice Cream makers. Glycol can easily withstand -50 deg without Freezing so you could store plenty of cooling power in your Glycol tank.

Then line the inside of the Ice Cream maker with the same 1/8 dia. Soft copper tubing. Add water and salt to make up your saline solution as always and start circulating the Glycol through it. The proper saline solution can also withstand sub-zero temps so you should be able to make Ice Cream pretty fast

Use a very small chemical feed pump such as a magnetically coupled 1/50 hp pump. You should be able to freeze several batches of ice cream with in a few minutes. Once the Glycol warms up (after everyone has had their fill of Ice Cream) it can sit all night in the freezer storing up its absence of heat preparing itself for the next day.
 
I think Lowes and HD have those Ice Maker Kits for about the same price.
I've been looking at counter top ice makers that are on the market today. A $200. unit claims 35lb a day. I read a post on a RV forum (Camping World forum) and people were saying they were using them while camping and having enough ice for week long trips.
A friend runs a charter boat (google Channelmaster fishing) and he just bought a Japaneese commercial ice maker that puts out 300lbs a day. He uses 2-3 5gal buckets of ice a day. He paid $2000. and figures it will pay for itself in less than a year.
As Rusty says sometimes you can be too clever when you re-invent. I would reccomend a factory unit. If your mind is made up just put a hole in the lid for hook ups
 
The ice maker shown on ebay was a good design when it was used by Whirlpool many years ago. It is a heated mold design. For that price, you can't go wrong.

However, I seem to recall this ice maker needed the temp in the freezer to reach down around 7-10 degrees F in order to for the ice harvest cycle to start. There is a thermostat located in the ice maker which senses this.

The small chest freezer should pull the temp down to around 0-5 degrees F but since there is no fan to pull the heat toward the evap coils, the unit will take longer to pull the temps down compared to that of a air assisted model. This of course will delay ice production.

Tim's idea of running the connections (electric and water) through the top lid to avoid any refrigerate lines is a excellent idea and one of those thoughts that causes someone to dope slap themselves and think why it was they missed the easy solution. :rolleyes: :D

But still you have to consider how to mount the ice maker, typically two screws through a bracket mounted onto the side of the ice maker unit. This is where you get to drill and pray, a few sheet metal screws will be fine but as ole Harry once said, "Do you feel lucky?"

Perhaps a extension bracket mounted to the lid itself. Just need to make sure the ice maker sits down far enough in the freezer to make use of the cold temps and not so far down that the ice maker will not jam against the wall when lifting the door.

First and foremost, I would recommend take some temp readings in the freezer if you already have one. If the temps aren't near 7-10 degrees F then I would not go any further with the idea as the harvest thermo won't even engage the unit until such temps are met.

Perhaps "5th Wheel" can comment on this this as he also ran a appliance repair bus. for years.

Good luck!
 
Rusty, lots of good food for thought. Ill put a thermometer in it and check the temp. Stuff in it gets rock hard quick so I suspect we are good there.

Matt, the reason for putting the two icemakers on one side is to hopefully use a small divided section on the other side of the freezer for other items.

With some short sheet metal screws I think I can mount the icemakers in the side wall ok. The screws would be just under the seal of the freezer. Surely no coils that high?

One idea for coil hunting, I have infrared imaging equipment, might try turning the unit off and on while "looking" for the coils.


I talked to a guy that works on alot of ice machines and he indicated that these new chest freezers do not even have coils in the side panels like the older ones. They are only in the back panel now. If thats true, problem solved.
 
How about building a rack to hold the Ice makers. that way nothing has to be mounted to the side the walls and if it didn't work out you still had a freezer and two ice makers and drill holes from the bottom.
David/toledo
 
What are we doing with the ice?

We have 8 to 10 eating here frequently. Out in the 90 degree heat alot. Cooler full of ice and drinks always nice on the deck. Making ice cream. A cooler on the service truck I sometimes drive. Going to the lake, etc. etc. We go through it.

Didn't know that about the grass.

Maybe I can use a studfinder for the coils.
 
I think if you ran the freezer for a while with the top open, you would find out if the coils are only in the back as the rest of the surfaces would be warm.
 
I just went to the GE website and the info there said this freezer does have wrap around coils. Also it stated that the insulation is foam.

I might cut a small opening from the outside of the freezer and carefully remove the foam from my proposed installation locations and then I'd know it was safe to drill mounts and hardware from the inside. After installation refoam and repair panel.
 
Well, I got the icemaker installed. All went ok with it. The condensor coil is right against the outside wall, evaporator coil right against the inside wall. That made things kinda tricky. Here is what I came up with. Works great.

2189732icemaker1.jpg


2189734icemaker2.jpg


As you can see I used a little Aluminum tread plate to cover the outside access to electrical and water supplies. Insulation was foam so I refoamed it when done. Thanks for all who helped with the good suggestions and fair warnings. I actually nicked one of the condensor lines but got lucky with no leaks.
 
are you still going to do the 2nd ice unit
For now I think the one unit is gonna do it. Just not enough room there for two makers on one wall. So if I added another it would have to be on another wall and that would eat up alot of freezer real estate.
 
I got a PM from a forum member about this so thought I would post a followup:

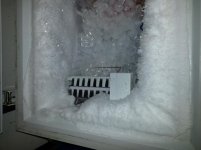
It's hard to believe that 6 years has gone by since I performed this little project. It has been working great ever since. Probably about 60 to 80lbs of ice at the ready anytime in the little chest freezer. I mounted the icemaker as high as possible. I poked around under the "skin" when installing to make sure I didn't get into the coil. Check it out. The freezer is not frost free so every once in a while you need to clean/unplug to get rid of the frost which builds up! Apparently I need to get this done. So the ice under the icemaker is about 30" tall.

20130515_193323.jpg


Back
Top