What's new
What's new

OT: Arm Wrestling Table Design Question

Randalthor

Cast Iron
Joined
Mar 7, 2018
Location
Kansas City
Background:

I have an employee who is a relative, that has been strength training for lots of years. He is like a son to me.

He's into arm wrestling. And I would like to build him a regulation arm wrestling table.

The problem to solve is that he needs a portable table with removable legs from the top, but once the table is set up, the removable legs (and table) need to be very rigid.

In other words the legs need to be detachable (so it's portable) but once fastened, the legs and table need to be very stable. These men put a lot of torque on the table. Wobbly legs (which translate to wobbly table) won't cut it.

It's no problem to build the top super strong. That's easy. But I'd love to hear some ideas on building removable legs which are rigid once installed. Ideally, installation of the legs wouldn't require an engineer to install. Rather a very minimal amount of time and minimal ease.

In tournaments, the bottoms of the table legs are bolted to the floor. That's easy enough to do, but for the portable table I'd like to build, I'd like the removable legs rigid when fastened to the top, yet removable.

I'd appreciate any ideas to fasten removable legs to the top of the table. Again the legs need to be removable, yet when fastened, very rigid.

I'm a proficient welder with a mig and industrial stick welder. I also have a Bridgeprort mill. I'm really looking for the best rigid removable legs, with the equipment I have

Here is a vid of a table. The example vid was taken at a tournament about 3 weeks ago in the United Arab Emirates. As an FYI, it's a vid of one of the best up and coming arm wrestlers called Schoolboy (because he looks like a schoolboy). He is wrestling one of the most powerful power lifters alive (Larry Wheels). Larry Wheels holds many world records in power lifting. Nevertheless, Schoolboy dominates him in these matches. But the table is what I'd like to build, yet portable and rigid, with removable legs.

SCHOOLBOY VS LARRY WHEELS | ARM WRESTLING SUPER MATCH 2021 - YouTube
 
Take a lesson from bridge builders: the truss.

Sockets on the table, perhaps screw in, perhaps pipe fittings. The legs could be pipe too.

Use horizontal braces close to the floor, perhaps only 6" or less. These could be pipe also, fitted into holes in the legs.

Use diagonal wires for bracing each side. Some kind of latch that also applies tension so adjustment could be done once and remain OK for a while. These should run from just under the table down to the horizontal braces for maximum stability. But if they must have leg room under the table some changes may be needed here.

Heavy duty rubber feet on the legs to help prevent sliding around on the floor.
 
Here's another idea to allow leg room.

Round legs (pipe?) fit into holes in table top, at least 1" deep. Hand tightened, wing bolts can be used from the sides to hold them in place. These can face the two sides where the contestants do not sit.

Four side pieces about 4 to 6 inches high fit between the legs and against the top of the table. Metal would be best, but hard wood would also work (1 x 6 oak boards?). The higher they can be, the more stability they will impart. They have longitudinal slots for tension members (threaded rods) that run from one leg to the next. The back/inside side of those slots would be covered with sheet metal with screws every six inches on both sides of the slot. Hand tightened nuts will allow the contestants to show off their finger strength before the contest begins. Some kind of safety cover would be needed over those nuts. Those sides would have two pins in each end that engage holes in the legs.

The legs and side braces would be assembled first and then the table would be lowered onto the legs and fastened down.

Again, heavy duty rubber feet.
 
Mortise receiver-tube(s) into the top angled slightly outward. Make an “X” frame or similar that will wedge against the legs once installed and splay them outwards radially from the center. That way the unit will be almost tool-less, possibly requiring a mallet to disassemble.

Basically you’d wind up with 6 pieces to make the table:

1) your heavy top with pockets of some sort to fit

2) four legs and

3) a crossmember frame that wedges against the bottoms of the legs, camming them against the walls of the pockets in the table top.

Just the way I’d start to skin this cat.

You could think about capping the tubing you make the legs out of and filling them with sand to add some weight, possibly doing the same with the crossmember frame. Angling the legs outward so the feet match the outside footprint of the top will make it as stable as it’s gonna get.


Be safe


Jeremy
 
what about using ductile iron water pipe fittings welded to the table top? at an angle. you can go big (3" pipe)and it will assemble in seconds. you didnt say it has to be light, right? use caps to adjust the four legs.
 
My opinion is to use round tubing for the legs and machine the tops to a taper that fits into a matching taper socket attached to the top. Add a collar with a 2-bolt flange and you have a super rigid attachment.

Provided with extra (long) bolts and some heavy nuts the same attachment flange could be used with the extra hardware as jacking bolts to separate stuck tapers at disassembly.
 
You will have to work very hard to find something to beat the strength, rigidity, and ease of assembly of tapered pipe threads in the legs.
 
Bolted to floor...

Make a sectional floor out of steel frames with plywood attached for both stability and traction.

Sections that bolt together, when not in use they form the case to carry parts.

Imagine a 2x2 ft table on top of a 3 x 6 floor that comes apart.

Steel legs of a lattice or truss configuration that fit into sockets on top and bottom with hitch pins to lock into place.

Some steel cable or strap in correct places with turnbuckles or over-center levers to cinch tight.

Contestants stand on portable floor so their weight hold it in place and since they are standing on it fixed to table.


Sent from my SAMSUNG-SM-G930A using Tapatalk
 
Thanks to everyone for the ideas. I knew I'd get a lot of good design concepts from this group.

I like the ease of the pipe and couplings. But the ideas of legs with a taper fit sound pretty good too. And there were some good ideas for bracing.

Thanks again to all.
 
Follow up - Arm wrestling table

Sorry for resurrecting this old thread, but wanted to post a follow up and ask a couple more questions.

I finally got some time this winter to build the arm wresting table. It turns out there are some table specs outlined by the World Arm Wrestling Federation.

The table shown in the video I posted at the start of the thread is how the WAF wants the tables to look. It shows a full view of the table at 49 seconds in the vid.

SCHOOLBOY VS LARRY WHEELS | ARM WRESTLING SUPER MATCH 2021 - YouTube


The World Arm Wrestling Federation has specs but not the clearest in some ways. This is one of the harder ones for me to decipher:

"2.6 Touch Pads
Should be on an angle, 12,7 cm (5") out from the inside corner of the elbow pad to the inside
corner of the pad and 1,3 cm (1/2") from its respective edge measured to the outside corner
of the pad. Running at an angle towards the hand peg it should measure 7,0 cm (2 3/4") from
the hand peg to the outside corner of the touch pad.
If it’s for a right arm table, these measurements should be made on the left side of the elbow
pad and reversed if it’s a left arm table."

As mentioned, I had to build a portable table which would fit in a car. Yet structurally sturdy.

I'm sure there are plenty of folks on this forum who could have done a better job, but this is how it turned out.

View attachment 344084

All the holes are for the elbow pads and pin pads. The pin and elbow pads are reversible for right or left handed wrestling.

Here it is with the elbow and pin pads installed for right hand wrestling.

arm table5.jpg

The elbow pads have studs which fit in the table holes. The studs in the elbow pads are offset from center, so that when the elbow pads are removed, and reversed 180 degrees, and fit back into the same table holes, they change to meet the specs of either left or right hand arm wrestling. The pin pads have to be placed in different holes to change from left to right hand arm wrestling.


View attachment 344081

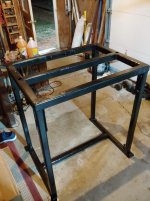
I welded four "stubby" angle iron "legs" to the frame, then have the "real" legs bolt to those.

Here is the leg assembly primed.

IMG_20220301_183239.jpg

We used button head cap screws to bolt it all together. I thought it would give a more finished look, and easier to assemble and break down. I gave him an allen wrench to install/remove the button head screws. I drilled and fitted three small rare earth magnets up underneath the top of the frame for the allen wrench to "stick" to, so he wouldn't lose the wrench.

Here is the frame after he put it together in his garage.

arm table6.jpg

I have a few more pictures and a couple questions in the next post.
 
Follow up - arm wrestling table

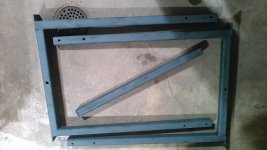
Two of the legs on each side are welded together to make a sort of C shape, which still fits into a car.

They are connected with a cross member which is again bolted to the two sets of legs by way of more 1/2"- 13 button head cap screws. I keyed one side of the cross member so that it wouldn't spin during assembly.

KIMG1346.jpg

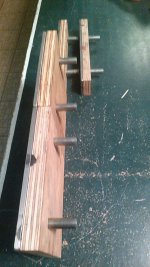
We made the frame of the elbow pads with scrap plate steel, welded the pegs in place, attached corresponding plywood with screws, then added the foam and vinyl.

IMG_20220201_192707.jpg

I made the hand pegs out of titanium because that's what I had on hand. I drilled out the bottoms and machined a 1/2"-13 insert to fit inside. Then cross drilled and soldered the inserts in place. Then machined it all flush. They bolt to the frame again using 1/2"-13 button head screws.

IMG_20220219_161557.jpg

The hand pegs are supposed to be knurled, but all I've got is a Bridgeport mill, with no way to knurl. So we just milled grooves instead.

The finish isn't great, but it looks a little better in person, than it does in the pics. Unfortunately, I don't have a lathe for this.

KIMG1362.jpg


KIMG1365.jpg


I made the little flanges for the pegs to trim out the holes for the vinyl. They are simply bolted to the pegs with little allen screws which fit in little holes I drilled into the pegs.

The flanges are all countersunk on the table, so they don't stick up past the surface.

I drilled 4 holes in the bottom frame and threaded in 4 button head screws for table adjustment, since few floors are completely flat.

The whole thing was more or less cobbled together with cut-offs and scrap steel. I did this for two reasons. One was for the young man to save some money on materials. The other is that I wanted to teach him something about welding, and a little about machining. It was good practice for him to learn to bevel two pieces of metal and weld together.

The table is extremely sturdy. We couldn't get it to rock at all. It's heavier than I'd like. Assembled it weighs 155 lbs.

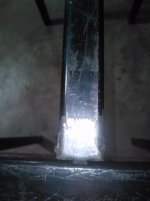
That brings me to a couple questions, about welding actually. I've welded for 35 years, but have always had trouble with welds pulling, regardless of how many tacks I make, or how firmly it's clamped.

This was particularly true when I welded the little pieces of angle iron to the top of the table frame (for the little "stubby" legs, which the real legs bolt to). As careful as I was, the stubby legs pulled outward, as I feared they would. I had to use a rosebud to heat the metal up to get things back where I wanted.

What is the secret to keep welds from pulling the steel?

Secondly, when he welded the pieces of cobbled square tube together, there was always a seam which showed after grinding the welds flush. I even tried it and still got an annoying seam after grinding, right where the weld puddle meets the base metal. I tried using minimal heat and still got the unsightly seam. What am I doing wrong?

The project took too long. It would have been more cost efficient just to buy a table for him, but like I said, I wanted to try to teach him something about how to fabricate something. My wife is certainly glad the project is done.


Back
Top