What's new
What's new

OT - Building a Stirling Engine, seeking brass scrap & advise.

doug8cat

Titanium
Joined
Jul 10, 2008
Location
Philadelphia
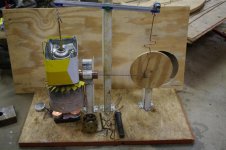
As the title indicates, my niece who is ten and has already been moved to the advanced placement program in science which she loves. I thought a nice gift for her (and project for me) would be a small Stirling engine.

I work with 99% cast iron at the shop and the only scrap brass there are beater bars.
Reading up on the different alloys available got me a bit confused as to which on would work best, machine well and be nice looking when polished up and mounted on a wood base.

So I ask if anyone has built a Stirling what alloy did you use and with what results.
I figured for the first one; prototype I'd us what I could get and see how it goes.

If anyone has some scarp round: ~1" to 1.5" in dia., length 1.5" to 3" plus and flat stock 0.25 to 0.385, square inch and above. I will of course compensate for postage and "scrap fee"

I love to see kids taking an early interest in science, any academics at all really these days. I just remember when I got my first old used RCA oscilloscope in the early 80's. It lead me to teach myself electronics, then an undergraduate in biology, followed by a masters in neuro-pharmacology and best part of a doctorate in the same field. Okay how did he end up in machining? "...What a long strange trip its been..." story for another time.

Thanks everyone any help will be greatly appreciated;

Alex might even want to be a machinist! She's quiet the smart cookie, got to AP cause she was bored in the regular class and took to annoying the teach to pass the time.. just like her uncle:D
Doug
 
Pretty sure I have the 1.5" diameter and a 3" length should be no problem if I have it. Lots of round drop in 5/8 and a lot of hex in 9/16? Value is fiddy sebin thousand dollars but the educational discount is huge. 360 brass. Taking about 8-900 pounds of shavings to the yard next week.
 
Alloy 360 is the all purpose free machining brass that takes a good polish and then oxidizes. If it does not get very hot, you can put a clear lacquer on it to maintain the shine. Best use stainless steel for the hot part.

Are you designing an engine yourself on the fly? I have not looked lately, but I have seen cute little finished engines, plus plans and complete kits with the materials. Heat source can be solar or an alcohol burner on the little ones.

Larry
 
Larry, this is the first Sterling that I am going to build, after a little searching on the old Interweb I found a nice looking little engine designed and built by a chap from Holland. The prints are well done but have very little documentation, hence the alloy question, he says he uses whatever is laying about. This design uses a candle for heat and I like the idea of the flame being reflected in the polished brass. I like the lacquer / stainless idea, think I just may try it on the beta version.
I did see a lot of kits out there, but this needs to be done from scratch, so she can the steps from stock to finish with manual lathe, basic hand tools and mill. I want to able to illustrate the craftsmanship, yhea it would probably be easier to make some pieces on the VMC, but I don't want her seeing a pieces pop off a CNC and done. I am going to do a simple little photo book with it containing simple theory and illustrating some lay out and a few pics of fab and assembly.
Golly this project beginning to develop a life of its own, may have to push off some real work:eek:

Thanks for your ideas and interest.
 
mjk and mrcompletely some 316 ~2" dia. x 2 1/2 for the warm bits would be great.

Thanks so much everyone who has responded so far, looks like I'm gonna have to get the mill warmed up sooner than later.:) Thats a good thing!!
 
Doug I think the guy you're talking about is Jan Ridder. He's super helpful and a very nice guy. I'm building 3 of his Coffee Cup Engines as gifts for people. In fact I began them a few years ago and threw the half completed bags of parts in a corner. One of the presents is for a guy's retirement, and I figured I better pull my finger out as the company we work for is, errr "restructuring", and it looks like we'll all be "retired" pretty soon.

Here's a link to the engine, the video of it running is in the top corner. Coffee Cup Stirling "Jan"

I was going to put up some shots of the finished engines, but thought Don would possibly throw a wobbly if he saw models being put up here. Be warned, there's a remarkable amount of machining in these little suckers. I had no idea when I first looked at the drawings, but once I started making the parts it became clear that it wasn't going to be a quick job. I'm following his drawings pretty much exactly, and probably hold tighter tolerances than I need to given the application. Multiply it by 3 and it becomes a bit tedious; a couple of hours time goes by, and all you get for the trouble is one weeny part you can barely see. I haven't really looked at his other engines, but I wouldn't recommend that Coffee Cup LTD engine for you and your niece. I couldn't tell you how many hours is in one of those things, I guess by making 3 it's taking me about twice as long as making one. But there's a lot of hours in one. I think she will hate you for life if you made her machine a whole engine up!

Anyway good luck with it. I'm not much in to models otherwise, and can't imagine how much time goes in to those live steam models. But I guess I can see how people like this type of thing. It sure beats the heck out of watching the crap on TV .... or worse talking to the wife! :eek:

Edit: just to give you an idea of the types of challenges that you don't expect. Just figuring out how to fixture and accurately cut that 100 mm acrylic tube took ages, and quite a few fails, before I could reliable squarely and accurately cut them to length with a good finish and not scratch the plastic in any way in the process. Just because they're small, don't believe they don't involve a lot of head scratching trying to figure things out. Jan's drawings however are excellent.
 
Pete, quite right Ridders is the chap who drew up the plans. Kinda thought I would be in for head scratching, tiddly winking etc.. Looks so straight forward, then you begin.......

I build and fly nitro RC helicopters, so I kinda knew what I might getting into.

I.e. step 3: Cut out and trim clear canopy then affix to fuselage with 4 self taping screws. YHEA right 10 exacto blades, 4 cups of coffee 3 plasters, 5 cuts to right thumb, 3 broken dremmel bits, all cats hiding due high decibel cussing and it 3 AM.... fits perfect; simple. Now on to tail rotor drive transmission assembly.:willy_nilly:

Thanks though at least I know I have some solid plans.
 
Yeah I think the plans are good, but I'm not sure which engine you're planning to build. I don't know about conventional Stirling engines, but most definitely with LTD Stirlings, friction is the enemy, as they don't have a lot of power to spare. Unremarkable when you consider the heat from one's hand is enough to power an LTD engine!

As far as your original question and materials, I wouldn't sweat it too much. There are times when it's possibly important, for example a bronze bushing in mine, but I think most of the time it should work regardless of what you use. I ran out of aluminium plate to use for the top plates for example, and brass could be easily interchanged. I can't imagine it matters a hoot what type of aluminium/brass/steel is used for anything, and much of my material came from the scrap metal guy down the road, and I just scrounged around until I found stuff I could use. Sadly he didn't have a piece of 150 x 500 x 6 mm plate the other day, or any aluminium plate for that matter. Rather selfish of him I thought, and it feels quite stupid to now have to drive to the aluminium dealer and buy, wait for it, half a metre of aluminium. I will most likely buy another few hundred kilograms to keep here in stock just so I don't feel like such a time wasting idiot!

These small parts drive me a bit crazy to be honest. If I recall correctly there's about 20 parts (if including fasteners) that go to make up the crankshaft alone. I haven't crossed out the flywheel yet, but I expect that to be an excellent way to kill copious amounts if time. I may save that joy for last, and make sure the things actually run first!
 
Aluminum piston, copper water line for cylinder, bits and chunks of this and that -- no one told it that it was too crude to run. Photo taken the day before it actually worked. Required a propane torch to get it to start. Friction really is the enemy. Eventually got it to start with less drastic means and would run quite a while with ice cubes in the pan.
 

Attachments

  • IMGP4989.jpg
    IMGP4989.jpg
    81.8 KB · Views: 691
Again thanks to everyone, for drops and the advise. Cannot wait to start mak'in chips, any more tips that come to mind are certainly welcome hope to post photos as projects gets going.:cheers:
 
Tips? Yeah don't do it! :D

Just kidding.

This is the state of mine, I just took the photo tonight. I still have a number more parts to make, and clearly some of the parts aren't fully finished. I left some of the final polishing etc until I was ready to assemble them so they won't get banged around too much. I'm waiting for some 2 mm cap screws to arrive and then I should be able to rough assemble everything, then pull them apart and polish it all up.

Srirling Engines.jpg

Looking at the photo is probably doesn't look like much, and indeed the actual machining is quite straight forward. Albeit a heck of a lot more in it until you look carefully at each part. For example most of the crankshaft parts are eccentrically turned, and that takes time to setup. However the main thing is just figuring out how to hold some of these small parts in full size vices etc. Just for another example, today I made the "con rods" (in fact plates) in the centre of the photo. They're made from 1 mm brass plate, tapered from 3 mm at one end to 6 mm at the other end, drilled with 1.5 mm holes. A bigger piece would be a no-brainer, and I could clamp it via any number of methods, but they are only 50-60 mm total length and become too narrow to hold without consideration. So it goes on around the parts. The top and bottom plate I still need to face, but each of those holes is tapped 2 mm. etc etc. A huge amount of head scratching went in to so many of those parts, even accurately cutting those perspex cylinders involved quite a few tries and epic fails until I could find a way to clamp, cut, and not scratch the parts. Sounds easy, and it was ... in hindsight. The blue tape around the cylinders is so I keep the piston matched to it's mate. They are all match lapped. I still need to cross out the flywheels to give them "spokes", I haven't ever done that before so am saving that joy until the end.

I decided to make these in my spare time as gifts, so the guys I'm giving them to better like them as there's a lot of "spare time" in that shot!

Good luck with your project.
 
The post man brought some gifts today thanks so much, now I can git started. Will post some pics when I get some pieces done.

I really appreciate all the advise and help!!!!


Back
Top