What's new
What's new

Press Fit

Joe Holt

Plastic
Joined
May 14, 2016
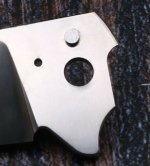
So, I'd like to get some experience / thoughts on a press fit problem that I've been seeing. I'm pressing an 1/8 .1247 dowel pin into a reamed hole that is .1245 with a small arbor press. The containing part is a hardened (61c) M390 knife blade that is .130" thick. The hole is reamed before heat treating. I'm not really sure what size the hole is after heat treat. Presumably, there is some size change post heat treat. Most of the time, I'm able to press in the pin without issue. However, about every 10th blade or so it will break the blade. I use a drop of Wd40 to help the pin slide in hole. Do you guys have any idea what I'm doing wrong? Any help would be appreciated.

Thanks,
Joe
SpecterPivot.JPG
 
I despise small diameter press fits. They are very fussy as to size of both parts. Standard press fit is .001/1" diameter, .002/1" diameter is a heavy press. At your 1/8 diameter, the difference between no press and a heavy press is less than .0003. That is a small box in which you have to play.

For a greater degree of confidence I think you will either need to size your parts after heat treatment or measure and selective assemble to insure you have sufficient but not over much press. I presume you are buying custom ground pins. Do you check them all for size?

I'm not familiar with the steel you are using for the blade. Would a differential temper to restore some ductility to the pin area be a solution, or would the reduced hardness affect the life of the pivot to much?
 
Might help to do some measuring before assembly. You could also warm the blade up before pressing.
Could also be alignment problem,make sure the pin is perpendicular to the blade before pressing.
 
That is a really small amount of room to play. I'd like to measure them to get a feel for the change post heat treat, but I'm not sure what to measure them with. I have a set of the expanding small hole gauges, but nothing that small. Is that the correct tool or is there something more appropriate to use?

M390 is a powdered metal stainless. It would be similar to a 440C with vanadium in it.

I don't think that I could to a differential temper, but I could certainly heat it up to just below the heat treat temp and it might help.
 
So, I'd like to get some experience / thoughts on a press fit problem that I've been seeing. I'm pressing an 1/8 .1247 dowel pin into a reamed hole that is .1245 with a small arbor press. The containing part is a hardened (61c) M390 knife blade that is .130" thick. The hole is reamed before heat treating. I'm not really sure what size the hole is after heat treat. Presumably, there is some size change post heat treat. Most of the time, I'm able to press in the pin without issue. However, about every 10th blade or so it will break the blade. I use a drop of Wd40 to help the pin slide in hole. Do you guys have any idea what I'm doing wrong? Any help would be appreciated.

Thanks,
Joe
View attachment 222570

Ream the hole with a carbide reamer after heat treat. I never finish a dowel hole prior to heat treat. I always wire it or jig grind after.
 
Could you switch to a spring pin? That would eliminate the problem of size variation in the holes.
 
Thia may not be practical but in a similar situation some years ago, two sets of parts were first measured and sorted by size. Undersize parts were used only in undersize holes etc.

Would depend on the dimensional consistency of your pins (may not be enough deviation to allow binning) and the ability to measure the holes. (I've seen inexpensive bore gauges that can measure 0.1 diameter but to what accuracy I'm uncertain.)

Just a thought.
 
What material and hardness your pins are?

Only reasonable method to measure the holes would be pin gauges.
Stupid simple and fast way to gauge your holes would be to grind a very small taper to a hardened pin. 8" long pin with 0.0001" taper per inch and you just check how far you can insert it. Doesn't need to be perfect, you can make one with cordless drill and abrasive paper...

How do you support the blade in the pressing op?
Extra bending stress can make things worse if the support points are far away from the pin location. Try 1/4 diameter support with slighly larger than 1/8" hole to ensure your support is right next to the hole.
 
Well, the Bohler spec sheet recommends a 2 x 2 hour tempering, which I read to mean temper it twice. This is done in other tool steels. A cryogenic treatment prior to tempering is recommended by some for martensitic stainless steels like yours. Supposedly this gets all the austenite out. Bohler specs out a -70°C cryo treatment. Better tempering may give you a trougher blade. Cryo treatment may give better dimensional stability, so if you goof around and find the way to get a very accurate and proper hole size initially, you should get a (only slightly changed) hole size after HT. If the blades are cracking, I'd probably think about better tempering in addition to hole size.

If its the case that you can't get the hole dimension stable, could you drill undersize and lap the hole? The 0.0003" difference between light and heavy press fit is pretty scary. Even for me, and I'm stupid and inexperienced enough to try anything.

That M390 sounds like the bomb.
 
I'd suggest reaming .1247 (same size as the dowel), or as experience with further testing, whatever reamed diameter will allow a close slide fit before HT. Then, Loctite the pin in if it happens to turn out loose after the part is heat treated. IMO, its not really 'better' just because it is pressed in. I prefer a close fit when using Loctite, in order to maintain the perpendicularity of the pin in the desired location.
 
Thinking out loud here:
Needle bearing rollers could work out as a suitable ready made precision pins if they are commonly available in inch sizes. 3x10mm needle rollers cost something like 20 cents per piece if you buy just a few.

Hardened precision ground M2 rods from mc-mastercarr on the other hand have -0.0002" to 0" tolerance and also cost next to nothing.
 
Hey Joe, If you are doing this operation often, I suggest you search for the formula for " calculating hoop stress," and once you master the formula, you can measure the pin and known the temperature required to enable a shrink fit between the members that is forever tight. You may want to manufacture a holder for the blade to use during installation of the pin if you continue to press fit the pin. The holder would need to support and clamp the blade in an exact position every time. The blade would align with a hole that allows the pin to pass through the blade and through the holder as well. The holder should look similar to the handle such that the pin is aligned and passes through the top into the blade and out the bottom. You may have to start with a long pin, install and trim the pin to final length later. The extra length is to provide a slight tapered section to assist alignment between members and sizing of the hole.
If the fractured blades fracture into two pieces in a straight diametrical to the hole fracture, as the blade is now two pieces, a bending load is indicated. If the blade fractures in a radial closed fracture from the hole and extending across the shortest section to the edge, as the blade is still one piece with a closed crack, a hoop stress fracture is indicated. You can send a private message if you want further conversation.

Good point about fracture type.

Calculating hoop stress for non-symmetric part with varying wall thickness could be futile exercise when you also consider pin/hole dimensional accuracy. Varying wall thickness is also making the situation worse as the stress is concentrated on the thinnest section.
Guestimating HRC 61 hardened HSS steel tensile strenght is another big mystery if one wants to solve this by calculating.

Hardened HSS seems to break sometimes with unexpected ease, not sure if internal residual stresses after hardening have something to do with it?
 
Well, the Bohler spec sheet recommends a 2 x 2 hour tempering, which I read to mean temper it twice. This is done in other tool steels. A cryogenic treatment prior to tempering is recommended by some for martensitic stainless steels like yours. Supposedly this gets all the austenite out. Bohler specs out a -70°C cryo treatment. Better tempering may give you a trougher blade. Cryo treatment may give better dimensional stability, so if you goof around and find the way to get a very accurate and proper hole size initially, you should get a (only slightly changed) hole size after HT. If the blades are cracking, I'd probably think about better tempering in addition to hole size.

If its the case that you can't get the hole dimension stable, could you drill undersize and lap the hole? The 0.0003" difference between light and heavy press fit is pretty scary. Even for me, and I'm stupid and inexperienced enough to try anything.

That M390 sounds like the bomb.

Dimensional stability vs cryo treatment for small hole like that is probably not a significant factor but I think you have very good point about the retained austenite.

ie. page 16 https://www5.kau.se/sites/default/files/Dokument/subpage/2010/02/93_1343_1362_pdf_76008.pdf

"Retained austenite. Elevated levels of retained austenite will usually result
in tool breakage after very short service periods and is currently one of
the main failure causes in tools made of cold work and high speed steels with
carbon concentrations exceeding 0.8% by weigh"
 
That is a really small amount of room to play. I'd like to measure them to get a feel for the change post heat treat, but I'm not sure what to measure them with. I have a set of the expanding small hole gauges, but nothing that small. Is that the correct tool or is there something more appropriate to use?

M390 is a powdered metal stainless. It would be similar to a 440C with vanadium in it.

I don't think that I could to a differential temper, but I could certainly heat it up to just below the heat treat temp and it might help.

McMaster-Carr
target size plug gage

You could use these for a reference (a .1250" pin will not fit into a .1250" hole, roundness, etc). You may find your pre-heat treat reamed hole is egg shaped too.
 
One other idea to throw in the mix, as mentioned press fit on small holes is fussy. I would get a small library of Deltronic pin gauges in .0001. Ten pins and a case will cost less than $100.00 and get a diamond lap made. I have used Di-Coat Corp. for a couple of small laps and been happy with the results. Ask them about best practices to make them live a long time.
 
You have metrology problems.

#1 You have no idea what the hole size actually is, Your just taking it for granted your reamer made a hole the size that was printed on it. THEN it got heat treated.

#2 you have no idea what the dowel size is besides what's on the box because maybe you have an decent micrometer but you cant measure any better than +/- .0001

You have no wiggle room with .0003 difference between too much and no press.


buy some pin gages.

make a tapered lap for the hole and some diamond paste?


Back
Top