What's new
What's new

Quincy 350 Compressor won't build more than 20PSI...

Zac Penn

Plastic
Joined
Oct 4, 2019
Location
Jacksonville
I got this from an auction a couple years ago. It looked rough but when it was installed, it made pressure just like it should. However, I was cheap when I installed it and used a 25amp contactor that ended up getting burnt out. After that, it sat for about 6+ months until I decided I wanted to actually put it into service.

I then bought a 50amp contactor and drained the old oil, which was quite milky. I used some 10W30 motor oil as a temporary lubricant to help flush out any extra water that was in the drain pan. I drained all of the water that is in the 200 gal tank and then the circuit breaker back on to get it running again. I left the water drain open for a while to make sure I got everything out. I opened up the 3/4" ball valve on the tank to see what kind of air volume was going generated by the compressor and I feel like it was a substantial amount of air being pumped. I then closed the valve and waited for the pressure to build but it wouldn't go above 20 PSI on the gauge. I let it run for 10 minutes and never went higher so I just shut it down.

I had ordered some Ingersoll Rand synthetic compressor oil as a long term solution but when I drained the cheap oil it looked more milky than I expecting. I am going to refill it with cheap motor oil again and flush it out one more time so that i don't contaminate my expensive compressor oil with the water that is still inside the pump.

This is my 1st industrial compressor so i have zero experience with what things to check and in what order, to narrow down the pressure issue.
The oil pressure gauge appears to be normal, arrow is right in the middle around 15PSI, and it seems like the unloader is working properly but I don't really know for sure if that is the case. Would it make ANY pressure if the unloader was stuck open?

Anyways, I figured you guys would have some advise for me. If you can be as detailed as possible in your replies I would truly appreciate it. Like I said earlier, I am a novice with these machines so i am going to need some hand holding and laymans speak to get me through this.

Thanks in advance,
Zac
 
Pull the4 tops off the intake unloaders and turn it on. While it's running manually push the unloaders down by hand. If the valves are working you will hear and feel a distinctive change in the sound and load on the motor. If they are not working you won't get much of a change.

HP valves have the harder life, but the LP cylinder will usually pump up to 50 PSI pretty quick by itself. This suggests you have issues with both cylinders or the unloader valve.
 
Unloaders can stick. On my Quincy they take a few seconds on start up to close and I can hear a hiss until then. The milky oil is another problem but the lack of pressure is probably in the valves. Dave
 
Bad head valves or bad pilot valve. Both easy fixes with the right parts and a lathe with back gears and a cam-lock spindle. (A 4-jaw chuck, a sturdy screwdriver and some heat work great for tearing down those valve cartridges in lieu of whatever proprietary tool Quincy uses.)
 
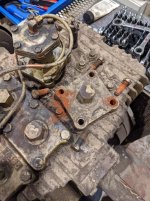
Juast for reference, here is a picture of the top of my compressor...
PXL_20211011_212042226.MP.jpg

What parts should I start to take apart?

If valves are sticky, is there a way to spray some lubricant into that area that can get me up and running for the time being?

I do not have the time to dedicate to a rebuild at the moment, so I either need to make a relatively quick fix (couple hours) or just wait until I get some spare time and work on a rebuild then?

I can always use a cheap compressor to get me though for the moment.

Thanks for your help.
 
In my limited experience, lubricating the valves in place is not sufficient. Corrosion which sits proud of the valve seat is probably the culprit. The only way to correct this is with a rebuild of at least the offending valve cartridges, but preferably all of them.

Online vendors commonly sell Quincy valve tune-up kits with all the springs, valves, gaskets and crush rings you'll need. Rebuilding the valves is not difficult, but it will take at least a few hours and a bit of patience if the threads securing the two halves of each discharge valve body are rusted up.

If the procedure for your 350 is more or less the same as my 1948 244, start by disconnecting the plumbing for the unloader towers. Then dismantle the unloaders if you intend to service them. Proceed to the valve covers.

Make witness marks and take pictures before you pull the covers as sometimes non-interchangeable parts kits from different eras get mixed together in a single head due to prior replacement. I ran into this.

From there you should have direct access to the valve cartridges. Take pictures again. The cartridges should lift out easily. Be mindful of the copper crush ring that may or may not come along with the cartridge. Older cartridges are cotter-pinned together. Newer ones are threaded and are more of a pain in the ass to get apart. That's where the lathe chuck, propane torch and patience come into play.

The rest of the process is fairly self-evident from that point on. I chose to stone the valve seats with white Arkansas once I had mine apart, but that's up to you.

EDIT: Also, the cap nuts on top of the valve covers act as jam nuts for grub screws that must be backed off prior to re-installation. Re-tighten them once the covers are torqued. They act as hold-downs for the valve cartridges.

IMG_20210815_130400804.jpgIMG_20210815_130500302_HDR.jpgIMG_20210815_130445312.jpgIMG_20210815_130430508.jpgIMG_20210815_184911086.jpg
 
Juast for reference, here is a picture of the top of my compressor...
View attachment 331908

What parts should I start to take apart?

If valves are sticky, is there a way to spray some lubricant into that area that can get me up and running for the time being?

I do not have the time to dedicate to a rebuild at the moment, so I either need to make a relatively quick fix (couple hours) or just wait until I get some spare time and work on a rebuild then?

I can always use a cheap compressor to get me though for the moment.

Thanks for your help.

With a QR-25 Quincy you just jump into it. If you have a little bit of mechanical aptitude, a hammer and a crescent wrench that's most of what you need to get it working. Sandpaper and thin cardboard help too.

I have exactly the same 350 pump from the early 1970's as you. Mine is rode hard and put away wet. I'm running it while I finish out my new compressor room. I had to leave the dipstick out as it has so much blowby it pushes a gallon a day out of the crank snout.

But you know what? It will never die. And it keeps up with a couple CNC's running no problem.
 
I would start taking the unloaders off and cleaning them first. I have a 340 and was plagued with the compressor not loading. I take unloaders off clean them lubricate and put them back on. I that works you are home free. You should check the diaphragms for leaks or being brittle. My compressor runs automatically every day on a timer and I have never had a loading problem since.
Ben
 
In my limited experience, lubricating the valves in place is not sufficient. Corrosion which sits proud of the valve seat is probably the culprit. The only way to correct this is with a rebuild of at least the offending valve cartridges, but preferably all of them.

Online vendors commonly sell Quincy valve tune-up kits with all the springs, valves, gaskets and crush rings you'll need. Rebuilding the valves is not difficult, but it will take at least a few hours and a bit of patience if the threads securing the two halves of each discharge valve body are rusted up.

If the procedure for your 350 is more or less the same as my 1948 244, start by disconnecting the plumbing for the unloader towers. Then dismantle the unloaders if you intend to service them. Proceed to the valve covers.

Make witness marks and take pictures before you pull the covers as sometimes non-interchangeable parts kits from different eras get mixed together in a single head due to prior replacement. I ran into this.

From there you should have direct access to the valve cartridges. Take pictures again. The cartridges should lift out easily. Be mindful of the copper crush ring that may or may not come along with the cartridge. Older cartridges are cotter-pinned together. Newer ones are threaded and are more of a pain in the ass to get apart. That's where the lathe chuck, propane torch and patience come into play.

The rest of the process is fairly self-evident from that point on. I chose to stone the valve seats with white Arkansas once I had mine apart, but that's up to you.

EDIT: Also, the cap nuts on top of the valve covers act as jam nuts for grub screws that must be backed off prior to re-installation. Re-tighten them once the covers are torqued. They act as hold-downs for the valve cartridges.

View attachment 331909View attachment 331912View attachment 331910View attachment 331911View attachment 331913


Thank you for the detailed reply. I have learned from other projects to only take one section apart at a time and to take pictures as I go. My short term memory has never been very good, so remembering exactly where everything went is usually a problem. I really feel sorry for you "Old Farts" that never had cell phone cameras to instantly look back at your pictures. LOL I am almost 40 so not that young anymore, but I have been spoiled in that department!
 
Thank you everyone for your replies! I will slowly start taking things apart and cleaning as I go along. I have always just used PB Blaster on stuck bolts when i work soon cars, but I want to make sure that will not hard any of the compressor parts if I get a little wild with the spraying?

I have ordered 4 new B90 v-belts to replace the cracked ones so I don't have to worry about damaging the old ones.

I will flush the oil one more time with cheap motor oil before going to the expensive compressor oil. That is of course if the second flush looks better than the first flush. I was really surprised to see how milky the 1st flush was and have no idea where the water is coming from. There is no coolant system, so no head gasket that can be leaking antifreeze into the pump, but I am in north FL so our humidity usually runs in the high 80's to 90's and my warehouse of course is not air conditioned. I am used to having a bunch of water in the air tank, but I didn't think I would see it building up in the oil pan.
Do you guys think that is caused by piston blow-by sending the condensation down into the bottom end?

I do have oil leaking from around the crankcase but it is nothing like what Garwood mentioned about oil usage.
 
Do you guys think that is caused by piston blow-by sending the condensation down into the bottom end?

That would be my first guess. Hot compressed air at 350*F leaking down into the crank case where it cools and condenses.

If you've got bad rings you might as well test run it unloaded for fifteen minutes or so to let the oil warm up and thin out... then listen for knocking of the con-rod bearings. Mine has a knock that only starts up once the oil thins. I'm going to get it ground down for -.020 bearings since it's already got -.010s in it.

It may be that you'll want to purchase a complete deep rebuild kit including crank pin bearing inserts, wrist pins & pin bushings, gaskets, rings, main bearings, etc. rather than a mere head tune-up kit. Verify the dimensions of your existing crank pin bearings first so you can specify which size you need if you're going to replace them & have the journals ground.

Be mindful of the possibility of asbestos-laden head gaskets in an old machine like that if you end up pulling the head. Mine definitely had some asbestos in it. Lots of chrysotile-white, stringy, stretchy peel-apart fibers embedded in it so fine that they caught the air almost like gossamer. They looked and behaved exactly like this:

YouTube

If yours has similar fibers, keep it soaked in oil and have someone handy to shadow-vacuum behind you with a bag-style HEPA filter while you work at it with a sharp wood chisel. Have a tool grinder ready as you'll probably need to re-sharpen multiple times throughout the process, but try to keep grinding dust out of the exposed internals of the compressor. Hell, it might be best to undertake the whole operation outside in the driveway or something.
 
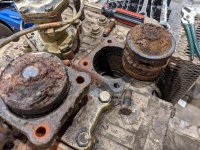
Okay I worked on the compressor this morning for about 3 hrs and am glad i did. I am going to call it the #1 cylinder, which is closest to the oil pump side of the unit, looked pretty good when I took the valve covers off, but cylinder #2 (closest to the radiator and pulley)was disgusting inside with massive amounts of rust. I will post pictures at the end.

I took out the brass piston assembly that goes under the unloader, cleaned it read good and greased it up so it would slide smoothly in the upper section of the unloader.
I took out the steel piston that pushes down on the valve assembly, wire brushed/brilo padded it to remove as much rust as possible, greased it up then put it aside.
I removed the washer that goes over the valve cleaned it the same as the piston, and then removed the valve assembly.
I cleaned the outside of the valve assembly the best I could, sprayed some degreaser into he valves while pushing the valves open, and then sprayed WD40 into the valves to help flush out even more debris that was in there. The valves seemed to open and close nicely when I was done cleaning them. I may have F-ed things up with the following idea but too late now...I used some outboard motor lower unit gear oil and dripped some of that into the valve assembly while opening and closing the valve to help get things lubricated again. I then greased the outside of the parts and reassembled everything.

Cylinder #2 was terribly rusty, and the exhaust valve seemed like it was probably stuck shut before because it seemed pretty sticky when I started cleaning it. But it seemed to clean up pretty good and it moved very smoothly when I was done cleaning things.

The only thing I didn't take apart on the top end of the pump was the actual unloader part because it seemed pretty clean and i do not have any RTV on hand to use as a replacement gasket. It seems like it is very easy to get to so I figured I would open it up later if the valves weren't my problem.

I put in new 10-40 oil, turned it on, and it seems like I am still having the same compression problem, but the pump sounds SOOOOOOOOO much quieter than before. There is still a little tap noise from the valves, but it was very loud before I cleaned them.

While the motor was running, and only building pressure to 17 PSI, I started tinkering with things...
I put my finger over the air hole in the #2 cylinder unloader tower and I could hear a sound difference in the pump, and the pressure went a little bit higher to ~20 PSI but stopped building after that.
When I removed my finger the sound changed again, pressure remained the same. When i put my finger back over the hole, the sound changed again but pressure remained the same. This time I could hear the intake valve under the unloader clicking ( which I think it what it is supposed to sound like when the valve opens and closes)
When I put my finger over the air hole in the #1 cylinder unloader the sound changes a little but not nearly as much as the other one.

After messing with it a little bit, I believe the unloader is staying on because you do not hear the distinct sound change when the pump start to really make pressure. You just hear the motor turn on making it's normal whine, and you hear the air getting suck in, but there used to be a very obvious sound change after 3-4 seconds of the motor turning on when the pump actually started making pressure. Now the pump sounds exactly the same from when you turn on the breaker to when you turn off the breaker and the motor stops spinning.

PXL_20211012_152800694.MP.jpgPXL_20211012_152739013.MP.jpgPXL_20211012_152510640.MP.jpgPXL_20211012_143011801.MP.jpgPXL_20211012_142913463.MP.jpg
 
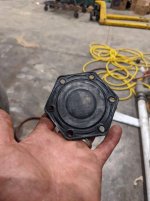
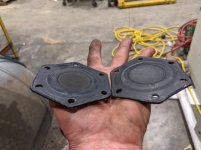
Okay i guess i wasted my entire work day on this compressor but i am making good progress. I dismantled the top of the unloaders and found the following...
-The rubber diaphragms appear to be in good condition with no tears
-I don't remember which cylinder was which, but the diaphragms were flipped in different orientations on each unloader (you can see from the pics)
-One of the diaphragms appeared to have an air leak in at least one spot that could migrate to a bolt hole, and possibly in three spots total (1st picture)

PXL_20211012_194530245.MP.jpgPXL_20211012_194609300.MP.jpgPXL_20211012_194736115.MP.jpgPXL_20211012_194822183.MP.jpg


After I removed the diaphragms, I turned the compressor back on and like magic it was able to build pressure quickly. If I pushed down on the top of the brass piston, then it would unload the piston like it should.

Now I just need to clean up the steel piston cups (that are pushed on by the rubber diaphragm), grease them and reinstall them.
Buy some RTV
Figure out which orientation I am supposed to reinstall the diaphragms and then put everything back together.

At least i know the valves are pretty clean, lubricated and working properly, and that the compressor will work once I get the unloader taken care of!!!!!
 
Indeed, sounds like a suck unloader valve. Might even be cheap enough to replace the whole valve if you don't feel like screwing with it.
 
How much oil pressure was it making? If it isn't making enough oil pressure to actuate the hydraulic unloader valve it will not produce air.
 
Hey guys, I am back with more unloader issues with this compressor.

I am now having the unloader not UNLOADING when the motor turns off (which is set to turn motor on at 120 and off at 160 PSI) so it is creating MASSIVE Amp draw when starting up. I had my meter on it during a start up and it jumped up to 120 Amps for a second and then dropped down to 26 running Amps.

Is there a quick way to isolate the cause of the problem?
There is beautiful looking oil in the reservoir at the correct level (compared to the milky cream I had at the start of this thread in 2021.
 
Okay here is Zac's Crazy Idea Time...
Has anyone ever customized one of these unloader circuits using a solenoid from a sprinkler valve?

I mean it seems easy enough, and the principle is the same.
At start up we want the solenoids to have no power, so that the unloader piston is in the up position and the compressor will only make minimal pressure.
After 5 seconds or so, we want the solenoid to be energized so it pushes the unloader piston down and the compressor will start building pressure.
When the pressure switch gets triggered, the motor stops and the solenoid looses power, which will unload the compressor.

Is it that simple?


Back
Top