What's new
What's new

Repairing Martin DLZ 502 - Trouble opening the apron

WerkBerg

Plastic
Joined
Nov 16, 2019
Hello,
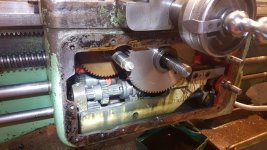
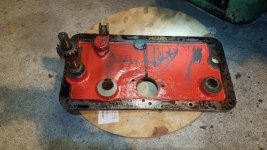
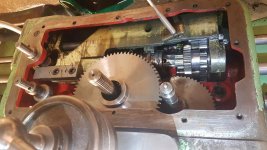
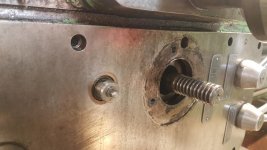
I got my first lathe (made in 1962) last week and I am currently busy inspecting, cleaning and reparing it. I have to open up the apron because the handwheel rod has a lot of play and I want to fix it. I removed all the screws and levers on the front plate but it won't come off. There are still two visible pins. I assume these pins are for proper plate alignment. I'm out of ideas on how to remove it. Do you have any advice on how to proceed? Here are some pictures. I took them before I removed the levers.
1.jpg2019-11-16 17.50.54.jpg2019-11-16 17.51.12.jpg2019-11-16 17.50.45.jpg2019-11-16 17.51.03.jpgThanks!
 
Probably stuck on with sealer . Take a old pocket knife blade and a small hammer and tap the blade down between the front plate and main casting in several places around the edge. I have used that method to separate different things with no damage ,motorcycle cases etc. Once you get a little clearance opened up then you can use other forms of prying tools.
 
If it's steel (attracted by a magnet, you could build a slide hammer with a relatively strong magnet. The advantage would be in a pull exactly on axis with the pins.

Paolo
 
Those pins are dowels and they're for aligning the front cover plate onto the apron casting. Some machines have tapered pins, some are parallel. The conventional way to remove them is to drill and tap them say 5 or 6mm down the centre and pull them out with a slide hammer.

Most of the time to carry out effective repairs to the apron you need good access to the inside of the apron gearbox from above. You might get lucky just pulling the front cover off but I always used to separate the saddle from the apron so you had good all around access. Some times you can leave the apron in place blocked up on timbers and get at every thing from above. Sometimes you need to be able to work on the inside face so the apron has to be removed from the lathe. If I started on that lathe at 8.00am, barring unforeseen incidents, I'd have all the lead screw and shafts out,the saddle off the apron and the apron sat on a work bench by dinnertime. It's not that big a job once you know what you're doing.

Regards Tyrone.
 
Last edited:
A written and photo summary of this lathe exists: Martin Lathes DLZ502, DLZ602 & DLZ702

The writeup states that the apron was of double-walled, lubricated design. I suspect that the lever and wheel shafts are fastened to gears and bearings on the inside of the apron front, and not to the front itself. Further, if the apron interior is lubricated with a self-contained oil pump, the shafts likely have seals.

My money would be on Tyrone's methodology - remove the pins from the levers and remove the levers and dials. Then the front should come off but the seals will have to pull off with the apron front. Be sure to drain the oil sump first!

The URL above offers documentation for your lathe.
 
He took the levers and knobs all off after the photos were taken. It looks like there are some bushings pressed into the cover plate. To me this means the cover plate is accurately pinned in place. So I guess those two pins left over are taper pins not just parallel pins.
I would try to remove the plate with a putty knife as far from the pins as possible. Then slide over near the pins and pry a little without bending the plate. If it does not slide off over the pins then they are tapered and will have to be removed.
To remove them drill and tap for a slide hammer. You may want to make a guide bushing for the drilling. Guide bushing as simple as a wood or steel strap bolted into two holes with a pilot hole for the drill carefully laid out.
If you do drill and tap be careful not to go so deep that the hole breaks through and chips get into the apron interior. You can grease the tap so chips do not fall in.
Bil lD

Sometimes you can get lucky and the pins will come out still attached to the front cover plate.

Regards Tyrone.
 
A written and photo summary of this lathe exists: Martin Lathes DLZ502, DLZ602 & DLZ702

The writeup states that the apron was of double-walled, lubricated design. I suspect that the lever and wheel shafts are fastened to gears and bearings on the inside of the apron front, and not to the front itself. Further, if the apron interior is lubricated with a self-contained oil pump, the shafts likely have seals.

My money would be on Tyrone's methodology - remove the pins from the levers and remove the levers and dials. Then the front should come off but the seals will have to pull off with the apron front. Be sure to drain the oil sump first!

The URL above offers documentation for your lathe.

That's a very interesting article. I'd never come across a " Martin " on my travels. I guessed it was of German manufacture before I read the article, German machine tools have certain styling cues. It looks to be a quality machine that has been built to high standards.

Having said that I see that the data plate for the feed box is situated in a position where most operators stow the chuck key, files, spare tools etc. Give it a few years and it will be totally illegible. The domed headstock sight glass is also in vulnerable position on top of the headstock. Maybe German lathe operators are taught to be more careful with their machines.

Regards Tyrone.
 
Thanks Tyrone, I learned something new today.
Bill D

If for some reason the pins are tighter in the cover plate than the apron, maybe steel cover plate - cast iron apron, when you drive in your pallet knife followed by your fox wedge to separate the two the pins will stay in place in the plate. That applies to both style of dowels, straight and parallel. Same thing applies to the leads screw/feed shaft hanger bracket at the tailstock end, they're always dowelled as well.

Most of the time dowels have to be removed but you can get lucky some of the time.

Tyrone Shoelaces.
 
Wow, I am really impressed about the number of helpful replies. This was my first post here and I really did not expect such a great feedback. Thanks to you all, I guess you'll see more of me here from now on ;)

I first tried the approach with some prying tools (used some cheap chisels) and after I overcame my fear to break anything and used some more force, it simply popped of. The dowels stayed in the plate and were still intact and provided a tight fit when I put the plate back on. I got it all together again yesterday and even produced my first chips later that day. Everything seems to work and I couldn't be happier. Ok well, maybe if I had some more tools I'd be ;)

@Tyrone
Removing the saddle would be a good thing because I want to clean the underside and fix the semi-automatic bed lubrication. But to lift it, I'll first need a engine hoist or something. I think, I'll stick with manual lubing for now and when time and hoist comes around, I'll dedicate myself to the saddle. Also, I have to replace the handwheel rod then. It's totally worn out because the oil passages were packed with schmoo and probably didn't see any lubrication for ages.

The data plate for the feed box has been removed by a previous owner - pretty sure the reason was exactly what you mentioned. I got the plate with the machine and it's in a very good condition.
The headstock sight glass caught my eye as well when I first saw it. It seems that hot chips made it suffer and you can't really see well through it but it kinda still lives ;) I think the lathe overall is in quite a good condition (it was quite cheap) but I can't say much about the accuracy since it's not aligned at the moment and I will move it again in the next days.
Maybe I'll start a new thread about the machine, if people are interested.

I really learned a lot about this machine in the past two weeks and since I never fixed or maintained a lathe before, it's quite the adventure.

@bosleyjr
I have the original user's manual for my lathe, looks like it's the same as on lathes.co.uk. It's a pity that I can't find a repair or shop manual for it.

@Bill D
Thanks for the instructions. I would have done it your way if it had come to that.


Again, thanks to you all- I know where I'll turn if i need some more advice. And that's a given.

Greetings

Did I mention that I dropped a screw in the apron when I was fixing the compound? Yeah, well. That's me ;)


2019-11-17 17.36.36.jpg2019-11-17 17.44.08.jpg2019-11-17 17.42.49.jpg2019-11-17 17.44.34.jpg2019-11-17 18.57.53.jpg
 
It's a brand I've never come across before but it looks a good quality machine. I've never worked on a German machine tool that wasn't top notch, always really nice machines to work on. Removing the saddle is no big deal on a small lathe like that one but it is advisable to have a safe means of lifting it. Take off the compound and I reckon two strong blokes could lift it. I'm not volunteering to help though ! Are you bolting the lathe down or is it going to be free standing ?

The apron gearing seems to be in really nice condition. No sign of the usual coolant induced rot and crap.

Yep, telescopic magnets, I had about 5 when I was working. All different sizes. They are lifesavers.

Regards Tyrone.


Back
Top