What's new
What's new

Right Angle Milling Attachment

Grandmachine69

Plastic
Joined
Mar 29, 2020
Thinking about purchasing a right angle milling attachment for my vertical knee mill. Can these attachments be used on a mill that has a power draw bar?
 
You'll have to remove the power drawbar because the right angle attachment uses a drawbar with a long hex @ the top. the quill needs to be lowered to allow the attachment to be clamped to the quill so an extended hex allows you to tighten the drawbar. Unless the power drawbar will lower far enough to reach the drawbar down inside.
 
On my Burke/Millrite the right angle attachment has a built-in R-8 drive and uses the same drawbar as anything else. I've seen Bridgy's with the same setup.
 
I remove the R-8 shank and gear from the right angle head. Use my power draw bar and install said unit. Then lower quill and slip on head and engage the gears and you are ready to align the head.
 
Thinking about purchasing a right angle milling attachment for my vertical knee mill. Can these attachments be used on a mill that has a power draw bar?

I hope you find what you're looking for.

But with forty years in the trade, I've ALWAYS found a way NOT to use one of those evil things.

I've literally never mounted one for any reason. The only time I was in the same room when one was mounted, it caused a monster crash were the head was nocked off tram by a good four inches. (J head bridgy)

Sorry, but you asked.
 
I've ALWAYS found a way NOT to use one of those evil things.

What the man said.

Mine has sat in the cupboard for 20 years waiting for the "absolutely no other way to do it" job. I'll put money on being at least the third cupboard owner since it was new!

Still waiting despite a few fairly hairy work-arounds that weren't quite hairy enough to make me relent and fit it. Which, in retrospect, might have been the lesser evil in a couple of cases.

It needs the drawbar pulled and changed over. Not enough ceiling height in the shop to do that with the head upright. So thats two tramming sessions and associated faff to factor into the job.

Need to be really sure you have appropriate work before getting one. Better off with a proper horizontal mill if you have the space. I guess even a Burke no 4 or similar will outperform a knee mill & adapter. Mine wasn't expensive from a used tool dealer but I could have had a Harrison horizontal mill for twice as much.

Don't forget you will need cutters too. Getting harder to find now and much more job specific than endmills.

Clive.
 
LOL!

Yah well.. my one actually weighs more than a BirdPort "head".
Hangs off 4205 Avoir of mill..

Built by some little back-alley tinsmith's shop up Milwaukee way.

Kearney & Trecker was it?

:D

Well, if you have one that big, why not just buy a horizontal mill and be done with it?

BTW, never even heard of that brand.
 
I have an R-8 Bridgeport. I use mine several times per week. Very handy tool that allows me to set up far more easily than without. I use it with a 4” facemill on cast iron. I also drill castings with it. I’d hate to be without it.

At first, using it seemed awkward. But, now that I have used it many many times, I can set it up quickly and accurately. Those who have never used one will never learn how.

Denis
 
Last edited:
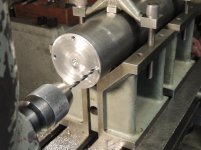
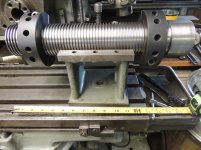
I agree with Denis, I use mine pretty often and setting up only takes a few minutes. I have the short drawbar that was mentioned earlier so I tighten it using a 6" long extension with a 3/4" socket and ratchet. It holds R8 collets and has made end work on long parts simple. I'd like to find one for my M Head machine if anyone has one gathering dust.
spaeth
DSCN3629.jpgDSCN3630.jpgDSCN3640.jpg
 
Interesting pictures spaeth

Maybe mine will end up being dragged into daylight soon.

Pictures got me thinking about a a job I may have coming up next month that might work out well if the drive end of the Bridgeport adapter is stable enough to use an end mill in that orientation. Half a dozen long parts need both ends faced off dead nuts square. For one or two it's be no hardship to wait out the shaper on auto up feed. Probably quicker overall as its just bolt down a couple of Vee blocks and go for set-up on the shaper. But over 12 ends the mills greater speed in cut should more than wipe out the extra set-up and re-tram time.

Thanks.

Clive
 
Don' tell us you picked the login handle over a fondness for beans?

Depends on the type of beans. (no lima, thank you.)

But the handle is in reference to the old Aurora Thunderjet slot cars.

We still race them and collect.
 
Clive,
No need to tip the head and re-tram it. I too have a low ceiling and use the standard draw bar. 3/4" socket on 6" extension with ratchet is the trick. Only indicating to be done is along the machined flat on the right angle head to align it parallel with the table movement. You run the motor in reverse to make the head go clockwise. They will take a fair sized cut but not designed for big roughing.
Go for it.
spaeth
 
spaeth

Thanks for the tip about socket extension and ratchet to do up the drawbar.

That makes my first D'oH moment of the year. Many more to come no doubt. I'll probably use a long tube spanner as I have a set about 9" long including the appropriate size.

Teeny cut. Just to clean up the error on my Rapidor power hacksaw, which usually runs 5 thou or under per inch out of square, after chomping off 3 ft of thick wall box section.

Clive
 
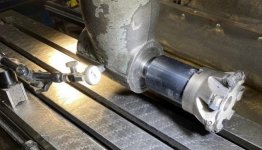
Here are a couple pics of the head in action. I face and drill straight edge castings I pour in my small foundry. They range from 8 to 48 inches. Hanging the longer ones over the side would be a pain. But facing an 18" as shown and boring it is a cinch with the head. I usually do them in small batches. Sorry about the photo caption—-it was added previously for a different thread on a casting forum.

IMG_6210[2].jpg
IMG_6203[5].jpg


Getting the spindle of the head parallel to the x-axis of the mill is easier as I precision ground tracks on the sides of the head parallel to the spindle axis.

Closeup tram.jpg

Denis
 
You'll have to remove the power drawbar because the right angle attachment uses a drawbar with a long hex @ the top. the quill needs to be lowered to allow the attachment to be clamped to the quill so an extended hex allows you to tighten the drawbar. Unless the power drawbar will lower far enough to reach the drawbar down inside.

I understand now. No my power drawbar will not reach that far down. Thanks for the explanation.


Back
Top