What's new
What's new

Rotary Broaching question

Kingston1100

Aluminum
Joined
Nov 6, 2005
Location
Saskatchewan, Canada
I am kind of interested in doing some internal & external hexagons. My question is ,can I work the rotary broach off of the lathe tailstock or do I need a totaly different machine to make one of these units operate correctly. Have any small production runs been done sucesfully by you folks. If so, some pros & cons of this device would be appreciated. Have watched some video about this device & looks quite interesting. Thanks in advance for your shared opinions & advice.
 
The only rotary broaches I have seen are for cutting a keyway in a bore. I don't know of any that cut an internal hex or will even go in an internal hex.

The rotary broaches are driven by the spindle of the mill and since the tailstock quill does not spin you can't use one in the tailstock.
 
It will work fine in a tailstock. It might be handier to mount it in a toolholder on your toolpost so you can use the power feed of your carriage.
 
These people seem to have the Injun sign on rotary broaching:

http://www.slatertools.com/

Their stuff is expensive but they offer tooling that does internal hexes, 12 point driving recesses, internal splines and keys, solid keys, etc. Simply add money. As I understand it, rotary broaching requires axial force to feed it and centering for the tool: a tool post mount may be a good idea if size control is important. A little radial offset to refine the size and all that.
 
Yes, it will work fine as long as you can hold it in the tailstock. Carl must be unfamiliar with the rotary broaches that you are thinking about using. Google Slater or Somma for more info. The power feed method Mud mentioned using the tool post will make the tools last longer as well as give a more uniform finish.

I have done a few small runs (10-20 parts each) of 1/2" and 5/8" internal hex parts with mine and had no problems whatsoever using the tailstock. Look on Slater's site for speed and feed info. I can't really think of any cons to the process other than high initial cost of the broach holder. I solved that problem by scoring mine on Ebay a few years ago for about $80 with a 5/8" hex broach.


Edited to add: Forrest got in a reply while I was in the middle of typing my reply. Quick draw, buddy.
 
Ekretz, you stole it, those suckers are expensive. Not really all that complicated, but expensive.

A bit back had several runs of 3/8" 12 point external hexes in 17-4 to do. Went the Slater route. What I remember is that it took a LOT of force. Blew up the power feed on a big old southbend. Switched over to an old clausing, 16X60 or so, blew the powerfeed up on the carriage, then blew the power feed on the turret(it had a turret instead of a tailstock). I think it was just sheared keys, didn't care, then sold 'em.

Ended up using almost 3ft long cheaters on the handles for the turret. I don't know if it was the material or that a 12 point hex takes a lot more force than a 6 point, but after running 1700 of them suckers, I was SORE and the cheaters were bent.

I would say that you are better off with the tailstock, but no special equipment required, its really a very simple process. Be aware that it does take a bit of force. I know Slater has the #s and formulas in their catalog, I certainly wouldn't try it on a mine lathe.

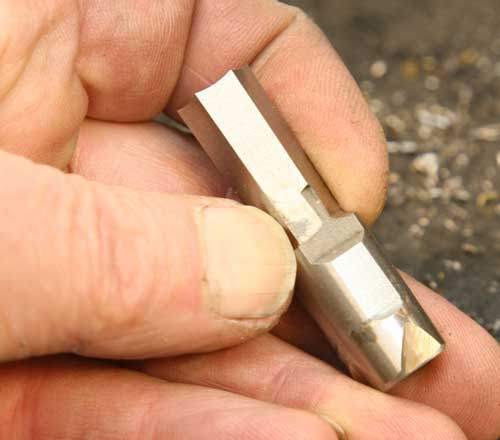
Cons, On long lengths your form will twist a tiny bit, and you need some place for the chips to break off. So you need a groove, either internally or externally depending on what you are doing, though I have seen some socket heads that just mashed the chips into the bottom of the hex, they worked, I was happy.
 
I have done many parts this way, but they have all been on "automatic" equipment, so I kant attest to the thrust needed. ???

I have only done internal hex and "Dbl D" forms. The 12 points must push harder? Of course I have only done it in 1200 series LCS as well as brass, so the material diff will Shirley change things up as well...

I had a special app where I needed to cross drill perp into the hex, so I needed to time the broach. This proved to werk OK via the method that they show for use on a turret lathe and such, but was a bit more daffycult in an automatic app, but I got there. However the small holder just couldn't handle the extr grief that it placed on it for long and died a cpl times I think. ??? I ended up making my own out of REAL bearings. The new unit is about 6-8 times as big and doesn't fuss at all. ;)

Yes on the 1* angle. (That would be 2* incl)

Sometimes I make my own broaches as needed. But I don't use drill rod and if I can grind the broach to size - I Shirley oughtta be able to spin down the shank eh? A drill blank or even a dowel pin will werk in a pinch. (Pending on material to be broached I guess...)

If you can install in your tailstock - IMO that would be ideal.


---------------------

Think Snow Eh!
Ox
 
...
You guys do know you can make the heads yourself, don't you? Not a major machining project.
...
The internal broaches can be ground yourself with an indexing head on a T&C grinder. The biggest hassle is finding metric drill rod for the blanks.
...

Doug,

I would like to hear more about your shop-made rotary broaches. Could you post a sketch of what you do? What bearings do you use?

McMaster-Carr has hardened drill blanks in metric sizes. Just search for drill blanks, the metric blanks are hidden in with the decimal sizes. Go to the bottom of the page and open the diameter drop-down, then scroll towards the bottom. They have blanks from 1 to 30mm; 0.05mm increments below 6.30mm; 0.10mm increments below 13mm.

Cal
 
My Hardinge clone seems plenty beefy enough to broach in 12L14, although 3/8" hex is the biggest I've done. Here I'm using my shop-made 9/32" hex bit in the tailstock to eat a .63" deep hole in one of 20 little banjo wrenches I made a while back:

banjowrench13s.jpg

No problem holding the stock with the regular lever collet closer.

I've made a few bits for my eBay Slater rotary broach, using my characteristically "offhand" kind of technique.

Here's one I made from the back end of a burnt end mill on my little Sanford surface grinder, using a hex collet block to hold it:

broachmaking12.jpg


broachmaking04.jpg


For what it's worth I posted the process on my HomeShopTech site:

http://www.frets.com/HomeShopTech/Tooling/BroachMaking/broachmaking.html
 
Alright Ox, we can handle your spelling but, "I ended up making my own out of REAL bearings. The new unit is about 6-8 times as big and doesn't fuss at all. ;)" with no pics, is going too far!

Bob:)
 
OK - lets werk this out....


Take that little putzy one that you have.

Hold it in your left hand with the shank end pointing to your right hand.

Are you with me?


Got it?


Now - multiply everything times a factor of 6 or 8.

Hey - Watchit! - it gets heavy! DON'T DROP IT! :eek:

Sorry bout'cher toe. I should'a warned you first. My bad.... :o


What? You don't believe me?


I think I have some 2-1/2" prox bearings in it. They were whatever I could scroung up in a chumms misc bearings box one weekend.... I made the holder to fit the bearings. Not the other way around. Eny bearing will werk.... (Unless you install backwards - then that can git bad inna hurry...)


With all that said - a bigger than needed one is not really recommended as the trq required to spin it will yield the helical form as mentioned above. As I said - in this application I was driving off the spindle to keep it in time.

------------------

Think Snow Eh!
Ox
 
Last edited:
Well look at it this way Mr. Power. THEY say that:

A) Pain is temporary

B) Chicks dig scars.

B1) Not exactly sure who's lookin at'cher hoof, so you may need to hang by the pool for this one to help much.


C) What doesn't kill yuh only goes to make yuh stronger.

C1) After a healing spell of course.


Wifeys camera was out here enyway - so I went ahead and took a cpl shots of it for you. You'll be surprised to find that it looks a lot like a rotary broaching unit. LOL! Will post pics whenever she feels like downloading them...


------------------

***My intentions are good*** :o
Ox
 
I believe that "They" were in reference to his toe injury. It will heal quickly enough. Those other things .....


Shaft is 1.5" Dew can for ref.


RotaryBroachHolder2.jpg


RotaryBroachHolder1.jpg


---------------------

Think Snow Eh!
Ox
 
If you wunna make your own - you need to keep a cpl parameters.

Tool needs to be on a 1* angle (2* incl) so to act as a shear and not push sqr on. Otherwise no point in the rotating action.

Tool tip to be on C/L. So that means that you need to take into account the distance from your backing plate to the tip, and offset your mount to compensate for it.


As you can see - I have a pretty large adapter bushing. I did this so's to be able to adapt to forty leven diff sized shanks as needed.


I don't recommend going nearly this big for general purpose use. However - I see that my drive dog is not mounted - so the last use musta been non-driven, so maybe it's not so bad as I would think?

... thinking about it - I believe that this unit has a much werse "skidding" issue doo to the size. Either had to seat the tool before applying rotation - or [better option] is to always chamfer AFTER broaching.


-----------------------

Think Snow Eh!
Ox
 
Lots of good info in the other replies. Be sure to review the Slater website.
http://www.slatertools.com/
also
http://rotary-broaches.com/?gclid=CNuntMj_0JsCFaKF7QodvG1UKw
http://www.youtube.com/watch?v=lcTJKySDDx8
http://www.youtube.com/watch?v=gUEcagEmmZo
http://www.rotarybroaching.net/
and a bunch more. google on "rotary broach" for 2,600 hits

One thing to remember is that there will be a *SLIGHT* helical twist in the hex or other shape, which may or may not be a problem. One way around this if you are using a cnc lathe is to reverse the spindle rotation every few tens to hundreds of revolutions to minimize the "twist."

Good luck and let the group know how you make out.


Back
Top