What's new
What's new

Sharpenning hlaf-round drills?

Wlodek

Aluminum
Joined
Nov 15, 2018
Half round drills are very good at producing accurate, round holes that are as good as reamed holes; I use them especially brass. What is the technique to sharpen those drills? I have a CHRISTEN LC-21 drill grinder that is great for twist drills but obviously cannot be used for half round. I have as well a DECKEL SO single lip grinder. This is producing the right geometry for engraving or milling cutters, but it does not look as or work as well as the original drill. And there isnt any good way to hold those in the Deckel collet. Chucking on the round steam leaves too much overhang especially in small drills. Please note that the tip geometry here is different than gun drill or D bit geometry (that usually does not have clearance).
In the photos: Half round drill, single lip cutter tip as produced by DECKEL, original drill tip

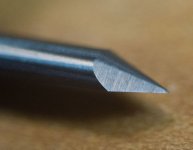
hlf-round.jpg Engraving.jpgDrill.jpg
 
I touch mine up on a pedestal grinder off hand. Matching the stock geometry of a good drill produces holes of the same quality. Much easier than a twist drill because you only have one lip and if the angle is off a wee it will still cut well.
 
I am not an expert as I have only sharpened a few. I used a 5C collet spin fixture and set a stop so the cutting edge would have clearance. The rest of the point was cylindrical instead of having cam relief but it worked at moderate feeds.
Half round or "D" bits can operate at insane feeds so my method probably would not work for getting a factory grind but special angles and shorter bits it is OK. Longer ones may leave too much unsupported and get chatter.
Maybe you could set several stops and get progressively more clearance on the relief side.
Many years ago when I worked for a guy running multi spindle screw machines the boss and I could sharpen drills and have them last as long or longer than factory new drills but those days are long gone and I cheat when I need a good regrind. Lack of practice and age change things.
 
Just "thinking out loud" here but could you make a half round piece of stock (O-1 etc.) to replace the rest of the 1/2 round tip?

Then you could hold it near the tip and change the angle in the Deckel to match the original grind?
 
Last edited:
Just "talking out loud" here but could you make a half round piece of stock (O-1 etc.) to replace the rest of the 1/2 round tip?

Then you could hold it near the tip and change the angle in the Deckel to match the original grind?

Or a broken drill.
 
I think a device designed to sharpen single flute countersinks should work for half-round drills. I do my countersinks on a Darex TR-70 tap/reamer/countersink grinder, which has cams for 1, 2, 3, 4, 5 or 6 flute tools. Weldon also made fixtures for sharpening single flute countersinks.

Larry
 
Last edited:
I am not an expert as I have only sharpened a few. I used a 5C collet spin fixture and set a stop so the cutting edge would have clearance. The rest of the point was cylindrical instead of having cam relief but it worked at moderate feeds...

That is the way Deckel, Alexander and similar grinders do half- or quarter-round engraving cutters. I use Alexander and Green grinders for that job.

Larry
 
On one of my early jobs the boss had a single lip cutter grinder, probably a Deckel. That is where I go the idea of using the spin fixture. If the Deckel does not give enough clearance you could probably step it back for more.
 
It would depend on diameter, I sharpened and made 100's of them in my Swiss cam automatic days. I roughed them out by hand on a diamond wheel then finished them under a microscope held in a V-block with a diamond stone lap. inspect on an optical compactor or tool makers scope to check centering on the point.
 
I do not understand your problem, pic.1 looks like a D bit to me. Please post a pic.of your idea of a D bit.

Looks like you damn blokes from across the pond speaking a different language again. Those are all half rounds back from my Swiss days in the states. For the record we had many Brits on the Swiss line here in the 80's where I worked that is why I can usually understand your lingo.
 
It would depend on diameter, I sharpened and made 100's of them in my Swiss cam automatic days. I roughed them out by hand on a diamond wheel then finished them under a microscope held in a V-block with a diamond stone lap. inspect on an optical compactor or tool makers scope to check centering on the point.

This can produce the right geometry, but will be very time consuming. I would like to know if there is a specialized tool or technique to easily and reasonably quickly produce the factory type point, especially on small drills. I'll try to make myself clear. In the photo on the left is the point produced by the Deckel and on the right the original point. As you see the original point is like a spiral cut while the single lip grinder is producing basically a conical point with a short cutting lip (as used often on D bits and engraving cutters). The Deckel produced tip does works, but not as well as the original. Other issue is the holding of the drill. I did on a few occasions made a matching half round piece to hold in the collect, as Terry Keeley suggested above. But preparing a matching piece for the dozens of drills is quite a project and I have only two or three broken drills - those drills are quite expensive and I would not like to break them just for a support :). V block would be the right way of support, though would have to be centred for each size. By the way, centring of the tip is essential to produce an accurate hole, which is the whole purpose of those drills. I am not able to do it accurately enough by hand, we are talking about a few micron range accuracy.
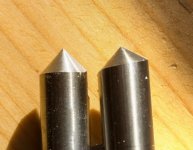
half-round-tips.jpg
 
Well I'm confused. Could someone please explain the difference between a half round and a D bit for me. Apparently neither is something I encounter much in my line of work.
 
One can sharpen a single flute cutter by slashing a grind across the cutting lip at the desired angle, (called the primary) clearance with small in-feed so not to get the tool hot. Then tip the lip up a little more up to be the clearance an forth )to being the clearance angle up to match the. Clearance varies some but very often a 10 to 12* primary clearance is good and a 15 to 20 secondary..

Yes many simply do the primary, then roll(or travel back and fort) and so don't bother with a secondary. This its just as good IMHO. To look like Wlodex"S first sharpening (post-12). You see the relief or clearance the that clearance just goes a
around

With having a loop one can look at the cutting edge where it comes to the cutting edge and come very close to check the primary clearance

Yes a redial relief or a cam follower fixture is perhaps the proper way but the slash across will work as good. Iften

*one can bring a dull but other wise new cutter up to the parked grinding wheel and with eye-ball or with a loop to look at the angle and clearance to set the grinder to the proper position.

Some times on can shappy mark the cutter and rub a parked wheel to see where the wheel will hit, then bump the fixture to make good.

OH! 10-12* and 15-20* is for steel and the like. brass, For plastic and wood a greater clearance is desired. Forst photo in post #1 looks like better that 30* clearance.
 
It would depend on diameter, I sharpened and made 100's of them in my Swiss cam automatic days. I roughed them out by hand on a diamond wheel then finished them under a microscope held in a V-block with a diamond stone lap. inspect on an optical compactor or tool makers scope to check centering on the point.

Do you attempt to make a cutting edge relief right to the center, or how does that work out? To my way of thinking, you cannot have a relieved point at the center because grinding the relief will have the effect of moving the point off center. But maybe it extrudes the material well enough that it is of no consequence? I discovered this when attempting to grind really sharp engraving points and found that a sharp point can only be a dumb cone if it is on center, no room for a relieved edge. So a point with cutting relief will create a flat bottomed channel of measurable diameter when engraving. Same goes for 'sharp chamfer tools', they don't cut at zero diameter and if you tool offset to the tip of such a tool, it will slightly overcut the depth.
 
Well I'm confused. Could someone please explain the difference between a half round and a D bit for me. Apparently neither is something I encounter much in my line of work.

I am not pretending to be an expert on this subject but yes, D bit is a cutter ground to half diameter (though there is a long going discussion if this should be exactly half or a touch over or under half), as is half round drill; so in some ways both can be called D bits. The most common application of D bits is for reaming or flat bottom hole drilling and I did make many of those in various sizes. Single lip engraving cutters are basically D bits as well, and as Michiganbuck observed there are a few ways to finish the cutting edge. I've noticed that most people making D bits just grind the diameter to half leaving the rest cylindrical (or conical) without worrying about cutting edge clearance.
So half round drills - in my opinion - differ only in the shape of the point and maybe the length of the flat that is relatively longer than classical D bits. Again, what Michiganbuck suggests is some form of cam follower fixture, and this fixture is exactly what I would like to find.
With the CHRISTEN LC-21 drill grinder I get a consistent, perfect point, on let say 1mm twist drill, in about two minutes. I would like to find a tool like this to do the half round drills.
By the way I have as well the Darex (I am not sure what model, maybe V390 or V391) drill sharpener and I am not very impressed with it. I do use it to sharpen big twist drills, but find the whole device rather crude and not very accurate.
 
Do you attempt to make a cutting edge relief right to the center, or how does that work out? To my way of thinking, you cannot have a relieved point at the center because grinding the relief will have the effect of moving the point off center. But maybe it extrudes the material well enough that it is of no consequence? I discovered this when attempting to grind really sharp engraving points and found that a sharp point can only be a dumb cone if it is on center, no room for a relieved edge. So a point with cutting relief will create a flat bottomed channel of measurable diameter when engraving. Same goes for 'sharp chamfer tools', they don't cut at zero diameter and if you tool offset to the tip of such a tool, it will slightly overcut the depth.

I am not sure If I am addressing the same issue, but a single lip grinding fixture like the Deckel will produce a relieved cutting edge and keep the centre intact. Of course, as with any zero size point, the very centre cannot cut, but the the tip will be on the centre axis of the tool.
I can attempt to show it in the attached model of a single lip cutter, as produced in engraving or milling cutters. The tip is at the centre and we do have progressively wider (zero at the tip) cutting edge. The degree of relief is easier to see in the section on the right. In Deckel and similar the width and consequently the angle of the cutting lip is determined by the the vertical tilt of the tool holding spindle.
This type of point is great for engraving and milling, but does not work as well for drilling as the "spiral" tip.

Single-lip.jpg
 
Hybco and Harig Step Tool fixtures have cams that advance the tool as it rotates to create relief. Is that what you want? The Hybco can change the cam angle for more or less relief.
I have both and I see them on E-Bay regularly.
 
Hybco and Harig Step Tool fixtures have cams that advance the tool as it rotates to create relief. Is that what you want? The Hybco can change the cam angle for more or less relief.
I have both and I see them on E-Bay regularly.

Thank you. I am not familiar with those fixtures but will check, those seems to be universal tool grinder accessories. Still, I am sure there must exist a small, dedicated grinder for this type of drills including some convenient way of chucking them.
 
No,we speak English,you(US) bastardise it. Is that 15-0 to me?
You, being cam Swiss,did understand my question so perhaps you can answer it. Is pic.1 a D bit?
In the meantime just keep pointing the bars and check your guide bush.

I think pic one is a half round also. I think it is the way it is sitting and shadows make it look the way it does.
 
Do you attempt to make a cutting edge relief right to the center, or how does that work out? To my way of thinking, you cannot have a relieved point at the center because grinding the relief will have the effect of moving the point off center. But maybe it extrudes the material well enough that it is of no consequence? I discovered this when attempting to grind really sharp engraving points and found that a sharp point can only be a dumb cone if it is on center, no room for a relieved edge. So a point with cutting relief will create a flat bottomed channel of measurable diameter when engraving. Same goes for 'sharp chamfer tools', they don't cut at zero diameter and if you tool offset to the tip of such a tool, it will slightly overcut the depth.

I made them like pic 3. The clearance is similar to a uniflute countersink except steeper. We did not use a machine we made them by hand. Roughed out on an old school Agathon then finished on a V-block with a diamond stone under a scope. If you were good at it with a steady hand and keen vision you could make them pretty fast.


Back
Top