What's new
What's new

Techniques used for making brass nameplates on machinery?

Joined
Feb 10, 2020
Location
Dunedin, New Zealand
I've been wanting to know what techniques are used to create the brass nameplates you see on some older machinery (I think most newer stuff is aluminium). From what I've been able to find, there are 2 methods for generating the text/imagery, engraving and etching, and it seems to me that most nameplates are done with etching, but I'm not sure. In addition, some of the plates seem to be inkfilled with place in the background, and the colouring seems pretty resistant to stuff like paint-stripper, so I was wondering what method was used to get that colouring, since it doesn't seem to be paint. I'll try to summarise the questions below
GEM_V38_I4_Apr_2003_11-1.jpg

My main questions are as follows:
- What process is used to form the lettering and decorations on nameplates like this
- What process is used to create the black ink-fill appearance
 
I was wondering what method was used to get that colouring, since it doesn't seem to be paint. I'll try to summarise the questions below

View attachment 278320

My main questions are as follows:
- What process is used to form the lettering and decorations on nameplates like this
- What process is used to create the black ink-fill appearance

Are you sure that photo site looks like they etched out the black areas than filled them back with a good black paint/enamel, then sanded and polished accordingly. Keep in mind there etching process leaves a rougher surface which the paint probably sticks to much better.
 
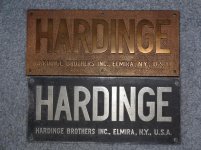
Most brass nameplates for a hundred years or so before 1940 or so were sand cast. Hardinge also used some etched brass and aluminum and molded plastic plates. Hardinge switched to cast aluminum during WWII (see photo). Remember the steel pennies in 1943? Then silk-screened aluminum became the standard plate at Hardinge.

Nameplates, brass and aluminum.jpg

Somewhere in the early 20th century photo etched brass and aluminum became fairly common, but not so much at Hardinge. After the etching stage, the bare etched brass could be painted to fill in the low spots. Then the resist and the paint that covered the resist was removed, leaving bare brass high spots.

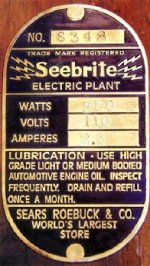
There are some people in business making reproduction photo etched brass or aluminum plates for old machine tools that could make a plate like that Sears example.

Larry
 
Are you sure that photo site looks like they etched out the black areas than filled them back with a good black paint/enamel, then sanded and polished accordingly. Keep in mind there etching process leaves a rougher surface which the paint probably sticks to much better.

I just threw up the first image I found, but I think that one was restored. This is an older one: Vintage-Brass-Machine-Data-Name-plate-ELECTRIC-ARC.jpg
It just seemed they kept the black colour better than paint would allow, but I'm not terribly experienced with this stuff.

John sonders did a youtube video on it a couple years ago ,,, I think him youtube name is "NY cnc"

Thanks, I'll take a look

Most brass nameplates for a hundred years or so before 1940 or so were sand cast. Hardinge also used some etched brass and aluminum and molded plastic plates. Hardinge switched to cast aluminum during WWII (see photo). Remember the steel pennies in 1943? Then silk-screened aluminum became the standard plate at Hardinge.

View attachment 278321

Somewhere in the early 20th century photo etched brass and aluminum became fairly common, but not so much at Hardinge. After the etching stage, the bare etched brass could be painted to fill in the low spots. Then the resist and the paint that covered the resist was removed, leaving bare brass high spots.

There are some people in business making reproduction photo etched brass or aluminum plates for old machine tools that could make a plate like that Sears example.

Larry

Right, I figured they were etched, although it seems it might be a tad cumbersome for large runs, I don't think they'd need to make that many at once. Thanks for the information. I'll probably just do it on my shitty hobby engraver if I want something that appears similar, not really willing to deal with disposing of chemicals
 
Last edited:
I think a lot I see are electro-chemical etched.

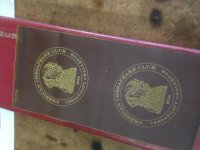
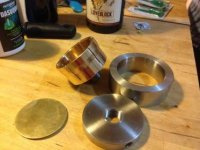
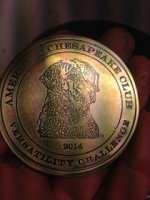
I set up for the process some years back for a run of dog trophies:

36374A40-0BC2-4FD5-9EDB-D721EEE2C924.jpg 83389C53-1D0C-4668-9487-35CE9BE53C66.jpg

B4EA1F19-86C4-4284-A8B9-6B5CC26BF5C5.jpg D93A7EFE-A8E3-4737-8DF3-C85C4015777D.jpg

These days it’s done with a photo etched mask- I don’t know about back when..
The process can be done with completely benign material for solutions.
A bit of table salt etc

I purchased a professional level power source but it can be done with any number of cobbled together things- look at the knife making forums- lots of kitchen table top work being done with good result.

The mask is the trick- it can be developed at home from printer output or just ordered from a shop based on your graphic for a couple of bucks.
 
You can use a flatbed scanner to scan an original data plate, then use a program like Inkscape or Corel Draw to layout new black line art over the image to get a nice perfect artwork before printing on an inkjet printer on transparency film to get full scale artwork. The artwork is used to expose some photosensitive film applied to your new name plate blank which then gets developed to form the etching mask and is etched in many types of etchant chemicals which may or may not need an electric assist depending on the metal. After etch the mask is stripped with solvent and the plate gets a coat of paint and then sanded with fine sandpaper to remove the paint off the high spots.

278342d1581418752-techniques-used-making-brass-nameplates-machinery-parks-1280.jpg


278343d1581418752-techniques-used-making-brass-nameplates-machinery-ih_badge_brass_1.jpg


278344d1581418752-techniques-used-making-brass-nameplates-machinery-vonpittler.jpg
 

Attachments

  • Parks 1280.jpg
    Parks 1280.jpg
    95.7 KB · Views: 637
  • IH_badge_brass_1.jpg
    IH_badge_brass_1.jpg
    80.8 KB · Views: 617
  • VonPittler.jpg
    VonPittler.jpg
    93.7 KB · Views: 631
I think a lot I see are electro-chemical etched.

I set up for the process some years back for a run of dog trophies:

View attachment 278335 View attachment 278336

View attachment 278337 View attachment 278338

These days it’s done with a photo etched mask- I don’t know about back when..
The process can be done with completely benign material for solutions.
A bit of table salt etc

I purchased a professional level power source but it can be done with any number of cobbled together things- look at the knife making forums- lots of kitchen table top work being done with good result.

The mask is the trick- it can be developed at home from printer output or just ordered from a shop based on your graphic for a couple of bucks.

Right. Thanks for the tip. I'll look into it

You can use a flatbed scanner to scan an original data plate, then use a program like Inkscape or Corel Draw to layout new black line art over the image to get a nice perfect artwork before printing on an inkjet printer on transparency film to get full scale artwork. The artwork is used to expose some photosensitive film applied to your new name plate blank which then gets developed to form the etching mask and is etched in many types of etchant chemicals which may or may not need an electric assist depending on the metal. After etch the mask is stripped with solvent and the plate gets a coat of paint and then sanded with fine sandpaper to remove the paint off the high spots.

278342d1581418752-techniques-used-making-brass-nameplates-machinery-parks-1280.jpg


278343d1581418752-techniques-used-making-brass-nameplates-machinery-ih_badge_brass_1.jpg


278344d1581418752-techniques-used-making-brass-nameplates-machinery-vonpittler.jpg

Yeah, I had been thinking of getting a laser printer (apparently they're better at transparencies) for adding soldermask to machined PCB's. Do you know if inkjet transparencies are comparable? If so, I wouldn't need to pick up a new printer. From the replies it seems like it is just paintfilled, which answers my main question. Thanks for the replies :)
 
Right, I've looked into stuff for photo-etching brass, and I'm having a real tough time finding any photoresist within the country (I'm in New Zealand). I might give it a go on my mini-CNC, even though it's not great at machining metals, but I should be able to get it to do brass, albeit it very slowly. I haven't seen much on machined nameplates, but hopefully I can get a decent result if I end up going that route.
 
Are there any electronic hobbyists there? You can etch brass with the same technique and materials as etching copper. If you can't find photo resist plain old lacquer can be silkscreened onto cleaned brass. After etching it is possible to use a couple applications of Birchwood Casey Brass Black to blacken the freshly etched areas immediately after etching but before removing the resist with lacquer thinner. Usually a very light clear coat is then sprayed to add durability.

I've etched both copper and brass with either ferric chloride or ammonium persulfate. I prefer the latter as the ferric chloride will stain many things if you aren't careful.

In the past I've even hand painted simple circuit patterns on copper clad circuit board material using black touch up lacquer meant for cars. Etching works better at around 100° F or so and adding bubbles (with an aquarium pump and foam bubble wand) speeds up the etching but in a pinch you can just briefly expose it to air before returning to the etch bath.
 
I'm speculating a bit but I'm thinking like Scott. Here's a link to Brass Black:
3oz Brass Oxidizing Solution

After etching just dip in that for a while and turn the open areas black. I'd bet that's what they did originally, think about the simplicity of that process compared with painting and screeding and whatever.
 
Are there any electronic hobbyists there? You can etch brass with the same technique and materials as etching copper. If you can't find photo resist plain old lacquer can be silkscreened onto cleaned brass. After etching it is possible to use a couple applications of Birchwood Casey Brass Black to blacken the freshly etched areas immediately after etching but before removing the resist with lacquer thinner. Usually a very light clear coat is then sprayed to add durability.

I've etched both copper and brass with either ferric chloride or ammonium persulfate. I prefer the latter as the ferric chloride will stain many things if you aren't careful.

In the past I've even hand painted simple circuit patterns on copper clad circuit board material using black touch up lacquer meant for cars. Etching works better at around 100° F or so and adding bubbles (with an aquarium pump and foam bubble wand) speeds up the etching but in a pinch you can just briefly expose it to air before returning to the etch bath.

Yeah, I've ordered some photoresist from Britain in the meantime, and have emailed a local printing company to ask them about it.

I'm speculating a bit but I'm thinking like Scott. Here's a link to Brass Black:
3oz Brass Oxidizing Solution

After etching just dip in that for a while and turn the open areas black. I'd bet that's what they did originally, think about the simplicity of that process compared with painting and screeding and whatever.

The screening would be required regardless, since that's what removes the material, but I had thought some of them might use a brass blackening solution. Thanks for the link, although shipping from the US to here is stupidly expensive
 
BTW If you need a good etching company www.ppdltd.com over in Scotland has an excellent flat rate service available and doesn't mind small orders.

The only minor complaint is the Great Britain to USA mail route is manned by the most incompetent group of hacks the world has ever seen! They really should outsource that whole stinking mail route to the Chinese as I have had countless packages get stuck in Heathrow or JFK for weeks. So name sue it is a low priority job or play them to ship or with someone competent.

No idea how the Chinese ship something from Schenzen to my house off ebay for $2 and 2 days only to see Scotland to the US take 3-4 weeks
 
This is the company I have used in the past to make the silk screen masks:

Stencils for Electro-Chemical Etching | T.U.S. Technologies, Inc.

Worth a read through their site even if you don’t use their products or this technique as it informs on the etching process.

Thanks, I'll take a look

BTW If you need a good etching company www.ppdltd.com over in Scotland has an excellent flat rate service available and doesn't mind small orders.

The only minor complaint is the Great Britain to USA mail route is manned by the most incompetent group of hacks the world has ever seen! They really should outsource that whole stinking mail route to the Chinese as I have had countless packages get stuck in Heathrow or JFK for weeks. So name sue it is a low priority job or play them to ship or with someone competent.

No idea how the Chinese ship something from Schenzen to my house off ebay for $2 and 2 days only to see Scotland to the US take 3-4 weeks

Right, I'll keep it in mind, although it's a fair distance from NZ to Britain. As for how the Chinese keep shipping costs so low, it's because the government subsidises
the shipping in order to grow the economy, and they have so much stuff being exported they can just dump consumer stuff alongside big shipments.
 
Right. Thanks for the tip. I'll look into it


Yeah, I had been thinking of getting a laser printer (apparently they're better at transparencies) for adding soldermask to machined PCB's. Do you know if inkjet transparencies are comparable? If so, I wouldn't need to pick up a new printer. From the replies it seems like it is just paintfilled, which answers my main question. Thanks for the replies :)

The two problems I have with any laser printer is that the film distorts when run though the hot fuser rollers so dimensions can change/distort and I have yet to see a solid black from a laser that can equal an inkjet printer with the black density turned up high. Also as there is no film distortion, you can stack two inkjet prints and they will register/line up accurately.
 
Right, I've looked into stuff for photo-etching brass, and I'm having a real tough time finding any photoresist within the country (I'm in New Zealand). I might give it a go on my mini-CNC, even though it's not great at machining metals, but I should be able to get it to do brass, albeit it very slowly. I haven't seen much on machined nameplates, but hopefully I can get a decent result if I end up going that route.


I just buy it on 10 metre rolls from Ali Express website with free shipping.

Here's an old crap video I did showing how I apply the film to metal wet and push the water out the edges to get a good defect free coating, it also shows exposing the film with the inkjet film art with a home made light box that uses a 400 W metal halide street light and a microwave oven timer to beep when exposed. It then gets the cover protective film peeled and get developed in a weak washing soda solution while a paint brush removed the unexposed film. I use cuprous chloride as the etchant and it will give a good deep etch on aluminium in 1-2 minutes.


That's basically what I did, I've ordered a 30m roll from China since I can't get it locally. Thanks for the video though, I'll check it out


Back
Top