What's new
What's new

Template following on a manual lathe

Clive603

Titanium
Joined
Aug 2, 2008
Location
Sussex, England
Agreed to make some 47 mm bore carburettor intake bell mouths in the the same style as the old short aluminium ones fitted to Amal RN and TT carburettors.

Turns out it's gonna be a bit of a nightmare all round but the part I really need help with is how to produce the inside radius between lip and bore. The curve is near enough 130° at 18 mm radius. A form tool will have a cutting length of almost 14 mm which, I think, is pretty much certain to chatter. Especially as the required sequence of operations means the workpiece won't be as well supported as one would ideally like when it comes to finishing the curve. I've not got anything in stock to make a suitable form cutter without ridiculous amounts of grinding.

I do have a nice 10 mm diameter 3/4 circle shaped lathe tool that will get into the bore OK and both my lathes have taper turning attachments. So I figured that a 10 mm Ø cutter will do to make a suitable curved template with appropriate straight lead ins and lead outs. The template can then be set on one of the lathe taper turner guide rails and the groove followed with a freely rotating 10 mm pin supported in the hole provided to bolt the lathe cross slide to the taper turning attachment shoe. Obviously I'll need to make the slot touch over width so the pin can rotate. Using a fixed follower pin in pure sliding contact is, I think, going to be very high friction and near certain to jam.

I've never done anything like this before so the question is which lathe to use and how to go about the job.

The Pratt & Whiney has a dual cross slide arrangement where the taper turning, or in this case template following, movement is completely independent of the feeds. I'd prefer to do the job on this machine but that assumes it can follow the rather tight bend and long, in angle terms, arc. Mounting the template will be harder as it has to sit in the U channel but it's do-able.

The Smart & Brown 1024 normally requires the cross slide feedscrew to be disconnected for taper turning. It has a guide bar rather than U bar so mounting the template will be much easier. Plan with this machine is to leave the cross slide feedscrew connected and manipulate the saddle feed and cross feeds so the pin follows one side of the template. But which side of the template groove is it best to follow and which way to feed. Seems to me that working out from the bore would be best as both cutting forces and following forces are woking in the same direction against the feed.

What do the experts suggest?

If all else fails I suppose I could do a crash course in learning to use the cherrying head that's sat on the back of the Bridgeport. Or even get round to learning CNC to put it on the unused "white elephant" Taig toy CNC mill sat in the "disgrace corner" of the shop that I wasted far too much "it seemed a good idea at the time" money on around 15 years ago.

Clive
 
Karl

This style can't be spun. Basic wall thickness is almost 3 mm and it tapers out to 1.2 mm at the edge. Has to be machined.

As usual, a couple of hours after posting the query I realised there is machining sequence that will leave it strong enough and held well enough to stand using a form tool on the inner lip. Not only that, whilst looking for something else I tripped over a couple of pieces of suitable size tool steel hiding in a completely inappropriate place. So come Monday I shall try my hand at grinding an internal radius form tool.

Clive
 
At one time my son was interested in making pulse jet engines which have a similar "throat" very much like a carburetor. Not having any CNC equipment I had to come up with a way to turn them. I did try a form tool with no luck. I experienced a lot of chatter just as you described you might run into. I ended up cutting a template from 1/8" brass sheet (easy to cut and plenty strong for this application). I left a long leg on the template so I could C clamp it to the ways. I had to block it up a few inches to line up with the bottom half of the QCTP. I made a "follower" by grinding a chisel point on a piece of 1/2" key stock to ride on the template. The key stock was clamped to the QCTP just below the tool holder. I then took the cross slide nut out and attached a spring (I think it was a screen door spring) to the clamp that was being used to hold the key stock to the QCTP. The spring was attached to the wall behind the lathe. I used the long feed to move the saddle with the follower pulled up to the template by the spring. I know it sounds kind of flaky but it worked quite well.
 
Love that spring idea. If I did that with the P&W underslide it would essentially take all the slide moving loads off the follower pin so it ought to be able to run round the tight curve OK.

There's a bunch of ex trampoline springs in the "got to be useful someday" stash. One of those should be up to the job. That will be 6 down with 4 to go.

Clive
 
I have had to do this a few time. What I did was make a flat template and using the drill chuck in the tailstock like a vices that will hold the template steady. Then indicate the edge of the template parallel to the spindle axis of the lathe. Set the compound 90 degrees to the cross slide. Now mount an indicator to the compound so that it will touch and 0 on the temples. By using the cross slide and the tailstock you can manipulate the tool and the indicator to the start point. Then you can make cuts at a fairly low spindle speed with a fine feed. If I was making a Venturi I would set it up so that you are boring on the back side of the Venturi that way you can make a series of step cuts and when the indicator touches the template and zeros that will be your stop. You would only have to keep an eye on the indicator to stay on zero for the last few cuts. I have used this and held dimensions to a thousands of an inch.
 
"stepping" does a remarkable job. A non "female" radii could employ a short version of a "form" tool - the aim being to avoid chatter by small increments - or non broad cutting tool engagement

DCP_1386.jpg
 
I don't think I have the co-ordination to follow a template with the aid of an indicator as SIP6A suggests. Very envious of those who can manage such but one eventually learns to live with personal limitations.

Having, hopefully, figured out a machining sequence that leaves sufficient metal in place when doing the inlet taper for the job to be held securely enough to take a brief finishing cut with a form tool Plan A is now to use stepping as johnodor suggests to rough out the shape the finish off with a quick kiss from the form tool.

If that fails Plan B is the spring-loaded template follower approach.

We shall see.

Thanks for everyones help.

Clive

You can cut your stress, "buy time" to go slow, thereby raising the margin for error if the roughing cutter isn't single-point.

Powered wheel, rather.

You've seen keys made, yah?
 
I don't think I have the co-ordination to follow a template with the aid of an indicator as SIP6A suggests. Very envious of those who can manage such but one eventually learns to live with personal limitations.

Having, hopefully, figured out a machining sequence that leaves sufficient metal in place when doing the inlet taper for the job to be held securely enough to take a brief finishing cut with a form tool Plan A is now to use stepping as johnodor suggests to rough out the shape the finish off with a quick kiss from the form tool.

If that fails Plan B is the spring-loaded template follower approach.

We shall see.

Thanks for everyones help.

Clive
With a modest feed rate it is easy to follow a template with a dial indicator. I have done semi production of pipe tapers and it is fairly easy. By the time you have them roughed in, you will be a master of it so finishing them will be no problem. If SIP6A had not suggested already I would have.
I ran some venturi for Brazwell 2 barrel carbs that flowed like 4 barrels way back when. The foreman set the job up and I pushed the buttons on a tracer lathe. For limited production a template and an indicator should be fine.
 
I like both the "hand-eye servo" technique and the mechanical template follower technique. The latter was used a lot in the pre-CNC days, well back into the 19th Century.
 
This topic is an excellent example of something that I could easily learn if someone showed me how to do it. But to describe it in written form then give it to me to learn? Very difficult.
 
This topic is an excellent example of something that I could easily learn if someone showed me how to do it. But to describe it in written form then give it to me to learn? Very difficult.

I was thinking of that as I wrote my post. If we were together and I was showing you how to do it after a few minutes you would have that light bulb moment. I'm not the most talented writer around and sometimes thing are just hard to put into words. To bad we live so far apart, if you were closer I would invite you over for an afternoon in the shop.
 
It's really more a comment on my ability to learn...! I'm very good at learning by seeing something done but not so good at reading it (or hearing it).
 
It's really more a comment on my ability to learn...! I'm very good at learning by seeing something done but not so good at reading it (or hearing it).

No fear.

More folks are biased that way than to extrapolating rapidly and easily from printed or similar media than not.

It happens to be "a good thing", VERY.

Taking the long view of humanity's journey, not really a handicap at all. Quite the "edge" where books aren't, as was the historical case, and still often IS..

"Both" is nice of course.

Part of why humans specialize. Then "team" when they can gain by that. "Usually" IOW.

See "PM" as an example? I surely do!

:D
 
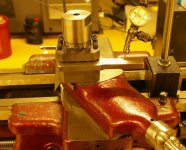
The baby bullet 8 youtube shows one way to skin the cat. I did a mock up for posting here a few years ago. The indicator is on the wrong side of the pipe taper template for doing ID threads, but I think you might get the idea. If I had been doing a lot of these pipe threads, I would have made a more permanent place for the template to be mounted on the cross slide as in the second photo. I would have milled a slot, then drilled and tapped a clamp hole in the cross slide for the template. To make it adjustable in "Z" as in the video, mounting the indicator on the tailstock would have been the answer.

The fellow that gave me the idea threaded pipe tool joints with an indicator set up. I never saw him do it just the set up on the lathe. NOW THAT would have been hairy threading up to the shoulder (4 threads per inch) while watching the indicator.


taperthread1RS.jpgtaper thread2RS.jpg
 
For those who prefer show to tell, Tom Lipton's YouTube "Baby Bullet 8" around the 20:00 mark shows the technique well.

Searching Baby Bullet on YouTube led to a bunch of baby food. Here's a link to the video: YouTube

I started it a little bit earlier, where he explains what he's doing. The actual machining starts around the 20-minute mark, as Dumpster_diving said.
 
Rather then a spring I would screw a pulley to the wall and use some strong string with a heavy weight. That is easy to adjust the weight if it is a can or bag full of metal junk for weight. Gravel or rock is okay but do not use sand. If any sand leaks out it may get into precision surfaces.
Bill D
 
there is one other way, if it doesn't need to be very repeatable or precise, the Etch-A-Sketch method. It's when you manually control both Z and X-Y, and it works for quick and dirty. one guy know I saw make an almost perfect circle on an etch a sketch, and I'll bet he could hold 3 thou that way!


Back
Top