What's new
What's new

Turning Between Centers

kalister1

Plastic
Joined
Jun 16, 2018
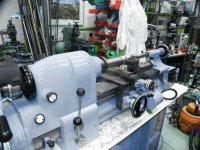
I made a test bar to check alignment of the tailstock on the new to me 9" Logan Lathe. I have to really tighten the tailstock against the shaft to get a decent finish on the round stock close to the tailstock. The piece near the chuck looks good with very little pressure on the shaft. I have a live center in the tailstock.
How much pressure should I need to get a good finish? If I am using too much pressure, where do I look for the problem?

Do I need to say i am new to this?

Thanks
 

Attachments

  • DSCF0620.jpg
    DSCF0620.jpg
    91.1 KB · Views: 2,243
If that started out as a solid bar then you beavered the shit out of it. On a test bar like that you only need to remove a small amount of metal between your collars. You do this so you don't have to remove a lot more metal when you take a test cut after offsetting the tailstock or something like that. Just cut the bar down .200 or .300 or something like that between collars and you will have plenty of material to remove a few thousandths when you want to check your centers. It might be so thin now that you are getting some chatter.
 
In the picture, I do not see a center in the chuck and I do not see a dog. Yet the title says turning between centers. So where did the test bar come from? Was it purchased or was it made on the lathe in the picture? If made, then how?

From your comment, I have to wonder if you have a low quality live center in the tailstock.

Larry
 
Small diameter of bar is too small, more than 8x diameter chatter will be an issue, I don't care how big or small the part is. If you are trying to drive with pressure between centers instead of a dog, that can also cause chatter.
 
First off, you are not turning between centers. You are turning in a chuck with a center at the tail end.

Second, if you are turning a "two collar test" to check the lathe "level" the the bar should be in the chuck and unsupported at the tail end. The bar need only be 6" to 8" extended.

If you are checking the tail stock for centering or set over then you need to be turning between centers. I.E.-a drive plate mounted to the spindle, a dead center in the head stock, a drive dog on the work piece and a live center or dead center, with lubricant, in the tail stock.

As for why the finish quality is degraded see the previous two postings.

Vlad
 
I started with a 3/4" bar and made the 2 doughnuts out out of 2.5" AL round stock and used red loctite to hold them in place.
So does being in the chuck and a live center on the other end cause a problem?
From what i am reading here I should have used a larger diameter shaft. I am working out of scrap that I can get my hands on.

Thanks all!
 
Why are you even doing this? Yes, it may be a useful test on a new or freshly rebuilt lathe, but that isn't what you have. The test allows you to set the tailstock in exactly one position. A different extension, a different position on the ways, and it will cut a different diameter at the tailstock end. Its a used lathe, get used to adjusting the tailstock as necessary depending on the tolerance level of the part.

And to turn between centers there is no need to remove the chuck and use a drive plate. Merely put a piece of stock in the chuck and cut a 60° center on it. Use a chuck jaw to drive the dog. Save said center and retrue next time.
 
I started with a 3/4" bar and made the 2 doughnuts out out of 2.5" AL round stock and used red loctite to hold them in place.
So does being in the chuck and a live center on the other end cause a problem?
From what i am reading here I should have used a larger diameter shaft. I am working out of scrap that I can get my hands on.

Thanks all!

Yup, it does.

You need to start with your bar on centers on both ends (maybe a collet would be almost as good, but dogs and dead centers are cheap)

Do it that way and see how it shakes out...
 
Thanks again for the help!

I will make a center to put in the chuck, turn the 2 doughnuts down smaller.
 
Ignoring the chuck issue, that bar would chatter no matter what unless you used a follower rest. A test bar needs to be fairly stout. I cut both ends near the headstock by flipping it and measuring the collars. After that, it's only used for measurement. A live center gets snugged up reasonably tight. Not so much as to wreck the bearings, but don't just touch it lightly. Think kinematics. If you hold the bar in a chuck, the far end is going to try and wobble. You're trying to prevent that by using a center, but something has to give. Get a center, dog and faceplate for the headstock!
 
To summarise, the test bar is likely to cause chatter at the tailstock end because the 3/4" steel bar core isn't stiff enough to transmit the torque needed to turn the 2 1/2" Aluminium ring without oscillating. Holding one end in the chuck and the other in a centre is not ideal for this use, but can be worked around if the centre hole at the tailstock end was drilled with the work in che chuck and the work hasn't been removed since then.

If either of those don't apply, then turn the bar around, drill a centre hole in the 'chuck end', get a live (soft) centre, fit it to the mandrel, turn the end to 60° (ensures that it is centred) and drive the work with a dog.


The 'rollie's dad' two collar method is used withour tailstock support to verify that the headstock is aligned with the bed, both horizontally and vertically (or that the bed is free from twist). Turning a bar between centres can give a clue to wear in the bed. Here's an example of turning a bar between centres to verify that I'd got the bed straight and the tailstock aligned (I Checked headstock alignment separately):-

work-in-progress.jpg
 
People have told me I was out of my mind, or just doing it wrong, but after careful measurements I concluded that my Logan 211 headstock had the bearing bores out of alignment by about 0.002" or so. Seems like nothing, but it's a huge freaking error when turning because the bearings aren't that far apart. Fixing the root problem is difficult, and I can actually detect it when installing the spindle, but I shimmed the headstock against the ways and it now cuts near perfect taper free parts. Just because things have no adjustment doesn't mean they're perfect.

BTW, a virtual rattle can of grey fixed that Hardinge right up-
 

Attachments

  • work-in-progress2.jpg
    work-in-progress2.jpg
    81.4 KB · Views: 357


Back
Top