What's new
What's new

Determine Taper in Degrees: Reamers for Acoustic Guitar Bridge Pins

GrievousAngel

Plastic
Joined
Jun 2, 2021
I have several reamers suited for small holes (~3/16") as used on typical bridge pins in acoustic guitars. In using one that I thought was 5 deg taper, but it over sized my bridge pin hole! I've measured taper angle(s) using a cheap digital angle measurement device with opposite reamer side on a granite (Grade B) layout block, but they all fell around angle I thought they were. I understand machining tolerances effects on real-world parts, i.e, could be disappointing at best.

The formula I kinda remember is: tan (alpha) = (D.large - D.small) / 2L or something like that. Of course I could Google it to be certain.

My question is: If you had a tapered reamer in-hand, how would you determine taper in degrees (labeled or not)?

BTW: Typical tapers for acoustic guitar bridge pins are either 3 or 5 degrees. Bridge pins should only be tight enough so if you slightly pushed pin into pin hole and then turned guitar over, the pin should not fall out. The pin is the critical acoustic interfacing element for transferring string vibration into guitar body. Many debate if pin should slotted (grooved) for string placement or left unslotted. Slotted seems to be more popular. Anyways ...

Thanks
 
I'd just measure at two points and draw it up in CAD to get the angle, but that's because I don't math so good...
 
"My question is: If you had a tapered reamer in-hand, how would you determine taper in degrees (labeled or not)?"

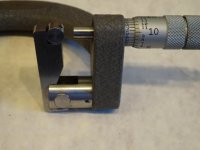
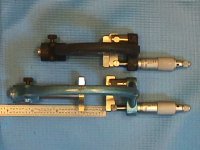
I would use one of my Taper-Mikes. They are micrometers with a sliding adjustable 1" wide anvil and a 1" sine bar with a mike head. The mike reading can be converted to degrees or inches per inch or other measurements of taper.

Larry

Taper Mike 1 1.jpg Taper Mike 1 2.jpg taper mikes closed.JPG
 
QT: angle measurement device with opposite reamer side on a granite plate is a tough way to check reamer angles or size.

Around 3/16” Dia and having only two tapers 3* and 5* should be easy enough
Example:
Large Diameter .750
Small Diameter .500
Length of Taper 2.000

1. .750 - .500 = .250

2. .250 x 28 = 7

3. 7 divided by 2.00 = 3.5 degrees

So for your size and taper
.187 to .160 in a .250 length = 3*
.187 to .148 in a .250 length = 5*
.012 difference should be easy to see by eyeball.
REF: .187 - .160 =.027 x 28=.756 /.250 =3*
*You might figure for a 1/2" length of taper to make gauging easier.
* You might just use your drills and make a gauge plate.
* You might drill 3/16 and 11/64 holes and use that for a taper check gauge as 3* and 5* would have a different taper length.
To measure, find the distance and to find the desired intersect place a number drill gauge card might be used.
https://www.walmart.com/ip/General-...=sem&msclkid=30f33c768b1818f282a75ccfa2e83929

OT: to grind a taper end mill or reamer I like to circle grind the taper to a small land and then bring the back-off up to sharp or a hair land.
 
Last edited:
I have to imagine that a reamer for a guitar pin would be somewhat short. Perhaps only an inch or an inch and a half long. This short length will be a contributor to errors in measuring the angle of the reamer. If you want an accurate measurement, great care should be taken. For instance, if you simply mark two points on the reamer that are one inch apart and measure at those two points, even a small error in placing those two points or in placing the micrometer or caliper at those two points will change the reading.

The angle of the measuring instrument will also have an effect on the reading, as will the angle of the reamer where you must read the maximum values as the reamer is rotated.

There are many places where errors can creep in. In general it is better to take these readings over a larger distance, like 2, 3, or even 4 inches.

But it sounds to me like you need to go further than just measuring the angle of the reamers. You should carefully ream one or more holes in a scrap of metal (aluminum?) and test the pins in it. Coat a known good pin (a new one from a trusted source) with marking ink or with a magic marker and rotate it a half turn or so in the reamed hole. The ink, or the lack thereof, will tell you how well the fit is. You can then go from there.
 
Watching this one. Bridge holes in one of my guitars are too loose and I just can't give Stewmac $100 for a reamer to plug and recut.
 
It is very easy to ream an oversize hole for bridge pins. There is no stop on the reamer and it is just trial and error. There is a stop on the pin however so once you get the pin in to the stop and it is loose then you have to go to plan B. Yours are probably 5 degree unless it is a vintage instrument as 5 degree are by far the most common. If the reamer goes too deep even a few thousandth then the hole may very well be too big at that point. Plan B, C and D may include plugging the hole and starting over, shimming the pin, switch to wooden pins which hold better then plastic, buying oversize pins which are readily available etc.
 
I take a piece of wood and drill it through, and then cut it to the desired length so it bumps my chuck and the length bumps the part. Yes to slide over me drill bit or reamer.

A dowel would be better for this, but often I just use a table saw cut of wood and round the working end on my bench grinder.
Very quick to hand-make this device on a drill pressor just carefully by hand-holding.
this is also great for a screw clearance hole.

Note: s screw going through one material to screw to another with not a clearance hole does not pull tight more than just the pressure you push the drill motor.
 
I'd love to have a taper micrometer, but lacking one, I would put the reamer on a sine bar on a surface plate, and elevate one end until the taper indicated horizontal with the surface plate. The elevation, the length of the sine bar and a trivial bit of trigonometry (built into $10 calculators these days) would tell me the included angle.
 
Helical flute or straight flute?
If helical toss all this surface plate stationary in the trash can right now as your number will be wrong.
Not sure the flute number. Threes need other care.
Two and fours one can mark or blue and scribe lines as far apart as possible. Then use a regular mic to just get to that line with the corner and do the math.
Or just stick it in a optical compartor in a vee block and rotate it but if you had that you would not be asking.
Bob
 
just to rough check what one is 3* and what one is 5*
You might sharpy mark a 1/2 distance on a reamer and then measure with looking for about .054 in the 3* and about .078 in the 5*

You might micrometer a few bridge pins with a 1/2" length marked to validate my numbers as I am just figuring in my head, not with a calculator.

I find drill gauge cards very handy for rough checking sizes.

https://www.testequipmentdepot.com/...&utm_content=All%20General%20Tools%20Products

*Only a steel gauge card is good because a plastic one wears quickly
 
Last edited:
Here is an easy way to tell if it is a 3* or 5* reamer, just pinch a couple of rectangle blocks to a known angle bridge pin, then feel the reamer between the blocs to see a match or not.

Yes the blocks might be made of steel.


Back
Top