What's new
What's new

Wilton-Strands drill press modifications for Quadrill

ee_chris

Aluminum
Joined
Apr 9, 2003
Location
Derwood, MD
IMG_4074_small.jpg
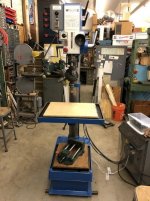
I recently finished cleaning up a Wilton-Strands 25" drill press I picked up over a decade ago. I built a converter box back then to run it, with a transformer, VFD, and filter so I could run the 480V 3-phase motor on 230V single-phase, but after that the project got put on the back burner.

IMG_4097_small.jpg
I got a Chicago Quadrill quill turret that is made for this drill. It's handy for some projects, but it costs you 2 of the 5 inches of quill travel, and the chucks are 1/2" capacity vs. the native MT3 spindle. With the original setup, it is a real PITA to take off and put back on, so I made and modified some parts and now I can do it in a couple of minutes.
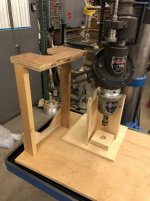
IMG_4104_small.jpg
I made a simple wood fixture and a stand to make removal and installation of the Quadrill easier.

IMG_4096_small.jpg
I modified the depth-stop screw so the knob on the bottom is removable. A pin in a cross-drilled hole is retained by a circlip in a shallow groove. Original one is on the right.

IMG_4155_small.jpg
The big part of the project was making a new collar for the depth stop screw that is easily removable. The factory part is held on to the bottom of the quill with set-screws, and it has a lip on the bottom that makes it captive above a protective cap at the bottom of the spindle. To remove it you have to pull the quill, which means removing the pinion, which requires pulling the downfeed gearbox off the side of the main housing. And you have to dismantle the spindle. Not a process you want to do, ever. The depth stop is a must-have, because this drill has a 4-speed power downfeed with an electric clutch. You can drill to depth with a button press, and the drill retracts by itself after it hits the stop.
 
IMG_4149_small.jpg
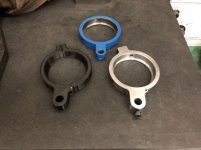
I designed a 2-piece removable collar with a hinge. This pic shows the factory 1-piece collar at the top, a 3D-printed mock-up I made for test-fitting on the left, and the finished steel collar on the right.

IMG_4151_small.jpg
This is the collar closed. On the far side from the hinge there is a dowel pin aligning the flanges and a machine screw holding them together.

IMG_4152_small.jpg
This is the collar opened up.

IMG_4141_small.jpg
The parts were profiled on my linuxcnc-retrofitted Hurco KM3 CNC knee mill. This was the first time I used a new copy of VisualMill Express, which was a big step up from the crap software I've been using, but I had a bit of a learning curve. I made a fixture plate using dowel pins and bolts coming up from below to secure the stock so I could work both sides. I faced the bottom and pocketed one side of the hinge area first, then flipped both the part and the fixture to do all the top-side profiling. Once finished, I bandsawed through tabs I'd left, cleaned up the outside profiles with my disc sander and files, and put the holes for the pin and machine screw in the flanges.

IMG_4147_small.jpg
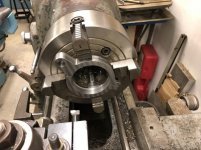
Once the flanges were aligned and secured together, I cross-drilled the hinge for a roll pin, and mounted the assembly in a 4-jaw on the lathe for center boring and final facing of both sides.

This project was a lot of work, but luckily I like making chips. Now I can have the utility of the Quadrill without losing convenient use of the much bigger native spindle.

Chris
 
I also have a Wilton-Strands 25" Heavy Duty drill press that I bought several years ago... It doesn't look anything like yours!:) Still awaiting time to refurbish it.

Wilton-Strands.jpg


Back
Top