What's new
What's new

JB Weld "High Strength"

Captain1201

Plastic
Joined
Apr 18, 2020
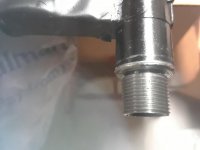
I used a pipe thread cutter to remove a 1/2" long barrel shroud from in front of the front sight post of a Saiga 7.62 x 39mm Rifle barrel, in order to thread the end of the barrel for a muzzle device. The Saiga Rifles don't come with muzzle devices, and mine didn’t have threads pre-installed, so you have to thread the end of the barrel yourself.

The muzzle device calls for a 14 x 1LH thread. When I removed the barrel shroud, the tube cutter wheel did cut into the OD of the barrel slightly deeper than the depth of the shroud itself. The groove around the OD of the barrel is probably about the width of a dime.

The barrel diameter mics out as follows:
Barrel diameter =.565”
Diameter of the Tube Cutter Groove = .489”

I assume the pressures at the end of the barrel would be significantly less by the time the gases are expelled through the piston mechanism, etc. I also assume the muzzle device itself will provide quite a bit of additional strength when screwed down and completely covering the tube cutter groove. I’ll be using some Rockset to secure the muzzle device to the threads so the muzzle device doesn’t move.

But, in an effort to reinforce the barrel at the groove, I decided to fill the groove with an steel epoxy filler. I used JB Weld, "High Strength," which provides 5000 psi when cured, to fill the groove created by the tube cutter. With regard to a tube cutter causing any deformation of the ID of the barrel, the barrel has been slugged, and there was no deformation. In addition, the arbor used as a concentricity guide in the barrel when using the 14mm x 1mm die, rotated freely inside the barrel as the threads were being cut in the OD of the barrel.

The temperature range of the JB Weld is supposed to be around 500 degrees F, but if the barrel reaches that temperature in the groove area where the JB Weld is deposited, there will be a muzzle device that will be covering over the groove, and also reinforcing the barrel strength. The muzzle break is a pretty thick and a pretty substanstial piece of steel, around 2 ounces, and it seems that the combination of the JB Weld, and the addition of a muzzle break, should also reinforce the barrel in the area of the groove. Plus the gas pressures at the last .500" of the barrel should be relatively low by the time the remaining pressure in the barrel after the rifle is fired reaches the muzzle break area, since most of the pressure has been expelled or absorbed by the piston cycling.

Once the groove has been filled-in, the muzzle break is threaded onto the end of the barrel, and tightened down. I'm using Rocksett as a thread locker to keep the muzzle break from becoming loose from the concussion associated with repeatedly firing the rifle over time.

A photo of the unfilled groove and a photo of the groove filled with JB WELD "High Strength" are attached to this thread.

I realize it isn't desireable to have a .076" grrove around the periphery of the barrel, but it is what it is. :mad5:

My question is, would I be better off not using the JB Weld, and just relying on the muzzle break to reinforce the end of the barrel, since it will be over the top of the groove. Or, does the addition of JB WELD help the integrity of the barrel where the groove exists by supporting the additional strength of the muzzle break.
 

Attachments

  • groove1.jpg
    groove1.jpg
    94.4 KB · Views: 432
  • groove2.jpg
    groove2.jpg
    78.7 KB · Views: 335
I doubt that small amount of epoxy is going to make much difference. If the muzzle brake covers the groove, I would not bother filling it.
 
Forget the pressure ,you are more likley to have accuracy problems cause by the cutter swaging the bore smaller ,maybe on one side.I suspect you may have to cut the affected part off ,or counterbore to the affected place.
 
I personally do not think JB Weld is going to have the desired strengthening effect you would like. I just dont think there is enough bonding area there to provide the results you wish

If it were mine I would find a competent laser welder in my area, and have them weld that up.
 
My JB Weld story- I was crossing the Atlantic on a 47 foot sailboat, and developed a leak in the wet exhaust manifold. It was a small crack in what is more or less a high pressure steam line, below the waterline of the boat, only about two inches from the engine block. I had JB Weld, so I made a temporary fix. I was not expecting much, as it was subject to heat, moisture, and vibration. This was regular stuff, not "high strength". But it never leaked. I kept an eye on it, but it was there for 8 years before I finally did a proper weld repair, as significant disassembly of the boat was required to get at it properly.
 
Sounds like even a more severe application of JB Weld than I had. Upon close inspection where the groove in the OD of the barrel was cut I noticed an anomaly on the ID of the bore, right where the groove on the OD had been cut and filled with JB Weld. It appeared to be more of a concentric crack in the barrel all around the ID of the bore exactly where the groove had been accidentally cut into the barrel shroud and into the OD of the barrel. The .300" pin gage still cleared the bore, but there was some scraping along that "crack" in the ID of the barrel.

So, rather than chance it, I decided to cut off the 1/2" of the end of the barrel where the groove had been cut, reface the barrel to 90 degrees, then recrown the barrel to 11 degrees, just like the original. Now, a .300" pin gage drops all the way down to the breach, slick as a whistle, totally unobstructed.

Next, I'll use a hollow mill to remove what's remaining of the barrel shroud in front of the front sight block, about .500" long, then thread it for a muzzle brake. I'll be using a guide arbor on the thread die so the threads are sure to be concentric with the bore.

I'm about .250" short of the required 16" barrel length after removing .500" off the end of the barrel. So, I plan to permanently attach the muzzle brake using silver solder so that the overall barrel length will be in compliance with the muzzle brake permanently afixed to the barrel.

I'll need to obtain an MAPP torch, and some high temperature silver solder (minimum 1100 degree) in order for the installation of the muzzle brake to be within ATF compliance. I've never had to silver solder a muzzle device before, but think I'll prefer it to a pin and weld method with respect to aesthetics.
 
AK47s typically have an 11 degree crown on their barrels, and this provides a relief around the periphery that evenly distributes the gases as the bullet leaves the barrel, which contributes to better accuracy. All rifles have some form of crown for this reason.

With respect to heating the barrel to permanently achieve a permanent attachment of the muzzle brake, on rifle barrels less than 16", permanent muzzle brake attachment is strictly required by ATF in order for overall barrel length to be in compliance with Federal Law.

Silver soldering (minimum 1100 degree) is one of the three methods dictated by ATF as one of the only acceptible methods for permanent attachment of the muzzle brake. I've checked very thoroughly into the silver solder method, and it's widely used without having any repercussions to barrel metalurgy. The ATF requirement stipulates a minimum heat level of 1100 degrees.

I agree that it's understandable that some might believe that to heat the barrel could effect the metalurgy. But, my research shows that heating the barrel to 1100 degrees has no effect on barrel metalurgy or barrel integrity. However, in order to isolate the heat from any other portions of the barrel, other than the muzzle threads and solder joint, it's a good idea to utilize a heat shield compound ahead of the thread area so that only the threads and the solder joint receive 1100 degrees, enough to properly silver solder the muzzle brake, while not possibly inadvertently affecting the metalurgy of the barrel with accidental amounts of excess heat above 1100 degrees.

The other two ATF approved methods to permanently attach a muzzle brake include either pinning/welding the muzzle brake in place, or welding the barrel at the joint where the end of the muzzle brake meets the barrel at four points along the joint equal distant apart.

If done correctly, in my own opinion, silver soldering is the most aesthetically pleasing. Pinning/welding, or welding the joint at four locations can turn out pretty ugly for those of us that are unskilled at welding, plus I don't have a tig welder, the preferable method to pin/weld,, and even that often requires a lot of clean up. The muzzle brake might become somewhat discolored from silver soldering, but it's usually far nicer in appearance than the pin/weld or welding four times around the joint where the muzzle brake is joined to the barrel.

I might need to use some Axpho Blue or high temperature engine paint to achieve a uniform appearance if the muzzle brake is discolored from the silver soldering process. I've used Duplicolor DE1634 Flat Gloss Engine Paint (500 degree) in other areas on numerous other AK47 Saiga Rifles I've built, and it matches the finish on the rifle perfectly.

Fact is, at Izhmash in Russia, where these rifles were manufactured, they used a proprietray paint to finish all of the rifles coming off the line, both the civilian models, as well as fully automatic military issue AK47s for the Soviet military.
 
I'll be using JB Weld to fill the pits.
Then finish with a baked on enamel.

View attachment 290321

View attachment 290322

I had an area once on a Russian AK where the importers had changed, and the new importer had to have their name engraved on the other side of the receiver, and obliterate the name of the old importer on the other side of the receiver, in order to comply with ATF regulations, so it would clear customs into the USA. The factory in Russia had obliterated the name of the old importer using cross hatching, painted over the cross hatching, and the paint they used matched the rest of the receiver just fine. But, it was about three lines and 2" long, and I thought it looked like crap with that cross hatching visible.

That was the one and only time I ever saw anything like that out of the Russian factory, and I was very disappointed that they would still ship it with one side of the receiver factory defaced like that. It was during a time when importers changed, and I guess they had to do something about it to who knows how many rifles. We had other rifles in stock with the new importer's name, but only had one rifle with the cross hatching. It had been a few years of having the rifle in stock, and in a factory sealed carton, before we opened the yellow tinted bag that contained the rifle. The tinted bag the rifle was in obscured the issue. By that time, we couldn't return it to the distributor for exchange because too much time had already elapsed.

I ground down the cross hatching, sanded it and filled it with Bondo. I sanded it a few times, and had to work on it a few applications to get it looking perfect. I then used some Bondo auto body glazing compound on it, then after the Bondo glazing compound was fully dry and prep sanded, I painted it with Duplicolor DE1634 Engine Paint, and got it looking pretty good. It was a relatively shallow fill, and I figured the Bondo and glazing compound combo would easily hold-up and be paintable. It color matched perfectly. The area where the cross hatching was, you couldn't tell they had ever cross hatched it. That repaired area looked just like the rest of the receiver, and it seemed tough as nails.

I believe now, after learning a little more about Bondo, and especially about just how the glazing compound will adhere and remain tough in areas where they apply it to automobiles, that it would probably never see the same level of abuse that an automobile would endure as it's driving over bumps in the road, hit with shopping carts, driving over pot holes, exposed to all kinds of harsh weather conditions, slamming doors, etc...I even watched an experiment once where it was proven to me that the auto body glazing compound was actually even tougher, and had more adherence to an unprepped normally painted auto body surface than the actual Bondo itself, which surprised me. But, Bondo is designed for deeper damage, and the autobody glazing compound is designed to fill pin holes, and shallow scratches, etc...

So, in retrospect, the Bondo auto body glazing compound would have been sufficient as a filler, rather than regular Bondo, because the cross hatching was very shallow. I did still lightly sand before each application of Bondo, as well as sanding before applications of the glazing compound over paint with 220-400 grit, the same as you would prep for repainting any surface. But, I've personally seen where the auto body glazing coumpound can be put right over the top of unsanded paint, and still be very tough and durable. But, I always lightly sanded before each application of Bondo or auto body glazing compound, just to get the surface texture of the finish looking the same as the rest of the receiver. I would also advocate autobody guide coat to help with visually seeing imperfections from the application of glazing compound that are difficult to see before priming. But, sometimes just a lite spray of paint will work just as well. On small project areas like we're discussing here, investing too much, such is buying guide coat, might be a waste of money if your trying to keep costs down on such a small project.

In a demonstration I once watched of the durability of the glazing compound versus actual Bondo, each was applied side by side. Once the Bondo and the glazing compound were set, the demonstrator had more difficulty removing the glazing compound versus the Bondo with an air chisel. He had more difficulty dislodging the glazing compound than in areas where he had used only the actual Bondo. The demo is somewhere on You Tube. I have to admit, I was impressed to see that!

I kept that rifle, and have it to this day, not wanting to send my Bondo/glazing compound rework out to a customer. In my opinion, the auto body glazing compound would possibly be an alternative to JB Weld on very shallow imperfections where aesthetics are involved, and even where durability is at issue, especially using baked on enamel paint. Even though I've personally witnessed the glazing compound's toughness on unsanded painted surfaces, I still advocate lightly sanding with 220-400 grit sandpaper between applications of glazing compound, as it just seems like the better thing to do prior to primer/paint. If your surfaces are already sand blasted, then that's probably even better if using auto body glazing compound under a baked on enamel painted surface.

I would advocate auto glazing compound instead of actual Bondo on very shallow surfaces like what you described on your project gun. It's not as thick as Bondo, it's designed for exactly what your very slight surface imperfections are, and it is tough as nails. JB WELD is advertised as a metal filler too, so I imagine it would work probably just as well, but not sure. The glazing compound might have the better spreadability than JB WELD. Were I in your position, I would have to mull it over before choosing one or the other after having used both products.
 
This isn't a "real time" project, but a "gunsmith time" project.
ie, The first coat of JB Weld was applied over a week ago.
However, I have so many rusty old guns, it won't be hard to try glazing compound on the next one.
I sincerely appreciate your contributions to the thread.
This is how I learn.
 
This isn't a "real time" project, but a "gunsmith time" project.
ie, The first coat of JB Weld was applied over a week ago.
However, I have so many rusty old guns, it won't be hard to try glazing compound on the next one.
I sincerely appreciate your contributions to the thread.
This is how I learn.

its a AK , strip that MD on there pin it tack it to make ATF happy and buy some grill paint and splash it and call it done


Back
Top