What's new
What's new

Throating Reamers and proper setup

Bryan M

Plastic
Joined
Feb 1, 2011
Location
CA/AZ
I’m trying to get a better understanding of how to setup and use a throating reamer. Here’s a few basic questions I have….

1). I’ve looked at PTG, JGS, and Manson. From just looking at their catalogs, it looks like the PTG is piloted but not the others. Are there any other manufacturers offering piloted throaters?

2). I have seen these for sale with a T handle but if chambering through headstock and bore is still indicated, is this a better procedure to be done on the lathe?

3). If done on a lathe, would a floating reamer holder be suitable for this? Im picturing this setup being guided with the pilot but no lateral support like a chamber reamer would have. Would this cause uneven cutting?

4). Depth of cut and touch off. Im thinking that a magnetic base indicator would be ok to show depth of cut, just go slow and measure often, but I’m assuming you wouldn’t be able to feel any touch off unless machine was off.

Thanks for any help and guidance on this.
 
The safest way to use a throating reamer is to make a collar with a set screw to limit the cutting depth. Without a hard stop, it is too easy to go too far. Put a shoulder on the collar that just fits in the chamber and it will help you with alignment.
 
I ordered one from PTG a few years ago. Planned on boring an 06 cartridge to support the shank end and clamp a stop on the reamer body as mentioned by Gaskill. Barrel is installed and intend to use the shop made reamer extension to drive it by hand. All I need is a "get around to it" day.
Cutting off the neck and boring the cartridge for support will allow putting it on the comparator to set the proper depth.
 
Thanks GGaskill and FredC for the help and info on this, those are some great ideas. The more I read on this the more it sounds like the T handle would be the way to go. I did look further into the Manson throater and it is piloted, just not a interchangeable pilot. I’m sure the JGS as well, I can see where it probably wouldn’t make sense to not be piloted.
 
166604.jpg

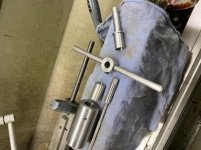
Two months ago I made a throater holder.
It is a piece of tubing that I bored out to 0.2495" with a tiny carbide boring bar.
Then I drilled and tapped the tube for a 4-40 set screw.
I held the holder with vise grips to counter the cutting torque.
I pushed the holder with the nose of the tailstock chuck.
I used the 3.1" dummy round as the go gauge.

After throating, I can now chamber a 3.1" OAL 260 Rem dummy round instead of a 2.6"

I sighted in, got a 1" (3) shot group at 200 yards.
I shot a deer a month ago with it.
 
View attachment 337016

Two months ago I made a throater holder.
It is a piece of tubing that I bored out to 0.2495" with a tiny carbide boring bar.
Then I drilled and tapped the tube for a 4-40 set screw.
I held the holder with vise grips to counter the cutting torque.
I pushed the holder with the nose of the tailstock chuck.
I used the 3.1" dummy round as the go gauge.

After throating, I can now chamber a 3.1" OAL 260 Rem dummy round instead of a 2.6"

I sighted in, got a 1" (3) shot group at 200 yards.
I shot a deer a month ago with it.

Clarkmag, thanks for sharing that picture. Looks like a great tool.
 
My .02 If you dont have a lathe at your disposal I would not consider a conventional throater and would opt instead for a unithroater.
If you do have a lathe you you will need to support the back end of the reamer or its goingto flop around and likely cut oversize. I simply support mine with a dead center in the TS but my TS is aligned with my HS spindle. If you cant get the TS lined up consider a "cap shaped fixture" that you could put over the tenon and then bore a hole that fits the body of the throating reamer to keep it line up with the existing chamber. Once you have this you can use a floating holder or a reamer pusher. As mentioned above you need a means by which you can control depth and measure progress. Throaters cut with little effort and if you arent careful you will overshoot it. If this post is as clear as mud and you want a pic of what I am describing I could take a shot and post it later

Steve, I like the idea of the rear support and think that would be a good setup. I do have a lathe, I’ve just been going back and forth on which would be the best way to do this (Uni w/ T handle vs accurate lathe setup). I would definitely be interested in seeing a picture of your setup.
 
So here are some pics with the set up
IMG_5091.jpg
IMG_5089.jpg
IMG_5093.jpg
I throat right after I chamber before moving the set up If you are lengthening an already chambered barrel you will need to get it lined up
The bushing that fits into the collar is undersize I install the collar then a bushing and bore the bushing to fit the shank of the throater. I set the reamer handle so that when the throater just starts to cut the handle is flush with the face of the bushing. Now I take a measurement with the case and bullet and determine how far I want to advance the throat. Now I face that amount off the bushing. Last step is to ream the throat until the holder is flush against the bushing. This setup allows for control of reamer depth and alignment. You might have some difficulty setting up the barrel esp. if you did not chamber it and dont know what points were used to set it up but not an insurmountable challenge
 
[QUOTE
The bushing that fits into the collar is undersize[/QUOTE]

That’s a pretty slick setup Steve. What is the purpose of the undersized bushing?
 
I assume so he can bore it once installed to insure it is concentric with the spindle, and by extension the chamber of the rifle.
 
Micrometer reamer stop, with an adapter/bushing for the smaller throating reamers.
Can't overshoot, even with the throating reamer.

Don't even think about doing it without a positive stop of some sort. All you're cutting out is the rifling- literally a few thou of thickness- you cant even "feel" it cutting.

ePgRrNwh.jpg
 
Put a Kant twist clamp on the tail stock quill and a indicator from bed of lathe to the side of the Kant twist now you have a way to indicate your movements of the tail stock
Don


Sent from my iPhone using Tapatalk Pro
 
Micrometer reamer stop, with an adapter/bushing for the smaller throating reamers.
Can't overshoot, even with the throating reamer.

Don't even think about doing it without a positive stop of some sort. All you're cutting out is the rifling- literally a few thou of thickness- you cant even "feel" it cutting.

Tobnpr, I like that setup and I do have a Mars II I can use for it. How are you supporting the rear of throater/holder?


Back
Top