What's new
What's new

Help charging counterbalance

abbeyroad1124

Plastic
Joined
Feb 8, 2021
20210225_193816.jpg

I have overhauled my counterbalance hydraulic piston by replacing the seals.

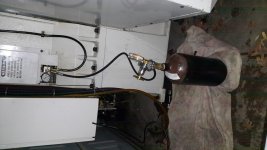
Please can anyone check in my second picture if I have routed the hydraulic hose correctly. (The second photo was taken standing at the back of the machine.) This is very important. I need this information please.

Is there is anything I need to be aware of before I start charging it??? (I.e. before I open the valve on my charging bottle and start pressurizing.)

Over the past days I have replaced the seals in the hydraulic piston, reassembled it, and filled the pressure bottle with 2 quarts of the correct oil.

The piston cylinder is properly seated in its recess and the two nuts and washer are screwed on.

I let in a tiny amount of gas and I could hear the hydraulic fluid bubbling inside. This seems correct to me.

I assume that as I let more gas in I am going to hear a thud as the piston contracts causing the nuts and washer to seat against the head.

I plan to fill it to 100 psi to start, then check for leaks, then fill some more.

The instructions say to fill to 790psi at the bottom of travel, and not to turn on power until it is full charged.


20210225_195734.jpg
 

Attachments

  • 20210225_193816.jpg
    20210225_193816.jpg
    94.4 KB · Views: 85
I regret to say that I think your black counterbalance cylinder is 180 degrees in the vertical axis from how it should be mounted, at least compared to my 1999 VF-2. The hose/cylinder inlet should be pointing to the rear of the machine, not towards the front as your pic shows.

It "might" be OK if during head movement there's no risk of the hose or fittings contacting anything on the head, but if nothing else the extra twisting of the hose isn't ideal.

I don't have a lot of other thoughts at the moment, as I only did a gas charge and not any further rebuilding on my two machines ages ago. Take it slow (as you suggest you'll do), watch for leaks, and be extra careful with letting any body parts be near the high pressure stuff during the work.

Double-check yourself before removing any fittings to be sure pressure is relieved.

Wear a good fitting face shield and glasses to protect your eyes from any flying chips or fluid if something goes wrong!
 
... is 180 degrees ...

well spotted. thanks. since it is not yet charged it was easy to remove the nuts at the end and flip it around. this was a stupid mistake on my part since there is clearly a round gap in the casting to make space for the hose.
 
pressure switch is leaking -- came back some hours later and found it dripping everywhere

i ordered a new one on the haas website

i drained out the oil to re-measure 2-quarts because i don't know how much leaked out

also thought i would replace the pressure sensor with a more accurate one while i am at it -- ordered one from grainger
 
i got the pressure switch and fancy pressure dial in the mail. the switch had a different thread so i ordered an adaptor (haas must have changed the manifold i think) which took yet more time to arrive.

put it all back together and it "seemed" to not be leaking

came back the next day and the pressure had dropped 15psi

it seems the hydraulic line has a tiny tiny leak at the crip.....

AAAAAARGGHH!!!! what a nightmare!!!!

took it all apart and now i am waiting for a new 90 inch hydraulic line from discounthydraulichose.com - i chose overnight shipping
 
i was able to turn on the machine and home the z-axis. cotter pin on the counter balance rod is installed. counter balance cylinder has 0.002" movement over full Z travel.

here was a list of my purges and recharges:

1. initial charge attempt
2. discovered pressure switch leaking
3. discovered hydraulic hose leaking
4. discovered pressure switch adaptor is leaking (the newer style haas pressure switch is not 1/4" NPT so needs an adaptor {amazon.com/gp/product/B07H6DJ213 "Fitting UNF 7/16-20 ORB-04 Female to Pipe 1/4” NPT Male Gauge Adapter"} -- i JB-Weld'ed it in there this time so it ain't never leaking again, nor ever coming out without a blow torch :D )

so i have disassembled the pressure canister shroud, and recharged it, four times now ---- each time i had to wait many days for parts to arrive!! AAAAAAAAAAAARRRRRRRRRRGGHHHHH!!

i was very careful while charging to use soapsuds to see if there was a leak, but it seems a very slow leak won't even show with soapsuds.

i am very happy with my stainless 1% pressure gauge which looks super spiffy.

let's wait a week and see if any drips of hydraulic oil start forming anywhere.


Back
Top