What's new
What's new

Runout on toolholders..(not spindle).. drawbar?..bellville washers. how to diagnose?

countryguy

Hot Rolled
Joined
Jul 29, 2014
Location
Mich, USA
Hi everyone,
98 VF4.
My kid is trying to understand how someone might diagnose runout with toolholders in the spindle. We've done the taper checks (clean and and bluing test) w/ tool holders. Bought quality tool holders. But.. we only have basic ebay and amazon cheapy pullstuds.

He has checked the spindle run out.. it's max 2 tens. everytime.
He looks up in the spindle cone and we snapped pics w/ the bore-scope. Link below to gdrive w/ pics.
spindle - Google Drive

As he keeps trying combinations of his newer quality toolholders (kennemetal, Regofix, types) with his pullstuds it changes. sometimes a thou.. sometimes up to 3 or 4 thou even. (at the actual cutter shaft and insert hole ). He determins the best side (180) and marks the polarity for each toolholder to east dog.

I just ordered some quality Maritool pull studs. But he's seen posts on drawbar and bellville washers? but I have not had any time to research either. If not this... then where does he go next?

We do not have a drawbar tester... but Didn't I see some type of device you pop in the spindle as a standard or something?

thanks folks.
GC.
 
a bit more color... I just spent 45mins out here w/ him.
He has 2 setups holding to 2 to 3 tens to the cutter shaft. (nice!)
The issue: He is noting to me that it takes him 2 hours to cycle thru a few dozen pull studs, up and out of the spindle w/ indicating, and then trying each side of the dog. Over and over to get the best result for a single setup.

Today- 2 that he's 'certified' :D that's after an entire PM out here. And he's out of studs to use as nothing else will get concentric in a toolholder he says. He thinks something's not right.

I'll post up once we get the new pullstuds in. Gang He's new, just graduated, Has no machinist mentor... so its been ya'll, youtube and Google. I'm just the electronics and electro-mechanical repairman and the Janitor Dad out here :smoking:). So thanks again for any help.
 
I've never known a pullstud to effect the runout of a toolholder, unless it's the wrong geometry for the machine. The concentricity is set by the taper contact, provided you have sufficient draw force.
 
Easy way to check if its drawbar is, put tool in and apply pressure to the tool, if it moves than its not clamping enough force. do the same on the spindle with out a tool if it moves its the spindle or the head.
 
Is it being expected that throwing an endmill in a holder and seeing 2-3 thou of runout is not normal? They make little hammers for a reason. Just tap the runout in

Sent from my SM-G955U using Tapatalk
 
A '98 vintage machine...
Have you dismantled the drawbar clean/inspect/lubricate it? I would if you haven't and also go thru the service manual tool changer adjustment procedure. Solved a host of issues on my '93 VF0.

Yes there are tools to measure the drawbar force but considering your machines age I can nearly guarantee it needs rebuilt. The washers can be purchased from any bearing/industrial supply for better price than Haas direct.

I have read of the pull stud tightening affecting distortion on the taper. Tool run out I quit thinking about and simply practiced good tool holder maintenance. I use mostly ER 20, 16 and a few 11. Your basic set screw tool holder I only have a few and never without the Weldon flat. If any size issue I edit tool path if needed, I think I have had to twice in all the parts I have made and that was for a +/- 0.001 tolerance.
 
Are you quite sure it has anything to do with the pull stud? ER collets have to be squeaky clean. I had one the other day that I had to reseat as the 0.375" endmill had about .005" runout. I turned it around in the holder and got it well under .001.

Check it with something like a maritool touch probe calibrator.
 
a bit more color... I just spent 45mins out here w/ him.
He has 2 setups holding to 2 to 3 tens to the cutter shaft. (nice!)
The issue: He is noting to me that it takes him 2 hours to cycle thru a few dozen pull studs, up and out of the spindle w/ indicating, and then trying each side of the dog. Over and over to get the best result for a single setup.

Today- 2 that he's 'certified' :D that's after an entire PM out here. And he's out of studs to use as nothing else will get concentric in a toolholder he says. He thinks something's not right.

I'll post up once we get the new pullstuds in. Gang He's new, just graduated, Has no machinist mentor... so its been ya'll, youtube and Google. I'm just the electronics and electro-mechanical repairman and the Janitor Dad out here :smoking:). So thanks again for any help.

A suggestion to follow my earlier comment. I have gone down this rabbit hole myself. It is not clear from your description, I may have missed the detail, are you measuring the inside diameter of the holder or business end of an endmill? I got the best results and repeatability using an assortment of dowel pins. As mentioned "squeaky clean" is the standard. Degreaser, ultrasonic or a toothbrush, 0000 steel wool. Dip in a container of transmission oil and wipe with clean dry rag. Yes I am a bit ocd, its my money! Be systematic, same collet with different holder, rotate pin 180, same torque on collet nut also on pull stud.

In the end you may discover something or like me, just back out of the hole and practice good maintenance and assembly - stop worrying and make chips! And I will restate, If you haven't pulled the drawbar - As Arnold said; Do it, do it now!
Unless you find the inner edges of the washers worn thin or cracked and broken there are no parts involved, just your labor. The experience gained is priceless.
Keep it up!

PS - If you haven't seen it, the Haas video on tool holding is the best I have seen to date.
 
Thanks everyone who replied! Here is the update for folks on these older machines and garage-shop startups.
Essentially, $600 for the spindle drawbar test and taper regrind. We continue to learn and this was some of the best money spent so far IMO.

- The Spindle re-grind technician just left. Local folks and super knowledgeable.
- The spindle drawbar pressure holds just 850Lbs. Pitiful!!
- New Drawbar is ready for pick up w/ HFO $425 so not too too bad there. Kid is leaving in a few mins for pick up.
- The regrind was absolutely needed. He was actually impressed on how bad it was as he see's a lot of these.
- The tech and Son now have the unit holding to 2 tens on a 10" length holder. It'll get better post drawbar and tweaking once we get this all to spec.

The kid learned a lot. Heck, I did too... So close to being ready to make some $$$ with this thing.
 
Some pics.... and an update.
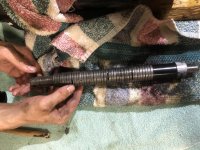
The drawbar bellville washers are broken in many places with pieces falling out all over.
We learned about the oil filled space in the spindle cavity upon removal (gush)! That was fun. -Yes it clearly notes this in the disassembly section. (and I should have read it myself rather than let a 20's something). anywho....
tomorrow is clean the drawbar sleeve, grease and insert and reassemble.
I assume they tell you how to fill the oil cavity back up? and what type of oil to use? anyone know or done this before?

Notes from readhing other posts:
There is no way we could see to remove the drawbar w/o removing the spindle cartridge. We tried to slide the motor and tranny back. (as some notes) -simply not enough room! Soooo after yet another $Grand$ for the day on this VF, time to call it a night.


IMG-4567.jpg
IMG-4566.jpg
 
all I could find on the cartridge cavity refill:
7. Fill the cavity between the housing and the spindle cartridge with Mobil Vactra 2 oil. The oil fill hole is to the left side of the spindle head near the spindle bore, as viewed from the top.

I'll check again.. I'm sure it's there someplace. Not seeing it yet. also, #2 vectra or do you use the red stuff now?

...outta here for the night.
GC
 
Wrapping this one up folks!
He's putting the skins back on the motor today. Overall, he followed the service manual steps for all the appropriate sections. areas like tool changer heights, spindle sweep, drawbar height, clamp/unclamp, shim washers, belt tension and Spindle orientation etc. In short folks- Just follow the manuals. A tip i mention often here:- Check several different service manual years. The 98, 99, 2001, and 2003 all have differences that can help supplement missing or confusing info at times. My 3 cents.

Was thinking about what we've done this past year on this VF. Reflecting I guess as he prepares to make money (so we hope)?
Wondering if I would do it again? Buy another used machine like this? I'll tell ya- For those considering a 'used' machine from the 90's I would rather not again- but a true benefit is that the kid and I learned so much together. Has been a fun Dad/Son project and he can get old machines cheap(er) now and rely on his new skills as a haas VF refurbisher. LOL.

The past 10-12 months alone we have completed:
LV power supply replace.
X thrust bearings and screw-end bearing.
Oil Restrictors on X
Full Vector drive (electronics side)rebuild
Way cover wipers replace.
Way Cover clean, align/tweak brass, and grease
TRT plate seal ring and fluid replace
Transmission filter and fluids replace
Coolant path cavity clean out (inches of crud!)
Drawbar replace
Spindle Taper regrind
AC Power upgrade from #6 AWG to #1 AWG over 80ft.
Fought w/ power Co. to replace pole transformer.
Installed Phase-a-matric power conditioner for wild leg.
Lil' skimpy tramp oil unit. (love it btw!).
Fan replacement for rear cab
Filers replace on rear door.
New Kurt DX and self made riser. (w/ a TRT-210 on for 3+2 the kid realized he had about 16" of table left. He built a traditional 3 axis/workdolding setup. He has both now. Was a good call on his end.

Yeah... Feels good to have a unit that he knows can hold tolerance and make quality parts with. But I wonder if a 2010 unit would have been a better choice? Time will tell.

Later all and happy end of October,
GC and son.


Back
Top