What's new
What's new

36" Feather-weight straight edge progress report. A few things learned.

dgfoster

Diamond
Joined
Jun 14, 2008
Location
Bellingham, WA
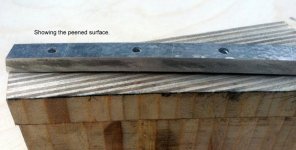
Well, my 36" light weight ductile cast iron straight edge is coming along nicely. It is scraped to 20 PPI. After casting it was stress relieved once by slow cooling in the mold (yes that is legit) and then again stress relieved at 1200 degrees for one hour followed by a 12 hour cool down to 300 degrees. This must have been effective as SE printed consistently throughout the many hand scraping cycles. I scraped off 2.5 ounces of metal in the process. The good news is that did bring her weight down to 20 pounds two ounces.

To see pics please go to post 129 of http://www.practicalmachinist.com/vb/general/how-straight-straight-edges-284745/index7.html I decided to start fresh with a new thread here for reasons that are probably apparent.

That may not sound like much metal scraped off but seemed like plenty for hand scraping. Next time I will use what i learned to do a more refined job of machining so there is not so much metal to scrape. Since my mill has only 23" of travel on its 42" bed, I made two setups to get the full of the SE. Someone pointed out I could have/should have just mounted it to my table and swung the column to reach the full 36" without making a new setup. I think that would reduce the inevitable error in setup and thus required less scraping. I will also say that after discussion with a materials science person, I used a corn cob rougher rather than a typical spiral flute end mill as the nubs of the rougher plow through the material rather than slice it. This should result in less hidden stresses in the SE following machining compared to using a spiral flute EM. The obvious trade off is the corn cob leaves a fairly corrugated surface and so more scraping is required.

Another lesson learned was the value of a filing the SE in conjunction with scraping. An experienced scraper hand, after listening to me whine off-line about the amount of material to be removed, suggested using a coarse file to very carefully file down to just about eliminate scraping marks as a cycle in scraping and then scrape down to just about eliminate the file scratches. This had to be done carefully to avoid round-over of the edge but did allow very rapid removal of metal (a thou in just one file/scrape cycle) which probably save 3 cycles of scraping for me. For me, filing at about a 20 30 degree off-longitudinal-SE-axis stroke of the file helped prevent round over. NEXT TIME after finishing with the rougher I will use the file first to get nearly get rid of the machining marks left by the EM and then start scraping. I will then not hesitate to get out the file for areas that may be very high as a quick way to lower them. I was hesitant (but fatigue can wear down your will to resist ;-) ) to follow his advice to use the file as I was afraid of raising hell with the print. But I found that this was not the case. In just a couple of cycles my print was back as good as it was before the filing process. It was being mindful of the scratch depth and scraping mark depth that kept me "on the level."

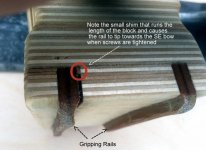
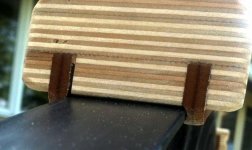
I am presently close to completing work on insulating handles that, like the SE itself, are somewhat innovative to the best of my knowledge. I will post more about that in a day or two in the spirit of sharing ideas for the general good.

My thanks to those who have offered useful advice and encouragement so far.

I am hoping this thread can avoid some of the controversial comments that plagued the old thread. So, if people have on-topic questions or helpful suggestions please feel free to offer them.

Denis
 
I am curious if you considered a single point HSS fly cutter at all. That would seem to be an easy cutting tool point...sort of along the lines of a shaped or planed surface but just made into a rotary cutter instead.
 
I wanted to add some more comment to that thread. I started writing, but went out of time. But I'll add my comments, promised!

Maybe even I'll make some weight and FEA calculations. That is an interesting topic. And because scraping is a very traditional trade, a lot of the wisdom is based on … tradition. Some get stuck in old procedures and shapes with the argument "It was done that way since ever and it works!". I'm a bit pissed by that attitude and so I lost interest in reading and posting in that thread.


Nick
 
I am curious if you considered a single point HSS fly cutter at all. That would seem to be an easy cutting tool point...sort of along the lines of a shaped or planed surface but just made into a rotary cutter instead.

Thanks, Matt. Yes, I did consider that. There were a couple of reasons I did not go that route. First, I wanted to turn the SE on its side so that I was milling the bottom surface while it was oriented vertically. That orientation was chosen to avoid the drooping of the mill table expected at the extremes of its lateral motion. Since I had no reference straight edge of more or less equal length I would not have been able to determine after the initial passes just how much actual inaccuracy there was in straightness of my newly-machined surface, at least not until I took the SE off the mill and put it on my granite plate. Had i been able to check that error, I could have just measured the error with the SE still in the mill and made additional localized truing cuts to minimize overall error and therefore eventual stock removed by scraping. Milling it on its side had the potential to avoid droop error.

Secondly, I left a lot of stock to be machined off--a quarter inch of material. Fly cutting that much off would have been slow going. The rougher just hogged off metal at a rapid rate. Speed of cut was secondary though.

For future reference I will use my new SE when milling a 36" prism to be used in conjunction with the SE.

I was surprised, on checking my mill table with my SE, to only find about 1.5 thou droop across its length. I expected more. That means that running it with the sole up and the bow down could be viable especially with final local truing cuts. And the fly cutter might be optimal for those final cuts.

(Edit added later: The ideal machine to single point the SE would have been a planer in good condition. Unfortunately, I do not have access to such a machine. Sure would have been nice... )

I can get you there and save the taxi fare. (That's a joke, don't get bent)

Post #129 http://www.practicalmachinist.com/v...straight-edges-284745/index4.html#post2298149

-Phil.

Thanks, Phil. I appreciate it.

I wanted to add some more comment to that thread. I started writing, but went out of time. But I'll add my comments, promised!

Maybe even I'll make some weight and FEA calculations. That is an interesting topic. And because scraping is a very traditional trade, a lot of the wisdom is based on … tradition. Some get stuck in old procedures and shapes with the argument "It was done that way since ever and it works!". I'm a bit pissed by that attitude and so I lost interest in reading and posting in that thread.


Nick

Thank you, Nick. Your comment on attitudes is a reminder that, although it may just seem like fun and games to make mindless negative comments, there is a cost to PM in that the "good guys" tend to back out of the discussion and much potentially useful comments are not made or are lost in the chaff. I have heard privately from a number of people who feel intimidated by that kind of behavior. (I know, those who are intimidated are just pansies, right?) I am sure you, Nick, were not intimidated, just weary. Can't blame you. If anyone wants to comment on this point, I would appreciate it if they would PM me rather than take off on some tangent and screw up this thread too or start a separate thread.

I would really be interested in any measurements you might be able to make of the variety of SE's you have. If you can do that, that would be great. I am certain a lot of people would like that BTW, I had to look up FEA = Finite Element Analysis.

Denis
 
Last edited:
Denis-

I would think side milling would put the most stress back into the casting. It is analagous to slab milling on a horizontal; unfortunately the worst method.The corncob rougher helps. And of course a "better" method like fly cutting can be bad too, if the cutter geometry is wrong and the tool is dull. Otherwise, I believe flycutting is better, almost as good as a planer (as you note). Again, sharp, pos tooling used in all cases.

The fact that your table crown on the mill is only 1.5 thou, does not completely relate to how much crown it will cut. Could be better (not likely, unfortunately) or more likely a little worse. Tables crown up in the middle from constantly bolting down and unbolting "furniture". The brinelling of the underside of the T-slots is like constantly peening the top of the table. Then the table surface of the saddle tends to wear on both ends more than the center due to the table crown, and due to the overhang of the table each way. The table then tends to mirror this wear. So the table travels in a curve, but also rises as each end is approached, cutting deeper than the mere top crown of the table would indicate. So do a check with an indicator, on a good SE leveled on the table top for a better picture.

I'm enjoying (& support!) your experimental efforts.

PS, I take it that when you say "hand scraping" you really are using a hand tool, not a biax?
Otherwise, if I calculated correctly, the 2.5 OZ material removed on a 26" x 2" wide tool only equates to about .008" average depth. As you note, something of a work-out, but not obsurd if (as you also illustrate) there is a plan and an efficient attack. The first .006" most likely goes a lot faster than the last .0016". :)

smt
 
Denis-

I would think side milling would put the most stress back into the casting. It is analagous to slab milling on a horizontal; unfortunately the worst method.The corncob rougher helps. And of course a "better" method like fly cutting can be bad too, if the cutter geometry is wrong and the tool is dull. Otherwise, I believe flycutting is better, almost as good as a planer (as you note). Again, sharp, pos tooling used in all cases.

The fact that your table crown on the mill is only 1.5 thou, does not completely relate to how much crown it will cut. Could be better (not likely, unfortunately) or more likely a little worse. Tables crown up in the middle from constantly bolting down and unbolting "furniture". The brinelling of the underside of the T-slots is like constantly peening the top of the table. Then the table surface of the saddle tends to wear on both ends more than the center due to the table crown, and due to the overhang of the table each way. The table then tends to mirror this wear. So the table travels in a curve, but also rises as each end is approached, cutting deeper than the mere top crown of the table would indicate. So do a check with an indicator, on a good SE leveled on the table top for a better picture.

I did first check the table for flat and it was very close to FLAT---the table had been rescraped by the PO not long before I bought the mill a few years ago. I always wondered if the scraping was purely ornamental or if it was truly a functional job. I think it was functional. Knowing that the table is quite flat I used a DTI on the table as it moved through its range and noted the amount of droop as checked at its outboard extremes where you would expect it to be worst. That is the number I was quoting. Sorry for not writing more completely on that point. Also, before I hang my hat on those numbers I need to remeasure a time or two. They seem a bit too good to be true. dgf

I'm enjoying (& support!) your experimental efforts.

Some expression of support is very much appreciated!
dgf

PS, I take it that when you say "hand scraping" you really are using a hand tool, not a biax?
Otherwise, if I calculated correctly, the 2.5 OZ material removed on a 26" x 2" wide tool only equates to about .008" average depth. As you note, something of a work-out, but not obsurd if (as you also illustrate) there is a plan and an efficient attack. The first .006" most likely goes a lot faster than the last .0016". :)

Right on all accounts. A Biax is cheating! (I have my eyes open for one--single speed or variable, I will convert a single to variable) It was possible to really rip off the first few thou and was fun. But that last little bit took a LOT of time and was tedious as you well know. But that is likely because I am still pretty early in the learning curve. Hearing scraper hands tell about spotting with a Biax in skilled hands--wow. dgf

smt

I responded in bold above.

Denis
 
I started this text almost a week ago, intended to post it in the other thread. As time went by, the other one kind of derailed and I lost interest.
But as this topic is quite interesting and I have the impression that the design of straight edges is more based on feelings than on facts, I deleted all what I wrote and now take the chance to cast it in a more structured manner.

For a straightedge, we have several design goals that we would like to meet all:
* Weight. Should be as light as possible/reasonable. At least for the bigger ones.
* Stiffness. Should be as stiff as possible.
* Thermal stability. Should not change geometry when room temperature changes. Temperature changes from handling can only be handled by a more careful handling.
* Shape. plain flat, dovetail, two parallels. As this is mere preference or need, I will leave that one out.

Ad weight:
Up to say 10 kg, it doesn't matter. Or even we would like something in a "nice" weight range. So for a small (500 mm) prism, weight is no criterium.


Ad stiffness:
In "the other thread", I postulated, that even something as "stiff" as a tape measure would work as long as it is flat. OK, it gets a bit dumb, but the principle is true.
I have been thinking about how you could define "stiff enough" in numbers. And I think I found a way (more on that later in a later posting)
There is a small pitfall with something as stiff as an I-beam or a camelback. Especially if you go to the extreme with weight-reduction: It is only stiff if you use it upright (means: spotting face down (or up, for the OZies)). If you have to tilt it (maybe to reach into a dovetail or spotting just one side of a Vee), it gets less and less stiff with the least stiffness when the working surface points sideways. So a super-lightweight CB should only be used upright (or you have to be aware of that fact).

A tube would be perfect. Oh wait, we need a flat. So let's make a polygon out of it. And reduce the number of sides to the minimum. We end with a prism where all three sides are closed And maybe cast with a core to reduce weight.


Ad thermal stability:
Again, thermal stability does not include (or just to some extent) temperature changes by handling the SE. Wear gloves, add wooden insolation.
Only a symmetrical SE will be thermally stable. Symmetrical means: If you look at the cross-section, it has to be symmetrical at both axes. An T-beam is not, something L-shaped is not. A triangle can be, an I-beam can be, a plain flat is.
Let's have a look at an I-beam:
Say the upper girder is less massive than the lower one. The upper one will adjust to the temperature quicker. But there is more behind that. What also matters if the ratio of circumference and area (if you look at the cross-section). If both have the same area, both have the same mass (area * length = volume). But if one has more circumference, it will cool/heat up quicker, than the other one with the same area. Think cooling fins!
So for the upper and lower girder, we want to keep area and circumference equal. That is impossible for an T-beam.
If we accept less thermal stability, you should know that some shapes not just bend (get convex/concave) but also twist. An example is an L-beam. So if asymmetry is in the vertical plane (looking at the cross-section), it is least desirable. A T-beam will bend (convex/concave) but at least it will not twist. With twist I mean bow in two directions. The result is something like a cone from that you cut out a strip that is not parallel to the axis.


Part of the design is to put more or less weight onto the three (I leave out shape) criteria. You can not have all three of them. For big straightedges, you will have to step back either in weight or stiffness or both.

That's it for now! I'll come back later.
I'm really curios what the result of the experiment "how stiff is stiff enough" is. I really have no clue. But my gut feeling says it will be surprising.

Now I have a question:
What is the thinnest acceptable thickness of a cast rib? 5 mm? Or should I go up to 7 mm? All without ribs added to that wall to ease running of the mold.

Nick
 
"Now I have a question:
What is the thinnest acceptable thickness of a cast rib? 5 mm? Or should I go up to 7 mm? All without ribs added to that wall to ease running of the mold.

Nick"

On my SE the lateral ribs on the web taper to a trifle under 3/16" which would be about 4.7mm. For ductile this was the lower limit of what my foundryman wanted to try. Grey could be flowed a bit thinner.

Looking forward to both your calculated and especially your empirical data. It will be interesting to see how closely they will be in agreement.

One answer (based on limited experience) of which there will probably be many. I did do a little checking of common tools in my shop and found ribs under tales on cabinet saws, band saws and similar items commonly 1/4 thick and in some cases 1" in chord. There were even some shallow ribs thinner than this. So, 1/4" or 6mm would be conservative.

Denis
 
On my SE the lateral ribs on the web taper to a trifle under 3/16" which would be about 4.7mm.

Ah OK. 5 mm are good to do in aluminium, 3 mm can be really a challenge. I have not experience with CI, but was told it flows very good (even better by adding phosphor).

Looking forward to both your calculated and especially your empirical data.
No empirical data. I can only model some of my equipment and do an FEA for that. It is too much work to measure and do the setup for actual sag.


Nick
 
Ah OK. 5 mm are good to do in aluminium, 3 mm can be really a challenge. I have not experience with CI, but was told it flows very good (even better by adding phosphor).


No empirical data. I can only model some of my equipment and do an FEA for that. It is too much work to measure and do the setup for actual sag.


Nick

No empirical data? Could you stress the straight edges you have with a given weight--like their own weight at their mid point-while they were supported by their ends and measure deflection? If you and, perhaps, others could could do this experiment with their SE's, we might be able to put together a nice table of results. This would be a simple albeit crude measure of real-world stiffness vs weight. I have feeling it would be much quicker to make the measurements than it would be to do a calculation. Both would be interesting.

Denis
 
Now I have a question:
What is the thinnest acceptable thickness of a cast rib? 5 mm? Or should I go up to 7 mm? All without ribs added to that wall to ease running of the mold.

Nick

I've had no problems with webs made from 2 thicknesses of 4mm ply (split pattern). Thinner would work, I'm sure.

PDW
 
Only a symmetrical SE will be thermally stable. Symmetrical means: If you look at the cross-section, it has to be symmetrical at both axes. An T-beam is not, something L-shaped is not. A triangle can be, an I-beam can be, a plain flat is.
Let's have a look at an I-beam:

There is a possible argument that your plan is only correct IF the heating/cooling is evenly applied to both parts.

if one will be closer to heat (to you, to your hands) there is a possible argument to make it lighter so it will cool off faster to same temp as the rest after being heated up by being near you....

Of course the symmetrical one may be heavier and heat up more slowly..... so maybe THAT is better.....

I expect in the end both sorts of shape work... at least both are used, and both give good results.....

The thinnest rib would relate to the mass of material connected to it, and to the strength and stiffness required of it. I doubt there is any way to give an ideal for all cases.
 
Coming now back to the real world nuts and bolts of the project.

I had promised some more photos, this time of the insulating blocks. I had described them as "innovative." Well, I had some crazy idea of using outriggers as an part of the design of the block but discarded that "refinement" as unneeded complexity. I had been concerned that the SE might be unduly "tippy" when inverted on standard blocks when applying spotting dye. That proved not to be the case. It can be tipped to the left or right about 7 to 10 degres and still be self-righting. That seems good enough to me. (Sometimes theory gets in the way of progress) So, I ended up with pretty conventional blocks. Please see photos embedded.

My design criteria for the blocks were:
1) Provide good insulation from heat transmission to the SE when handling it.
2) Be comfortable--friendly to the hand.
3) Durable and not prone to breakage or loosening with humidity changes from winter to summer
4) Not require drilling into the bow or web of the SE. This was due to the fact that I scraped the SE in without hole in it. After Archie Cheda's thorough discussion of hidden stress induction and relief I was concerned that drilling might throw the SE out of whack requiring rescraping.
5) Be removable. There may be times when it will be useful to position the SE on its side with the sole vertically oriented. Obviously blocks would get in the way.
6) Be firmly attached to the SE

Blocks fabricated from laminated pieces of Baltic Birch plywood seemed to fill the bill to provide good strength, stability at least side to side despite humidity changes and easy availability and machinability.

Please see pics of what I came up with. This design seems to fit the various criteria. The dark material that forms the gripping rails is phenolic sheet 1/4" thick. The grooves in the gripping rails and the bottom of the blocks all have 48" radius curves to conform to the bow of the SE. The curved grooves in the rails were cut using a palm router, 1/4" ball end mill, and a shop made compass device to guide the router.

The block will be finished with satin gloss polyurethane as it is so easily applied with a shaker can and is relatively impervious to most of the things these blocks are likely to encounter.

When the screws are snugged up for use, the blocks are very solidly attached to the SE.

Denis
 

Attachments

  • SE Block2.jpg
    SE Block2.jpg
    90.6 KB · Views: 634
  • SE Block1.jpg
    SE Block1.jpg
    90.7 KB · Views: 549
  • SE Block3.jpg
    SE Block3.jpg
    86.3 KB · Views: 531
  • SE Block4.jpg
    SE Block4.jpg
    58.8 KB · Views: 510
  • SE Block5.jpg
    SE Block5.jpg
    62.3 KB · Views: 565
A few more pics---and what got tossed.

Here are a few more pics. This partly explains why I am so slow to produce. If I could just figure out the right design form the get-go, less time would be wasted.

Denis
 

Attachments

  • SE Block6.jpg
    SE Block6.jpg
    83.8 KB · Views: 416
  • SE Block7.jpg
    SE Block7.jpg
    95.7 KB · Views: 333
  • SE Block8.jpg
    SE Block8.jpg
    77.9 KB · Views: 345
  • SE Block9.jpg
    SE Block9.jpg
    69.3 KB · Views: 437
There is a possible argument that your plan is only correct IF the heating/cooling is evenly applied to both parts.

If you already have problems understanding this sentence
"Again, thermal stability does not include (or just to some extent) temperature changes by handling the SE. Wear gloves, add wooden insolation."
feel free to ask for a detailed explanation.


Nick
 
JST and Nick,

You are both great contributors and I very much value your input in general, but I wonder if this issue would be best resolved off-line as the rest of us are confused and distracted. Please re-read the OP "I am hoping this thread can avoid some of the controversial comments that plagued the old thread. So, if people have on-topic questions or helpful suggestions please feel free to offer them. "

I know I am not a moderator and can not control what folks do. Just a sincere suggestion.

Denis
 
JST's observation is a good one, and on point. At least as I understand it.

6) Be firmly attached to the SE

When the screws are snugged up for use, the blocks are very solidly attached to the SE.

When I made my first iteration of the angle straight edge, with the solid sole, it was pretty much what had been done before in some cases; but did create the situation where a massive element (the sole) is paired with a very light element (the caternary bow). I recognized that thermally, this is bad. (at the time, of making the pattern, I had intended only to make maybe 3 for myself, to machine to different profiles. Dovetail, female Vee, male Vee. So it was important to me that the handles be not firmly attached (securely yes) but non-influencing either from grip, or from tightly insulating the SE, either. So my theory was to intentionally make them "float" somewhat.

Later, I made the cored out SE, which should be better thermally. But alas, those are the patterns that got stolen.

smt_straightedgecastings7.jpg


smt_straightedgecastings6.jpg


smt
 
You are both great contributors and I very much value your input in general, but I wonder if this issue would be best resolved off-line as the rest of us are confused and distracted.

What kind of PC crap is this?
JST quoted a sentence, but skipped the previous one that clearly excluded his argument.

Is this a kindergarden?
I really don't need your reminder to avoid controversial comments. Address your reminder to JST directly and avoid my name in this context! Do that best off-line, as you suggested.

Really, some people need to grow up and during that time should to learn reading.

Nick


Back
Top