What's new
What's new

First attempt at scraping...

Jashley73

Titanium
Joined
Jan 24, 2013
Location
Louisville, KY
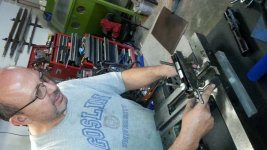
So at work, our "tool-room" lathe is a four-letter-word, Chinese made, mail order special, and it needs some love. Today while working on it, one of my guys was oiling the cross-slide, and fed the cross-slide too far and disengaged one of the double-nuts for the X-axis leadscrew, and didn't know what was going on.

No big deal - so we pull the cross-slide off so I can show him how it's all put back together, and how to adjust out the backlash etc... While checking it out, we noticed that the cross-slide ways are scored on both the carriage side, and the cross-slide itself. After some aggressive stoning, I had an "idear"...

I've been reading about scraping for a while now, and have toyed around on some scrap, and I figured that today we had the time, and the lathe needs the love, so what the heck, let's scrape it...

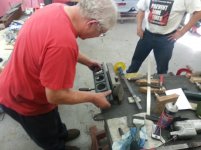
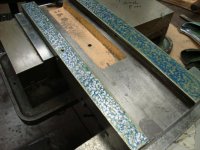
This was probably 40-minutes of scraping after the initial stoning.

Scraping 1.jpg

Scraping 2.jpg

Scraping 3.jpg


I'm sure to most of you this looks like garbage, and if you watched my technique you'd probably want to vomit and then pull out your hair in disgust, but the end result was a big improvement.

The tools used: I'm using oil-paint from a craft store for spotting, the scraper is made from an old file, and a cut-up broom handle, and the straight-edge is a 15" Starret .0005"/grad level that I saved from the scrap dumpster. The Starret level is hand-scraped on its sole, and when spot-checking it on a granite surface plate, it checks flat, and even across the sole, save the middle 1/3 is relieved. I assume it's relieved in the middle so that as a level, it will sit firmly on the ends, and not rock on the center.

As for the lathe - we noticed much smoother travel when feeding the cross-slide now. I should have taken pictures of the initial spotting for comparison. I'd still like to pull it apart and again, and try for more uniform contact across the entire carriage way surfaces, and then grind the cross-slide way surfaces. The cross-slide surfaces (not shown) are pitiful - they definitely need attention. I'd also like to remove the tailstock and run the carriage all the way back, and then pull the lathe away from the wall and stand on some pallets so I have more room to scrape from both sides, at a more comfortable height. I do have some questions however...

-After grinding the mating way surface (bottom of cross-slide), should I scrape/flake that surface too, or just leave the grind finish?
-What about the gib? The current gib looks curved like a banana. Is this normal - is it supposed to be sprung in order to make contact at both ends against the outer dovetail face? Or is it supposed to be straight, and typical 50% contact?

Anyway, thanks for reading. I just wanted to share.
 
Last edited:
The scraping marks look decent & the tools and process show ingenuity! :)

But as others have alluded to, how do you know what the geometry is? Which way do the ways tilt sideways and front to back? are they planar, or does one diverge up and the other down, from end to end?

It is obvious you have a level that will help a lot. I am not sure the cross vial is good enough to really discern sideways tilt, though. (Maybe it is, but I never trusted it for that purpose)

Basically, you did things backwards from the usual approach.

Generally with a way system like that, you would scrape the top member first to a surface plate reference. That way you would know the bottom ways were co-planar (flat). Now use that in conjunction with the straight edge/level to do the ways you did first. But the flat bottom of the slide will easily witness very small deviation/twist and keep you on the level so to speak. :)

Next, scrape the long parallel dovetails and keep them parallel.

Not only that, but they must be within 90° such that the cross slide will face ~.0005 hollow in 6"* or so traveling "in" from front to back of lathe.

Then mark the top slide to those DT's and scrape the non-gib side "perfect" with a slight center relief. Then rough in the gib side if it needs it. If it is a taper gib, probably easiest at this point to make another new one and scrape it in. If it's a parallel gib, scrape at least the face flat, and re-fit it with the set screws.

*figure for facing hollow: best to look it up, I didn't make the time for exact figures, but the principle is a standard.

smt
 
what kind of dumpster did you find that level? Damn I what to move into your area.:D

Haha no kidding - we were getting rid of some machines and associated cabinets and such, and in the trash-box I saw this dirty wooden Starret box. I opened it up and thought, "What the...? Who would throw this out?" After asking around and nobody wanting to claim it, I did. :)

Stephen - I hear you about the geometry. This was more of a quick & dirty reaction to seeing how scored and rough the ways had become. My initial thought was to put a mag-base on a 1-2-3 block on one way, and then indicate the other for a rough estimation of being co-planar. I like what you described as using the mating piece as the master for the carriage-side ways.

So, for the cross-slide/bottom surface - grind em' in, or scrape em'?

I'll probably just leave the dovetails and gibs at this point - maybe work on them some later as time allows. We have to remember this is at the day job, (production shop.) if somebody notices the crappy lathe feels really good all of the sudden, and they notice me "humping" the lathe a lot, they might start asking questions... Lol
 
You can straighten the gib and no need to make a new gib. If more people tried to bend them and not be afraid they will break, they would discover how easy it is to do. I wish i had some pictures but don't now. Possibly some f my students do and will show the method I teach. Basically you lay the gib on a flat surface and use feeler gages under it to discover how bent it is. Lay the gib on 2 blocks at each end...with the bent side on the top and place a plunger type dial indicator on the top of the gib with lots of pressure...say .300 thousands. Say the gib is bent .025". Push down on the gib so it moves 100 thous and let it up check how much it moved...then push it down .325 release and so on until the big bends the .025 down, then lay it on the plate and see if you can slide in .002". On some gibs I use a C-Clamp to pull it down. This resembles a straightening press used in engine rebuild shops to straighten crank shafts. This is the closest I can find that looks like it. It's a shaft, but same idea. Accept I pull it down. https://www.youtube.com/watch?v=mRtIxG2co5w Then you can put some Turcite on the face of the gib or some Phenolic on the back side. Your scraping looks pretty good, but I would shorten the stroke to no more the 1/8 to 1/4"
You can see.

Normally those Starrett levels are scraped low in the middle, so I hope you scraped it flat before using it as a straightedge, Otherwise your slide is high in the middle too. Rich

PS:
Here are some pictures of a EE Monarch saddle top like yours we just scraped yesterday. VetteBob is using a King-Way gage that uses a level vial to check the parallelism of the flats, plus he used a 18" camel back to blue it up. You can see several scraping pictures in my profile album.
 

Attachments

  • 20141026_131523.jpg
    20141026_131523.jpg
    97.6 KB · Views: 359
  • 20140921_162015.jpg
    20140921_162015.jpg
    86.3 KB · Views: 379
  • DSC02197.jpg
    DSC02197.jpg
    96.1 KB · Views: 370
  • 3132.jpg
    3132.jpg
    42.9 KB · Views: 419
Rich, you're right about the level. It's low in the middle, and the ways surely match. Not to worry though, because the mating piece is like a boomerang... I didn't think to check the level against granite until we put everything back together.

Now that I think about it, if I grind/scrape the mating piece, it might be enough to mess with the dovetail geometry. So for the dovetails, should I choose to tackle them - does one need a dovetail master for that, or just spot & check against mating surfaces? Surely there must be a need to check straightness/flatness of the dovetail surface, correct? (We're probably moving into "you need to take a class" territory by this point.)

Thanks for the comments all - they're much appreciated.
 
I straighten gibs about the way Richard describes, though of course he has done many more than me :)

I also start by putting various thickness wood shims at each end, and pressing down. if that was not enough, raise one or both ends with a little more shim stuff, and try again. Point being to have some control over how far you go. Or the ends can be raised, and the middle (of the hump, not always the middle of the length) can be pressed down to a block or stack, which is gradually lowered.

Here is a long gib from an automatic mortise machine table that was straightened that way, then re-scraped.

smt_mortisescrape6.jpg


My point about if it is a taper gib, by the time you scrape all the flats and DT's of the slides, and then scrape the gib itself to match the new work, it is going to be way too thin. I have shimmed them. But for myself, it is actually often easier to just make a new one instead of dicking around with all the issues of an old one unless it is in really good shape.

smt
 
In all my 40+ year being in machine rebuilding as a business and not a hobby, I can't recall ever making a gib. I may have bought a hand-full but I repair or rebuild them. Faster and works. Stephen has the equipment to make one if you want to go that route.

Jash...a simple way to check the slide is if you have a surface grinder, set it on the grinder and put on a super low mag or put it on non mag- netic parallels and block around it or on a good mill on the table and indicate the cross-slide in, check the flats and the dovetail. It will be high on the ends I would guess and probably bowed too.

If you do grind it. Rough scrape the flats to a surface plate 1st..don't worry about points, just get it touching all over and it hinges at the 30% on each end. Plus take a soft blow hammer and tap on it on the granite and it should be solid sounding all over. Then put the scraped side down on a surface grinder and mag it down and kiss the top, then flip it over and grind the rough scraped side. This should make it flat and parallel. If you don't rough scrape the worn side flat first, it is low in the middle and when you mag it down it will bend into the worn area..and when you release the magnet it will spring up and be bent.

If it is bent astraight edge on the dovetail is the best way, but if you don't have one buy a dovetail cutter and kiss the dove to straighten it up, or if you have a planer like Stephen, plane it...or if its just a repair job..put it back together. If it binds up...you can use a sharpie and when indicating the dovetail...mark how much it is high on the ends and get a tapered slip stone and hone the ends down. (Not best or even a good way, but it would work, lol.) Yesterday during the KC class one of the students had a a Bridgeport knee gib that went in to far and we checked with feeler gage and he needed .035". We discussed what he could do.

1. Put on some Turcite which can be epoxied on that can be purchased .010, .020, ( <--I don't recommend those 2) ,032", .047, .062, .090", .120" thick, 2. or like I said before phenolic that comes in the same sizes. 3. A cheap method that would work to get it going would be to buy some plastic shim stock from MSC that comes in a 12" x 20" sheet for $ 7.77 a sheet. (just looked it up yesterday) and all can be glued on. I showed the class a quick glue that is permanent is Loc-Tite Black Max 380 or a 2 part epoxy.

His gib had been repaired before and that guy had brazed on a cast iron length on the big end and re-machined. I have done this, but usually I turcite or phenolic them. It's late....bed time...have a good night. Rich

Tomorrow I can call you if you want me too. PM me your name and number. a lot easier to explain then write. Rich
 
Last edited:


Back
Top