toolnuts
Cast Iron
- Joined
- Sep 27, 2009
- Location
- washington
When you are scraping and you point sizes are small, say smaller than 1/16", how do scrape to make the point sizes larger.
Follow along with the video below to see how to install our site as a web app on your home screen.
Note: This feature may not be available in some browsers.
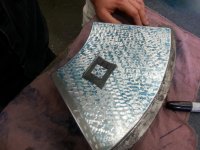
If you have depth of .0004 to .001" you can wet stone it to spread out the points. Think of the high points a pointed mountain and you et stone it to flatten it a little. I teach you only wet stone it ever 4 TH or 5 TH time when you have this issue. if you wet stone it every time you will get to much contact or percentage of points. You want to get as many low spots as high spots or 40 to 60% contact as you can see in the above photo's. Some one once called it "basket weave" and after repeated backet weave over and over again in the same area (checkerboard) the pattern comes and stays. If it goes away you violating rule 1, 2 and 3. It take lots of practice. Rich
well, the percentage of contact is still not clear no me. in my experience it varies something like +/- 30%, depending on the amount of blue you use. in the extreme case where you rub without blue, for example, you get tiny shiny spots. but when blued up "thin", bearing might be 70%.
Sorry to digress, but where does one find the gage used as a window to count the number of points? I realize that it is also for finding the scraper radius as well. I've looked in ebay with no joy.
Not as durable as the real thing, however a serviceable version is readily made by scribing a square on a bit of clear plastic - cd jewel case works perfectly for this
Notice
This website or its third-party tools process personal data (e.g. browsing data or IP addresses) and use cookies or other identifiers, which are necessary for its functioning and required to achieve the purposes illustrated in the cookie policy. To learn more, please refer to the cookie policy. In case of sale of your personal information, you may opt out by sending us an email via our Contact Us page. To find out more about the categories of personal information collected and the purposes for which such information will be used, please refer to our privacy policy. You accept the use of cookies or other identifiers by closing or dismissing this notice, by scrolling this page, by clicking a link or button or by continuing to browse otherwise.