Mud
Diamond
- Joined
- May 20, 2002
- Location
- South Central PA
I have a 50 taper CNC toolroom mill. The horizontal spindle was a little battered from careless operators letting the pull studs hit the ID of the taper when changing tools. Didn’t look terrible, but when I put a test arbor in it I could get a slight runout on the arbor and I could wiggle it slightly, so I believed there was room to improve it.
We set up to grind the taper with a toolpost grinder and a Kurt slide. We’ve done this before on our VMCs, this job was easy because the spindle is horizontal. Now that the taper is ground, the test results with the arbor are not significantly better than before and I’m puzzled.
The arbor is a Parlec, looks new, is 2” diameter and 18” long from the large end of the taper. When Installed, I get .0004” to .0006” TIR at the far end depending on its’ position in the spindle. When repositioning the arbor, the high spot turns with the arbor. With 75 to 100 lbs of effort on the end, I can move it about .0025” each way from relaxed, it always returns to the same place. Before grinding, I had about .0006 to .0012 TIR at the end, and the same amount of flex.
There’s no measurable movement of the spindle at the face, or of the arbor right next to the spindle face. Runout next to the face is not measurable, and movement when pulling on the arbor is not measurable. If I put the indicator holder magnet on the spindle face to test flex I get the exact same readings as I do when mounting it on the table, so the arbor seems to move in the taper.
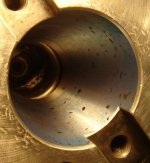
Drawbar pull is measured at 4400 lbs, right on the mfgr’s spec. When I put a very light coat of Canode blue on the arbor taper with a foam roller and rub it in the spindle taper about 1/8” turn, I get a light but very even mark all over the ID of the taper, and what’s left on the arbor is very even, no points of high contact. I’ve attached a photo. The marks left in the taper are about .001/.002” deep and I don’t really want to grind far enough to remove them all.
[FONT="]So – What results should I expect? I was expecting zero runout on the arbor, and no movement or dramatically reduced movement when pulling on the arbor. Is that too much to expect? I don’t think I’m flexing the arbor that far with only hand pressure. Will a self releasing taper like 3.5”/ ft of a Cat taper hold without movement? Do they seat in tighter under cutting load? The arbor does release with a pop now when extracted, and didn’t before. Should the contact be even from large end to small end, or would you make it slightly tighter on the large end anticipating more wear and load on the large end? How would you inspect the taper angle? I’d love to have some precision balls large enough to use but don’t have any.
 [/FONT][FONT="]
 [/FONT]
We set up to grind the taper with a toolpost grinder and a Kurt slide. We’ve done this before on our VMCs, this job was easy because the spindle is horizontal. Now that the taper is ground, the test results with the arbor are not significantly better than before and I’m puzzled.
The arbor is a Parlec, looks new, is 2” diameter and 18” long from the large end of the taper. When Installed, I get .0004” to .0006” TIR at the far end depending on its’ position in the spindle. When repositioning the arbor, the high spot turns with the arbor. With 75 to 100 lbs of effort on the end, I can move it about .0025” each way from relaxed, it always returns to the same place. Before grinding, I had about .0006 to .0012 TIR at the end, and the same amount of flex.
There’s no measurable movement of the spindle at the face, or of the arbor right next to the spindle face. Runout next to the face is not measurable, and movement when pulling on the arbor is not measurable. If I put the indicator holder magnet on the spindle face to test flex I get the exact same readings as I do when mounting it on the table, so the arbor seems to move in the taper.
Drawbar pull is measured at 4400 lbs, right on the mfgr’s spec. When I put a very light coat of Canode blue on the arbor taper with a foam roller and rub it in the spindle taper about 1/8” turn, I get a light but very even mark all over the ID of the taper, and what’s left on the arbor is very even, no points of high contact. I’ve attached a photo. The marks left in the taper are about .001/.002” deep and I don’t really want to grind far enough to remove them all.
[FONT="]So – What results should I expect? I was expecting zero runout on the arbor, and no movement or dramatically reduced movement when pulling on the arbor. Is that too much to expect? I don’t think I’m flexing the arbor that far with only hand pressure. Will a self releasing taper like 3.5”/ ft of a Cat taper hold without movement? Do they seat in tighter under cutting load? The arbor does release with a pop now when extracted, and didn’t before. Should the contact be even from large end to small end, or would you make it slightly tighter on the large end anticipating more wear and load on the large end? How would you inspect the taper angle? I’d love to have some precision balls large enough to use but don’t have any.
 [/FONT][FONT="]
 [/FONT]

