dgfoster
Diamond
- Joined
- Jun 14, 2008
- Location
- Bellingham, WA
New Featherweight Design 18" SE/Prism/Parallel/Precision Level. Nearly Done
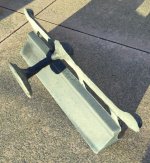
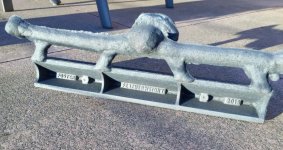
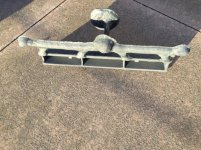
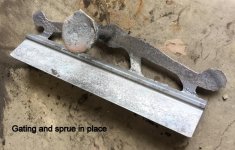
I am working on a new Featherweight 18" SE that includes a Prism, top rail, and location for a Geieer and Bluhm Precision Level Vial. The pattern has been made and the initial test casting successfully made. As cast it weighs 11.5 pounds and when machined as intended it will weigh about 7.5 to 8 pounds but will retain excellent rigidity.
After fielding a lot of inquiries and suggestions, I decided to design and cast an 18" Featherweight straight edge that incorporates several features to make it more useful to the scraper hand.
Firstand foremost it will be rigid and durable but quite lightweight ataround 8 to 10 pounds depending on final machining.
Instead of having a curved bow, it has a straight flat top bar allowing it to be ground (or scraped) and used as a parallel.
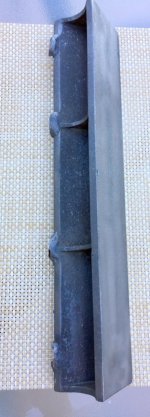
The base is 3 1/4 inches wide as cast and 3/8" thick (intended to be machined down to 1/4") as will be the prism
face set at45 deg to the base.
There is sufficient space between the face and sole to allow bolting in a precision vial by Bluhm and Geier: A highly sensitive mounted tubular level with adjusting studs, nuts, fulcrum and base with instrument black finish. Sensitivity: 20 seconds per division.
Because of the overhang of the prism face, drilling and inserting mounting studs would be difficult unless one has specialized equipment. For that reason I plan to supply the SE's with (edited and corrected to) 5-40 mounting studs in place upon request. I THINK I can make a single-purpose drilling device to reach under the overhang and drill part way through the sole from the top to allow loctiting threaded studs for mounting the vial. (Should be an interesting project) That way the sole working surface can be left intact. At least that is the plan. Worst case scenario (and far easier but less elegant) would be to simply through drill the sole from the working side and loctite in cast iron bushings with studs in place. Functionally I think that would be fine. But I want to try the drilling from the top surface.
Finally,note the two bosses molded in to allow convenient attachment of handles to the SE.
There re is a good chance that most users will not actually use the SE in all four modes. However, those capabilities will all be available in one high quality unit at very reasonable cost. I am thinking the rough casting price will be about 190 dollars. I am unaware of any other tool offering all of these features.
I am working on a new Featherweight 18" SE that includes a Prism, top rail, and location for a Geieer and Bluhm Precision Level Vial. The pattern has been made and the initial test casting successfully made. As cast it weighs 11.5 pounds and when machined as intended it will weigh about 7.5 to 8 pounds but will retain excellent rigidity.
After fielding a lot of inquiries and suggestions, I decided to design and cast an 18" Featherweight straight edge that incorporates several features to make it more useful to the scraper hand.
Firstand foremost it will be rigid and durable but quite lightweight ataround 8 to 10 pounds depending on final machining.
Instead of having a curved bow, it has a straight flat top bar allowing it to be ground (or scraped) and used as a parallel.
The base is 3 1/4 inches wide as cast and 3/8" thick (intended to be machined down to 1/4") as will be the prism
face set at45 deg to the base.
There is sufficient space between the face and sole to allow bolting in a precision vial by Bluhm and Geier: A highly sensitive mounted tubular level with adjusting studs, nuts, fulcrum and base with instrument black finish. Sensitivity: 20 seconds per division.
Because of the overhang of the prism face, drilling and inserting mounting studs would be difficult unless one has specialized equipment. For that reason I plan to supply the SE's with (edited and corrected to) 5-40 mounting studs in place upon request. I THINK I can make a single-purpose drilling device to reach under the overhang and drill part way through the sole from the top to allow loctiting threaded studs for mounting the vial. (Should be an interesting project) That way the sole working surface can be left intact. At least that is the plan. Worst case scenario (and far easier but less elegant) would be to simply through drill the sole from the working side and loctite in cast iron bushings with studs in place. Functionally I think that would be fine. But I want to try the drilling from the top surface.
Finally,note the two bosses molded in to allow convenient attachment of handles to the SE.
There re is a good chance that most users will not actually use the SE in all four modes. However, those capabilities will all be available in one high quality unit at very reasonable cost. I am thinking the rough casting price will be about 190 dollars. I am unaware of any other tool offering all of these features.
BTW,I am all out of 36" Featherweights and will be casting more inthe next week.
And as work progresses on the stud drilling device and the faces and top rail are milled, I will post further updates. I also intend to clean up the pattern lettering to eliminate the small defects that are seen if you look closely at the test casting shown.
I have really been enjoying designing and casting this SE.
Denis
Edit: A sharp-eyed reader noted that the clearance holes in the precision vial base were .140" I am not sure how I missed that significant fact. I am afraid 10-24 screws would no way fit .140" holes. I appreciate the correction. I will be getting a vial in a couple days and am anxious to get my hands on it.
Edit: A sharp-eyed reader noted that the clearance holes in the precision vial base were .140" I am not sure how I missed that significant fact. I am afraid 10-24 screws would no way fit .140" holes. I appreciate the correction. I will be getting a vial in a couple days and am anxious to get my hands on it.
Attachments


Last edited: