What's new
What's new

Scraping newbie help

Itstallion

Plastic
Joined
Feb 16, 2018
Location
Shreveport, Louisiana
So this is my first attempt at scraping. I'm working on the gib to my new to me drill/mill. So far I've been in the initial stage of getting the hump out of the middle of it. I'm seeing spots from one end to almost the other end. I'm wondering if I should switch gears and start going after specific regions or continue roughing until I see spotting from one end to the other. I've hinged it and its rotating at it's1/3 on both ends now. When I started it was hinging right in the middle. I've circled the highest spots that are polishing. Any words of wisdom or recommendations. I'm just hesitant to switch gears and not have that other end come in at all.

Thanks
Mark
6e4d2c30b14b12aca3c340aaf2447da6.jpg


Edited by moderator....


965617a332823b96bd28e1454223396e.jpg
 
at this point it is totaly sensless to shine up the highest points.
You need to rough scrap until you hav a minimum of 5 ppi all over your part.
To get this you need a shorter Stroke and a sharper Blade with Radius 60 or 90.
Also be look for "Individual Lines"


greatings, Franz
from the Lüftinger Brothers
 
You can use a sharpie to draw a line around a region of blue spots and then scrape off that whole region. That will start getting you to some initial marking in the low areas.
 
Well after some more passes here's where it's at. That end I was worried about still wouldn't come in so I threw a feeler guage under that end with it on the surface plate..... .0025. Yeah that end will just have to go like it is. It tapers off right at the adjusting screw hole. It shouldn't hurt anything considering the way it came from the factory. I shortened my stroke up and that seems to break it up finer. I still need to procure a way to sharpen my blade as I'm using the factory job on it at the moment. The next purchase.

Thanks for the replies
Mark
103dc1dfefb2ca9ce08fb9540de54331.jpg
e36d4a145df3c6947a05d7916c875aab.jpg
6a3c585dd262a09d844edf8e7b611e40.jpg


Sent from my SM-G975U1 using Tapatalk
 
So I know this is my first go at scraping. I'm as green as they come. Even the greatest started somewhere. I know I'm not winning any races but I guess its progressing? Thoughts? Does this look right. I'm going to shoot for 20 ppi.

Thanks
Mark
7c90a0a11df440e73416ba91eff764af.jpg


Sent from my SM-G975U1 using Tapatalk
 
Mark,
Just a couple of comments.
I have the feeling that the scraping marks are fairly shallow (and I bet that the spots start shifting around from one bluing to the next).
Second, I suspect that you have the tendency of running the blade off the piece, resulting in "rounding the edges", that is, you are tendentially high in the middle and practically no blue spot near any of the edges.
I urge you to sharp your blades, grinding the nose at ~60mm radius. Even if you haven't the perfect grinder, you can get it done in a makeshift way using, for instance, a Dremel tool with a diamond disk, a disk sander with a sheet of silicon carbide paper, or whatever.
It is rather important to achieve a certain depth of cut, having scraping marks at least a couple of tenths deep.

Now comes something that requires you to believe it works, since the results are fairly negligible at the beginning and become obvious only after a few passes: when the overall flatness of your piece is within more or less a thousandth, you need to start to lay down spaced lines with equally spaced individual scraping marks.

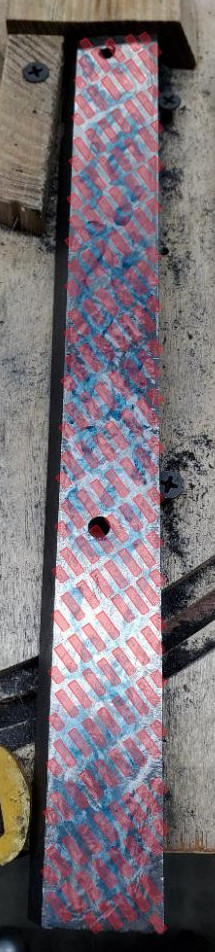
If the surface were more or less even, without clear holes without scraping marks, you would scrape it like this:

Checkerbox_Ideal.jpeg


But, in your case, you should avoid to scrape into the valleys (i.e. areas without any blue):

Checkerbox_Practical.jpeg


The part that is hard to accept at the beginning is that, starting from this phase of scraping, you will leave a lot of blue untouched. You'll take care of it the next pass or the pass after that. You need to follow strictly the individual lines and individual scraping marks rules before anything else.

Within a few passes, you will noticing the spots organizing themselves more or less in a checkerboard pattern.

I don't know if you ever had the experience of developing a black and white print in a darkroom: after exposing the paper, you drop it in the developer tray and you start slowly shaking the tray, to make waves of developer, to bring fresh chemicals in contact with the emulsion.
For several seconds (which feel like an eternity), nothing happens. You keep agitating and the paper stays white. Then, almost suddenly, the image appears with all its details within a few seconds.

To summarize:
1) Shape and sharp your blades.
2) Do never let more than half blade leave the edge of the piece, otherwise, you'll round the edge.
3) Have faith that the checkerboard pattern will pop up magically, if you follow the individual lines of individual scraping marks.

Have fun!

Paolo
 

Attachments

  • Checkerbox_Ideal.jpg
    Checkerbox_Ideal.jpg
    5.4 KB · Views: 50
  • Checkerbox_Practical.jpg
    Checkerbox_Practical.jpg
    5.3 KB · Views: 51
Last edited:
Thanks Paolo for your contribution! So basically consistency is the key. Consistent strokes, consistently spaced apart. By eliminating variables the flatness will eventually come in. I've got a new grinding wheel and some diamond hones coming in today. I'll be 3D printing a guage and working on my carbide blade shaping and sharpening. I am guilty of scraping right off the edge. I'll work on that as well and post some more pictures of my progress.

Thanks again!
Mark

Sent from my SM-G975U1 using Tapatalk
 
Well following the advice and the procurement of some diamond hones I think it's coming in. It's obvious during the roughing stage that I rounded over the edges pretty good. I'm using a 60 radius blade at the moment. When would I switch over to a 40?

Thanks
Mark
56c10ba2af2bd3e0bb9b1536e7c8a6cf.jpg
5b9986b91d996f8db2a5619029d1eab4.jpg
 
It looks better and you can see that you're starting to develop a checkerboard pattern.
However, I do have the impression that your scraping marks are still on the shallow side. If you have a tenth indicator move the needle between the scraping marks: you should see at least 0.0002" needle movement between adjacent spots.
I'd also suggest posting a picture of the piece after one pass of scraping, before cleaning and stoning it. This would give us an idea of how long, wide, and deep your scraping marks are.
My suggestion is to continue with the 60mm radius blade until you start seeing a good distribution of the spots, also on the edges.

Paolo

When scraping you should hear/feel "crunch-crunch" and you should see the small chips of cast iron piling up. Don't be afraid of digging in too deep. Ain't happen.
 
Well here's where it's at today. I'm going to continue with my pattern of scraping until I get that edge in. I realize this is probably overkill for a gib, but it's my practice piece.
8ec182a9691672e16414283431f4fa27.jpg
b3912612f05ce17d284b9b9cbc82ff27.jpg
e3ae784444126348d2f1ff2f095209ef.jpg
 
If the OP hasn’t watched Stefan Gotteswinter’s series on youtube of scraping videos, I strongly suggest he do so. Start with the two on hand scraping.

L7
 
You have a lot of what appear to be "bull's eyes", rings of dark around spots of hardly any blue.

The checkerboard is good advice. What I have done instead, is first to area concentrate, as you have been advised, and once the spotting is pretty much everywhere, with some bulls eyes start appearing, split them, scrape right through every one of them. That will up the PPI, and also will tend to bring the "mesas" (which is what the bull's eyes are) down lower and pick up more of them.

You can start cutting blue spots earlier too.
 
If you're trying to get the low areas to finally start registering, this is how I would think about it. You know the rounded edges are low but you don't know exactly how much. Same thing for the area at the end. Everything that's in the middle needs to be lowered to meet the low areas. Without measuring we don't know HOW low, but we could make a guess that they're at least half a thousandth low and possibly more. Unless you're really shoveling off metal, and there's no hint that you're really heavy handed at removal, you're probably taking off something like two tenths a pass. Meaning that the whole center section needs to be lowered at least two passes and maybe more.

So use a marker to include everything EXCEPT the low areas and then scrape the whole surface - blue, black, white, silver - everything inside the marked area. Then scribble marker, smear bluing with a finger or whatever over this whole central area. Scrape in the opposite direction to the cut you just made and scrape off all the blue or market you just put on.

NOW, stone it and see where you are. If the whole area that doesn't mark now is showing contact but the center is untouched (unlikely) you're nominally only one pass away from marking everywhere. If you still have low areas at the edge and end, you know a little more about how far you have to go and the process to get there.
 
Yeah, the amount taken off per pass..... One thing to do is when you brush off after each scraping, before stoning, brush it all to one place. When you are trying to get a fairly large area to come down and start catching the smaller low areas, brush all the chips into a pile. You should GET a "pile", not just some dust, but a pile of chips. It should be a surprising amount. You might get a half teaspoon of chips after a couple three passes or so, depending on how much area there is. If not, you might be there all day. You need to move metal.

I saw a scraping video a couple weeks ago that was actually pretty good, it was from some place up north, like J&D scraping service or the like. Anyhow, when that guy was scraping (he was doing hand scraping), there was a cloud of chips ahead of the scraper. He was really moving metal, which you have to do if you are going to lower a large area signuificantly.

Everyone has what they are comfortable with. When trying to move metal, I like to lower the handle of the scraper, which flattens the cut, and effectively makes the edge radius bigger. That way I do not end up with such big valleys to take out later if I bear down. Then when I am splitting spots, I have the handle much further up with less pressure, narrowing the cut. You might do differently.


Back
Top