What's new
What's new

Scraping turcite.

Peter.

Titanium
Joined
Mar 28, 2007
Location
England UK
I've been scraping turcite today on the underside of my HLV saddle. Learned a few things and found a new trick so I thought I'd show it here.

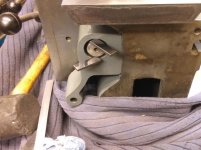
I had already glued this Turcite on at last year's scraping class (a year that has literally flown by) so I was ready to go. Here's the jig all clamped up last year after fixing the sheet to the saddle:

hlvturcite 4.jpg hlvturcite 5.jpg

I just needed to get a good reference to make sure that I scraped the turcite not only flat but on the correct plane, with me not knowing how flat and even the stuff was glued down. At first I tried using a surface gauge and indicator working of the high ledge in the picture above but I found that this surface wasn't ground and wasn't flat. Looked like it had been planed and left as-is. Anyway, the surface gauge rocked about a bit on it so I forgot about it.

The front surface with the holes in it however was ground - has to be because it locates the apron and with it the front veeway gib so it absolutely has to be co-planar to the flat way.

I knocked up three small jacks about an inch tall. turned a shallow peak on the bolt heads leaving a small flat to stand stuff on.

small jacks.jpg

I stood the saddle up-turned on those jacks and adjusted them until the ground flat face was parallel to the surface plate. I have a large comparator stand Which is rock-solid, and I used this with a tenth indicator. to sweep the shiny face length-ways and across.

HLV scraping turcite.jpg

After that I mapped the face of the turcite in 1-inch squares using the DTI. Found that it was all over the place the biggest variation being 6 thou. Wasn't expecting that I have to say but nothing to do but scrape it down flat. The pic above is where I got to before packing up for the day. Got to get rid of that last little dip at the end tomorrow then bring in the bearing points.
 
Here's the trick I learned. Because I was scraping quite heavily on the turcite I was pulling up small whiskers of material. I had some soft foam diamond-coated pads which are actually a concrete/stone finishing tool used on building site work. I cut one of these at a wedge shape one side and found that it was brilliant for quickly shifting the burrs and whiskers from the turcite when scraping.

Diamond pad 1.jpg Diamond pad 2.JPG
 
OK...finally had time to write it in my email and cut and pasted it so I could not lose it.

Peter I don't recall you using the prism SE to glue down Rulon? How can you be assured the clamping pressure was evenly displaced ? I would have told you to glue it to the lathe bed. Did you machine out some material to so the Rulon compensated for wear and grinding the bed?

If you remember I always tell everyone to set the saddle down on the lathe bed and indicate the bottom of the area where the apron bolts too. If it was milled you should have first checked that surface with a straightedge then set it on the mill indication the holed surface. I show this in several of Keith Ruckers You Tube shows.

If you glued the Rulon to a surface you did not mill then the centerline will be to high. Did you prepare that surface before gluing, check to see if it was flat with a SE?

Did you blue the Rulon to the bed? While scraping it did you indicate that apron bolt on surface when it was being blued up on the bed? How thick was the Rulon before you scraped it? Did you scrape off .006 " If you started with .030" Rulon and scraped of .006" will the centerline be low or high?

Lets get into the guts here and in my opinion indicate the saddle on the lathe bed and not the 3 jacks. 3 Jacks are good before gluing to be the detective. Will you be cutting in oil grooves? I hoe you marked the oil holes or they are easy to find from above. If the rulon is to thin now you may have to redo it and glue to the bed. Thanks for asking for my help. Rich

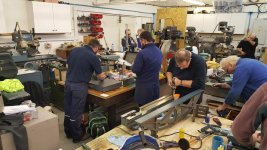
Pic's of the UK Class Pete helped organize. Pete is the fellow to the right of the entrance door. The class was at a hobby farm and are mascots were 2 lovely pigs...lol

20171216_131228.jpg20171215_122152.jpg20171215_082230.jpg20171213_150112.jpg20171214_145811.jpg
 
Yep machined, roughed and glued. We did it all at the class Rich. I guess you must see so many projects at so many classes it's not possible to remember everyone's personal project. I didn't have the lathe bed with me as with all the other stuff I had to do I didn't have time to strip it off (nor the space there really) so I used the prism. Know better next time.

hlvturcite 1.jpg hlvturcite 2.jpg

Can't remember exactly how much we milled off but we worked it out in the class. I figure that the high spots must be where I couldn't get all the glue squeezed out and lowest point near the far edge must be the target height so I'm scraping down to that. It's amazing how fast you can take a few thou off this stuff I had to be careful not to over-scrape the close bits.
 
I sort of recall someone machining something. Yeah I was a bit whipped to after spending 2 weeks in Germany teaching 2 classes in 2 different cities. Then flying to London and teaching you guys. The farm and the golf course where I stayed at made it another amazing memory. Pete, you're discovering the learning curve of rebuilding. We used to say it took 4 years working under a Journeyman full time to get the basics down. Your like a lot of the students, smart as a whip and venture into no mans land because it feels good. I am sure you will no better next time like you said. I learn something every day and when I am done learning I will be a dead man. I can't express strongly enough how I so appreciate you and my other students contributing here passing on the knowledge I gave you plus adding a little of your own. The forum is again under attack and I am sick of defending myself and YOU Guys who have learned by doing and not from those who do nothing but flap their idiotic gums. Thanks for the photo's proving you have done it! Rich
 
Well it turns out that Richard's concerns have come back to bite me. Although front-back I am good, the saddle is now 12-13 thou low :(

When I originally machined the saddle for the turcite I had no plans to re-grind the bed, just to apply turcite to remove the rust stain from the underside of the saddle and re-scrape for wear. After a good year at work which gave me no time to move the project on (but plenty of spare cash) I had a chance to get the grinding done on several machines and get rid of the single score in the top of the bed from some kind of trapped debris in the past. The combination of grinding the bed and the heavy scraping I've had to do on the turcite has left me needing to do the job over. I always knew it was a possibility once I decided to have the bed ground but I was kinda hopeful that if it was low it would only be a minimal amount but knew I was in trouble as soon as I put the gib in the gap because it sank in way too far.

To measure how much I was out I fitted the half nuts and the leadscrew then knocked the bearing out of the end support and fitted that. Clasped the leadscrew in the half nuts and adjusted the gib so the screw was centred vertically in the hole. Then I used Jo blocks to measure the gap difference, judging it by feel, which was easier than I expected. I had a .108" in the bottom and a .134" in the top.

lowsaddle1.jpg

I packed the saddle up with 12 thou feeler gauges and it brought the variation to just a thou both top-bottom and left-right.

lowsaddle2.jpg

Bit disappointed, but I'm not spoiling this ship for a hap'orth of tar, so I'm getting more Turcite and doing it over again. The benefit this time is that I can use the bed to set the turcite so it will glue down a lot flatter and should need minimal scraping.
 
Would you know it but there's only a shortage of the stuff in the UK due to 'supply problems'. I've had people looking through their off-cut boxes and all sorts. Eventually I've found some 60 thou thick which is on it's way to me now. I'll post an update when there's progress.
 
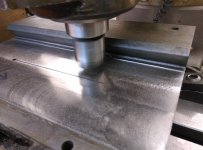
Finally I got a chance to finish re-doing this saddle. I couldn't get Turcite so I bought some 60 thou Marlon way material. It's a bit softer than the Turcite and without the bronze particles but it went on very well and it's easy enough to scrape. I glued it on with Araldite 2013 which is just incredible adhesive and let it cure for a few days, then fly-cut it down to plus 5 thou and scraped the rest. Now the leadscrew lines up dead centre with the support bracket and the tapered gib stops at pretty much the perfect depth.

HLV marlon 1.jpg

HLV marlon 2.jpg


Back
Top