What's new
What's new

LeBlond Dual Drive Cross slide and compound removal/installation.

Cobranut

Aluminum
Joined
Jul 21, 2018
I tried searching, but does anyone know of a thread which describes disassembly/reassembly of the Compound and Cross Slide on a LeBlond Dual Drive with the Taper attachment?

Details on making a new Cross-feed lead screw and replacement nut, especially with dimensions, would be a bonus.
I can buy a generic bronze ACME nut and lead screw material for a small fraction of what LeBlonde wants.

I'm also missing the sliding bed bracket and the drawbar for the taper attachment, but those should be pretty easy to make on the mill.

Thanks in advance,
David
 
I did a tear down of an early Dual Drive with a taper attachment a few years ago.
As I recall everything was heavy. And removing the support for the lead screw and other shafts was a pain.... there were 2 cap screws and 2 PIA studs. Removing the tapered pin for the clutch was a learning experience for me.

Other wise heavy is the only thing I can recall.
Presently the lathe is hard to get to....
Ill be glad to take pictures or dimensions of what you want as long as it does not require disassembly.
 
Thanks,

I printed the relevant pages, which should help.

I'll compare and see which taper attachment design I have. I think it's the later one.
 
I did a tear down of an early Dual Drive with a taper attachment a few years ago.
As I recall everything was heavy. And removing the support for the lead screw and other shafts was a pain.... there were 2 cap screws and 2 PIA studs. Removing the tapered pin for the clutch was a learning experience for me.

Other wise heavy is the only thing I can recall.
Presently the lathe is hard to get to....
Ill be glad to take pictures or dimensions of what you want as long as it does not require disassembly.

I detect a recurring theme here, heavy. :eek:

I'm missing at least a couple parts of the taper attachment, notably the bed clamp bracket and the drawbar.
Some detail photos of the taper attachment would go a long way toward visualizing what I need to make, and how it all fits together.

Thanks,
David
 
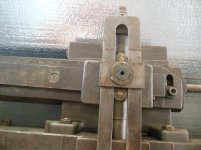
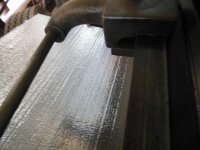
I would have to go out to the shop and take a look at it to recall disassembly on the cross-slide... As I recall the the nut on the end of the screw is removed and the entire taper attachment is removed so the screw can be slid out of the cross-slide. The taper attachment assembly is definitely heavy... and, as stated, it's held on but a socket-head cap-screws with a few dowel-pins. It must be carefully worked off.


Disassembly of the compound: The nut sticks up into a recess in the casting of the compound top, you must remove the screw then the nut in order to slide it apart. Remove handle & dial, use spanner wrench to back out the feed-screw retainer (the part the dial matches up to) then remove the screw by backing up the threads. Remove set-screw from the front of the compound base (this holds the nut in) and carefully remove nut (you may have to reach in through the hole the screw passes through and push it down a bit until you can get a purchase on it with a collet, pliers etc to pull it the rest of the way out). Loosen gib and slide apart. I've included a picture of the disassembled halves. The hole in the edge of the base is the hole the nut inserts through.

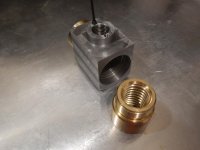
Cross-slide screw & nut: don't you have them to recreate? The screw is easy... but lots of dimensions that I'm not sure I have the time to recreate at the moment. The nut: IMHO can be better made. I used 2 thread-in bronze nuts and made a housing for them to screw into. Because the thread-pitch on the outside of the nut is different from the inside turning a nut will take up the backlash. I "notched" the nuts so they can be turned by reaching below the cross-slide, and a locking 4-40 set-screw can be accessed by removing the top hold-down bolt to reveal 2 set-screws in the top of the housing. See attached picture. I also drilled a hole through the bolt that holds the nut in the cross-slide so I could add a lube point that feed down into the cavity between the 2 nuts.
 

Attachments

  • DSCN0034.jpg
    DSCN0034.jpg
    96 KB · Views: 141
  • DSCN0189.jpg
    DSCN0189.jpg
    92.4 KB · Views: 237
Thanks lazz,

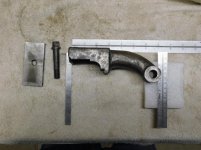
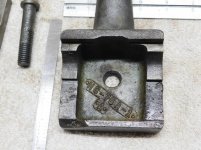
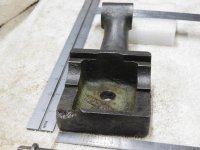
The pics of the taper clamp bracket are helpful, as I'm missing that part.
It looks like it should be pretty easy to fab a bracket that should work.
Any detailed pice of that part, particularly the clamp area, would be very helpful.

Thanks again,
David
 
Countryboy19:

That is very helpful.
I'm out of town right now, but will be getting back into this when I return.

I especially like your solution for the cross-slide nut.
I was already planning to make a block to hold a screw-in nut, but I'll probably copy yours to be able to adjust out any backlash in the future.

I was just hoping someone who had already done this had the dimensions for the screw, so I could make a new one while mine was still together.

Many thanks,
David
 
lazz,

That is excellent. Thank you very much.
I'll probably make this from aluminum stock, as I won't be using it very often, and aluminum is much easier to mill. Also, mine will probably be bulkier than the cast part, so the lighter weight will make it easier to install/remove.

Thanks,
David

Did you plan to make this clamp bracket soon?
 
It will be a while yet. I'm out of town on business right now, and still have some work to do on my mill, as well as buying a clamp kit, parallels, etc. before starting on this. I probably won't need the taper attachment for some time, but I definitely want to get it working eventually.
 
Countryboy19:

That is very helpful.
I'm out of town right now, but will be getting back into this when I return.

I especially like your solution for the cross-slide nut.
I was already planning to make a block to hold a screw-in nut, but I'll probably copy yours to be able to adjust out any backlash in the future.

I was just hoping someone who had already done this had the dimensions for the screw, so I could make a new one while mine was still together.

Many thanks,
David

I'll have to dig up my old one and measure for ya.
 
Countryboy19:

That would be awesome if you had those measurements.
No hurry though, our job scope just got expanded, and I probably won't be back home until early December.

Thanks a bunch,
David
 
I thought they were setup to where you don't need to sign in. I made those scans and I don't have any website storage setup currently to host them.

Actually, I'll go post them on vintagemachinery.org.
Vintage Machinery link
 
Last edited:
I want to extend a very BIG THANKS to Lazz.
He was casting some aluminum parts, and without even being asked, he cast a taper clamp bracket for me. He pm'd me asking if I wanted it, and sent it to me for a small fraction of what it should have cost.

This kind of help is way above and beyond anything I expected from a web forum, and is greatly appreciated.
Hopefully, as I gain machine tool experience I can pay it forward someday.

Thanks again,
David


Back
Top