What's new
What's new

scraping procedure/process - have I got a good plan?

small.planes

Aluminum
Joined
Sep 5, 2008
Location
Leics UK
I've been doing a lot of reading / watching various you tube vids, and I think I understand the process, but its always good to write it down and see if I've got it correct and ask if I have.
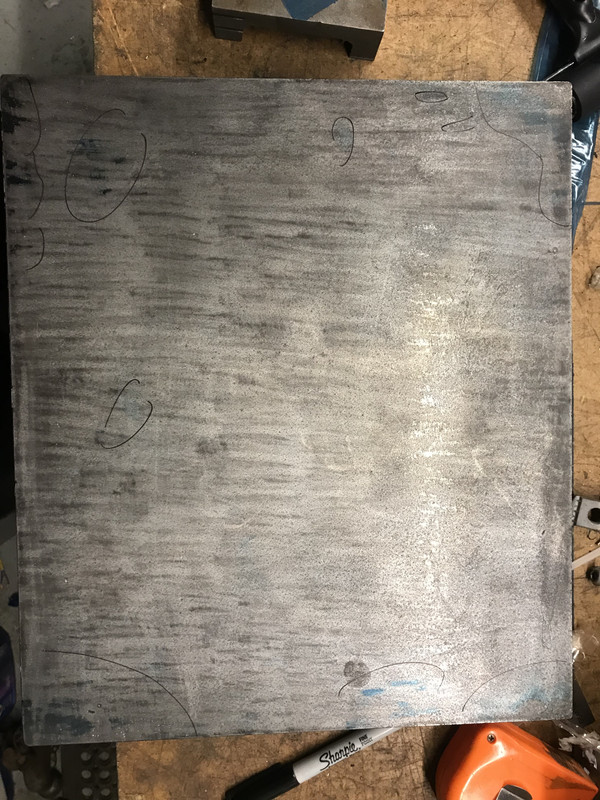
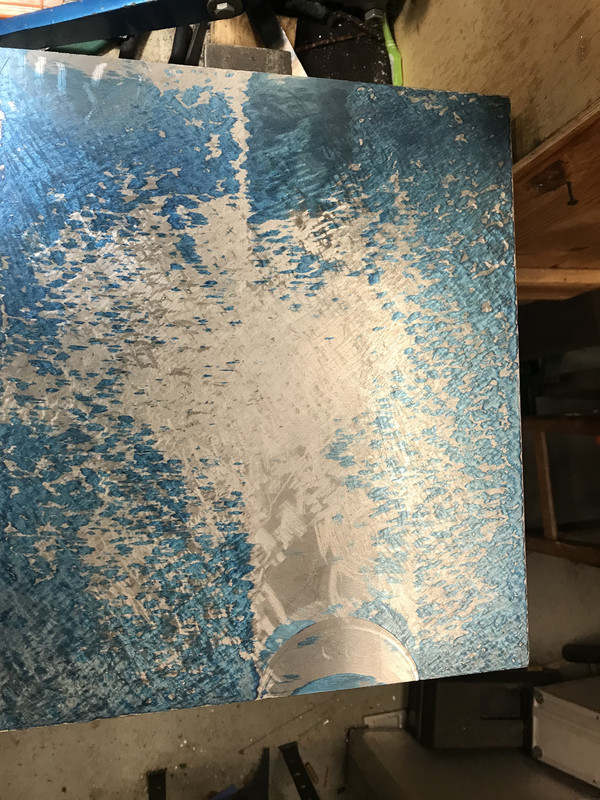
A bit of background: I am building a CNC machine. The base of the machine is an old small (12"x14") surface plate.
The plate was not in good condition - I think someone 'reconditioned' it using sandpaper to knock off the rust...
I have face milled it, and its 'fairly' flat but before attaching linear rail to it it seemed like a good place to learn scraping.

I think the sequence is:
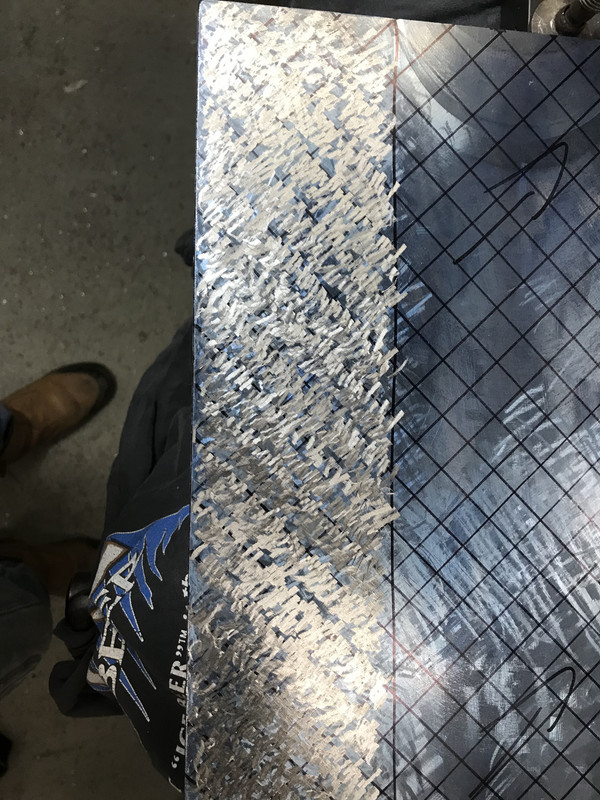
scrape once ////// all over, and once \\\\\ all over using about 20mm / 3/4" length on the scrapes to give the surface some 'texture' (45 degrees to long axis, 90 degrees between strokes).
Layout a grid to help keep the strokes in lines.
Don't worry too much about touching scrapes.

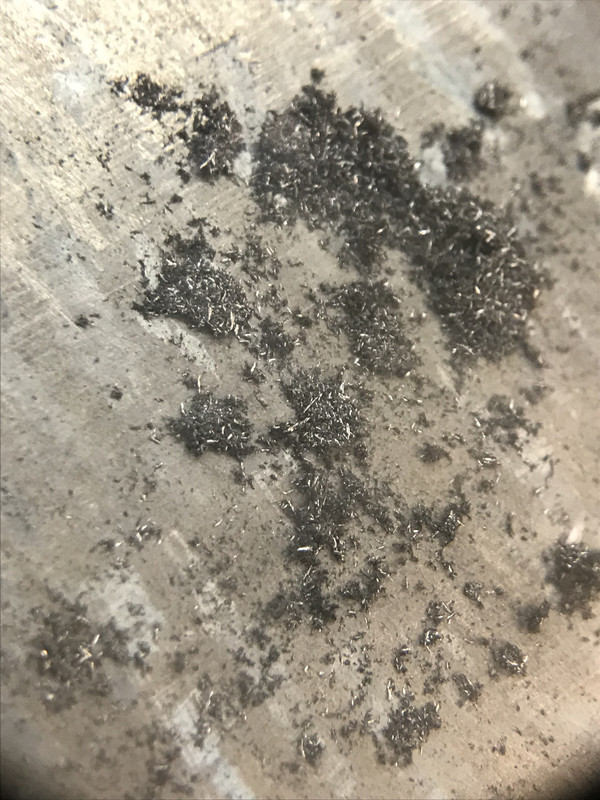
Then clean off swarf, deburr with a smooth stone. Check for burrs / grit / etc with fingers / hand.

Place on blued surface plate and try hinging.
Do large flat parts hinge successfully?
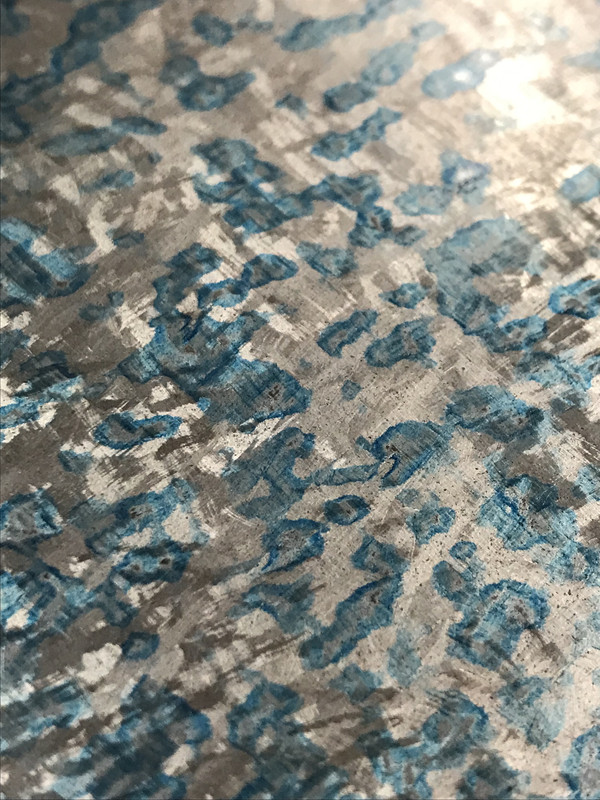
rub on the blue to get some printing.
How long to rub for?

Lift - I think there might be significant 'suction' to overcome here if the part is mostly flat - like gage block wringing, but less good x much bigger area.
Any tips on dealing with that?

Turn over onto bench and look at the blue.
Try to see if there are 'areas' which have blue and areas which don't.
Then sharpie around the areas to avoid - which have no blue on them and do another pass of 20mm / 3/4" touching scrapes on all the other bits.

Repeat until there is some blue on the whole surface - not worrying too much about just cutting off the points, rather scrape over the whole areas where there is some blue.

when there is some blue on all the areas, or at least no large areas without any blue - how big an area? 1"x1" or larger/smaller? then switch to a different sort of scraping.

This is using a 10mm / 1/2" stroke, and space the scrapes apart by about the same?
Again cut the areas, not just the blue spots and fill in the spaces with the 90 degreee cut.
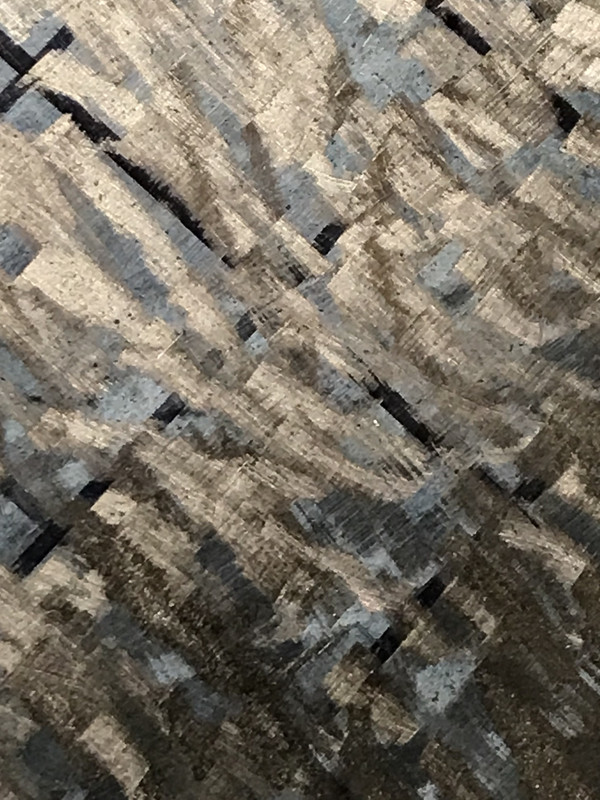
So a single scrape pass is now / / / / and then \ \ \ \ then deburr/blue etc? this will give a /\/\/\/\/ pattern to the scraping.
On subsequent passes where I scraped / is should scrape \ ?

At some point after this switch to just cutting the blue spots - when do you switch?

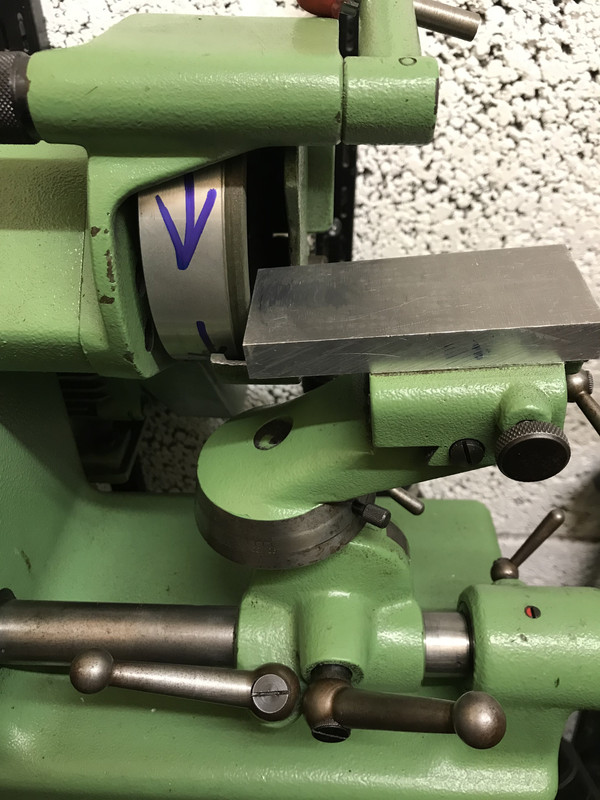
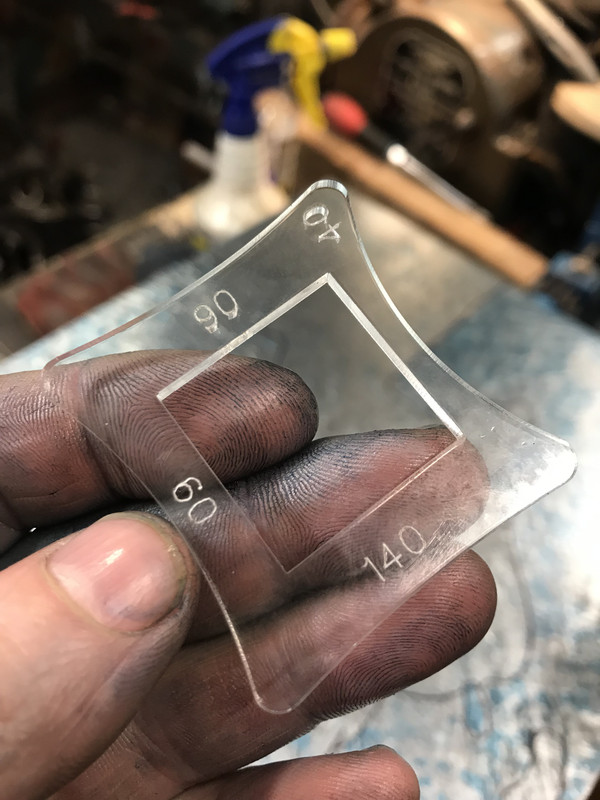
I have made a carbide tipped scraper (using an old milling insert) and setup to grind it with a diamond wheel to 95 degree included angle. I have also knocked up a diamond honing wheel - to use 5 micron diamond paste on to polish the edge - my diamond wheel is 300 grit IIRC, so produces nice, but not polished finishes.


How is my understanding?
What have I missed?

Dave
 
Here a couple of You Tube shows from my students. After Jan posted this I told him how to unstick the plate before lifting it. Lay aa thin piece of nylon plastic on the plate just in front of the handle and use a curved pry bar, slide under the handle and the bottom of the bar setting on the granite and lever up the one side and slide another piece of nylon plastic under the plate, lay down the bar and lift it up.

The rule of thumb when applying the blue is to roll it on with a foam roller first and then use a hard rubber brayer to spread a thin even amount of the blue. Your thickness is about .00005" and you can see through it or transparent. Rub the plate on the granite to a count of 10. The longer you rub it you can see the print better. Also thee first rub, try yo slide in a 1.5" feeler gage around the outside. He's using a power scraper, but the technique is the same.

Basic talk from Stefan Gottswinter my friend and student, Both students have many shows. Jan has more on rebuilding machines, alignment, hand and power scraping. You can also go to the top of this forum and look for a sticky about a Studer Grinder. Brue has alot of pictures.

Scraping basics - Scraping flat - Part 1 - YouTube <--- part one

Scraping basics - Scraping flat - Part 2 - YouTube <---part two

16x20 inch cast iron plate scraping - YouTube

Cast iron surface plate scraping part 2 radiused vs flat blade - YouTube
 
Thanks Richard.
I’ve read the rebuild thread and watched most of stefans videos. Hadn’t seen Jans, so now I have some more to watch.

The bump scraping is around 7 mins for anyone who comes across this later.
So that technique is sort of hit with the heel of your hand and I presume only for the final finishing?

Dave
 
It's at 12:02. Hell I taught the class...Hendic, was the student showing it. I TAUGHT HIM TO DO IT!!! Stefan came to the Denmark class where I helped him to scrape better and I asked him to be my Interpreter. What he shows on his You Tube is almost word for word what I taught him and what's inside his student manual I gave him. I don't have issues with you tube as long as the person doing the show knows what the hell he is showing. Don Baley has a good one too on showing the Moore method. Many on You Tube are clueless. Many of my students read practical machinist. So don't get offended if someone corrects your techniques once you start explaining things.
 
Peter. UK
Titanium

He also lives in the UK and is an excellent scraper. You should ask him for help if your close. If he can find some time, maybe he can show you how to scrape. I added some info about him in the BL-40 thread on here.
 
Richard, this video Richard King Scraping Class - YouTube you linked is 12:02 long, with bump scraping at around 7 mins.
I’ll get in touch with Peter, there is a chance we have previously met - the UK group of people who do this sort of thing is quite small.

I have no problem with people correcting me - that’s how we learn :)
I have made a start - will post pictures later when I can get them onto a computer. I cocked up the face milling and left a 1 thou deeper 4” wide pass down the middle of the plate, but that’s mostly scraped out now.

Buck, To mount linear rails and have them function correctly they need a flat surface, and as there is a pair I need 2 flat areas that are the same height. In theory I could just do 2 lanes for the rails and be done, but having a whole known flat I think will help in the setting up of the other parts - like the saddle ways and the column. The machine is intended to have 150mm (6” near enough) travels on fully supported ways. It’s for making very small precision parts and I think starting with a surface plate was cheaper than a similar sized but less rigid “chunk” of iron.

Dave
 
RE: [Buck, To mount linear rails and have them function correctly they need a flat surface, and as there is a pair I need 2 flat areas that are the same height. In theory I could just do 2 lanes for the rails and be done, but having a whole known flat I think will help in the setting up of the other parts - like the saddle ways and the column. The machine is intended to have 150mm (6” near enough) travels on fully supported ways. It’s for making very small precision parts and I think starting with a surface plate was cheaper than a similar sized but less rigid “chunk” of iron.]

Dave

Agree a CI plate would make a great machine base.

Likely a photo is due when you get it done.
Buck

Oh, retired/used broach inserts/ flat cutters make very good and low price rails, often at scrap prices. many 18 - 24" (and what) long...with threaded mounting hole in the bottom.. perhaps you have a broach shop nearby.

They, with a little grinding, become hard through straight parallels.
 
AS promised here are some pictures.
Prior to this the only thing I have scraped was a couple of areas that were about 2" wide and 6" long for a grinding jig.
That was done with HSS power hacksaw scraper - Uk source for carbide scrapers and probably took longer than it should have.

The plate I am working on as received - I took a print to see how bad it was. It touched down only at the extremities.

as-received-print.jpg


Doing some rough measurements (as per Don Bailey here: https://youtu.be/hui6pPZH36U) showed something like 2.5 thou hollow in the middle.

I have a Large mill, so I faced the ribs off, then turned it over an face milled the top. I managed to leave a step in one of the passes, but it was 'flatter'.
Then I scraped at it a bit and the HSS was just dulling almost immediately.

first-pass-after-milling.jpg


So I made a carbide tip for it.
To sharpen I knocked up a table for my Deckel S0 - the only thing that has a diamond wheel on it - to replace the index head:

Deckel-Table.jpg


and I made a lapping tool using an old motor and some bits of angle:

IMG-1929.jpg


The scraping insert is a triangular milling insert silver soldered to a piece of HRS - you can see it on the table.
I did some scraping on the plate and the step disappeared to fingernails, but the plate didn't seem to get to the stage of blue all over.
I suspect I switched form roughing to just trying to pick at the blue spots to early.
That's when I did some thinking and a bit more careful youtube watching and wrote the plan above.

Following that I drew a grid and scraped whole areas again.

This was my grid and rough scraping

IMG-1937.jpg


Closer pic:
IMG-1943.jpg


And this is where its got to so far:
IMG-1957.jpg


Its touching at the ends, so it doesn't rock on the master, but its not really showing blue all over.
I think I need to Scrape the marked areas and see how it prints then.

I haven't yet mastered the art of spreading the blue - if I keep it thin then I cant see the transfer, but I think its too thick or not even enough on the plate in this print - especially the lower right corner.

The plate now indicates about 0.5 - 0.7 thou using the same Don Bailey method, so I think it is flatter overall.
The grooves directly on an indicator tip cause a something like 3-4 tenths 'bounce'

Dave
 
Just my $.02, I like to start with a lot of blue when I'm roughing. WAY more than you have on there. With heavy roughing you're trying to remove multiple thousandths of material in as few cycles as possible. At this stage, slather it on, if the whole plate prints then it's too much. If half of the plate prints, then great, you found your low spots and you can avoid them.

That only applies to heavy roughing, for finish scraping you need a very thin layer.
 
I do similar to jwearing when roughing something bad and I use a beaten up granite plate to stat off with. It's very flat - A grade at least, just full of digs and chunks off the edges.

If it sucks the plate down to the work you're either very flat already or you got too much blue on it.
 
If I was standing behind you teaching you I would tell you to "scrape paint" when your roughing meaning no need to have such a short controlled stroke when you start. Also you need to use a base color first to dull the shiny metal. In the old days we used "red lead" mixed into a paste and we rubbed it on semi wet with white felt and then wiped it off dry. It was banned here in the states several years ago as it is hazardous.

Now I use Yellow Canode mixed with glass cleaner like Windex. I squirt out about some about the size of a silver dollar coin or 2" dia. 1/16" thick into a plastic paint pan, give it 3 or 4 squirts of Windex and use a foam paint roller to wet it evenly on the roller. Then roll it out on the cast iron (CI) plate evenly all over, then take a rag and wipe off they yellow ink until it is dry to the touch. You just want to leave a super thin in the pours coat.

If it is left wet or to thick it will smear the blue. You use the Yellow on the CI plate e you blue to before you blue up to remove the machining marks. I would use a 60 or 90 mm radius blade tip, negative 5 degree rake on both sides of the tip. When you "scrape paint" hold the scraper handle at about 20 degree's angle from the flat angle. Your width on your rough scraping looks about right. You also should measure the depth of your scraping. Minimum of .0002" to a Maximum of .001". Once you remove all the machine marks, all over. Reversing the angle of approach that you are doing correctly.

45 degree to the plate one way and 90 degree to the first pass. (writing this so others reading can understand too) You can check it like Bailey does or if you have a straight edge lay it across the plate and try sliding in .001" or .0005" feeler gage. Once you identify the low area's like your doing with the magic marker, measure the depth and decide to "Blind" scrape or scrape paint until the low areas are less then .001" No bluing. Now you can over stone it too. Use mineral spirits to wet stone it to remove the burrs plus some of the high spots, Once it is flat all over then you can blue it up, much like your doing, shorter stroke the more points you get. I'm getting writers cramp and will add more later. I have some pictures.


20191016_115255.jpg20191016_115346.jpg20191016_115302.jpg20191016_094612.jpg
 
I dont think I am spreading the blue well. I am using Stuarts micrometer - which is grease/oil based.
I have a rubber brayer, but its hard to give a 'thick' layer with that, almost seems the ink is absorbing into the granite as I push the brayer.
If I spread with a rolled up cloth, or my fingers the blue ends up with 'grooves' in it.
Does that actually matter? I assume it does - thicker blue will contact before the thinner, so print where the thinner one wouldnt.
It also seems like when I check for bits in the blue I end up with blue fingers, but when I then print I dont get any transfer.

My master plate is very dark, which I dont think helps -

IMG-1980.jpg


I tried a rolling a drop of 32 weight oil on the blue on the plate - boy did that stick the plate down.
It gave this print:
heavy-print.jpg

which is very 'smeared' - you can see the direction I rubbed (left to right).

When I place the plate down it 'hovers' for a few seconds no matter the blue thickness. If the blue is thick then it sticks, if its thin it will slide.

I think the print shows that the centre is still low, so I should 'shovel off' passes on all the 'red' areas (some of them 2x some 1x), whilst avoiding the 'green' areas:

heavy-print-Copy.jpg


I dont have canode, it doesn't seem easily available in the UK - I did see soemone on youtube use a coloured sharpie and some meths to just 'tint' the metal - Ill try that.

Dave
 
Did a bit of thinking at work ( unusual I know ;) ) I think my blue is too thick to spread successfully and get even and get a good print. The canode on YouTube vids seems much runnier. So I mixed up some with 32wt hydraulic oil and spread it on the master.

C055685-A-771-F-4986-98-DC-5-B754-F0-FE51-F.jpg


Bit thick, but after a few prints and cleaning off I got it to give me a nice looking print :

A52-DB56-D-0-A3-C-40-F5-9-B64-8-EF38-A2-D2-CA6.jpg


The marks are nicely defined

DF9-EAB7-B-00-BA-4-E60-9189-9963-CCDC0465.jpg


We have a laser cutter at work so I knocked up a little radius/square thingy.

00-AE2-FA5-2-B99-4372-AC14-31-D923-CA6935.jpg


My insert is just under 60mm radius. The square is the 1” for counting points when I get that far…

I layed out a grid and tried to paint scrape. Finger for scale.

0-FE41279-F818-4-AC3-AF7-A-9-C79-F637-D3-C7.jpg


The chips are swarfy looking

D72-D04-A1-0435-4-FF1-9155-72-C5-D33999-F1.jpg


Will try a couple of rounds of paint scraping at 90 degrees and see how it looks then. If I’ve managed to finally get the blue to spread consistently and thin/thickly enough I think that’s one hurdle over :)

Dave
 
Nice progress in getting marking to show what you need to see.

LOL on that laser cut square radius thingy. I made on a couple years back ( just saw and file) because I had a little piece of polycarbonate that looked appropriate. It might have worked well but I could never find it. I'd set it down somewhere and then look right through it. Maybe if I hung it on a nail it would have been useful, but mostly it was there - just invisible.


Back
Top