sure, more parts you remove better for you, more access. What you do now is next:
-have a tool in your turret, use tool eye and teach it. Make sure you know X position,
cause when you put everything back, you gonna lose this X-axis home position shift. Once everything is back, you teach same tool again and see the difference. That difference will go into X axis home position shift( parameters screen)
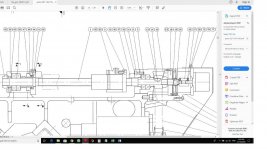
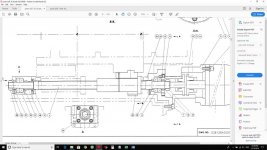
-very old machine, never done this particular one. Any way, encoder has to go, then nut, then gear. Then plate 31 and ball screw has to be pulled out. That plate 31 might be the one that preloads bearing, if preload is controlled by outer rings, not inner rings. That is if new bearings have different thickness, plate 31 needs to be machined. I need to call my man and ask him if I am right. Old man has more knowledge about old Mazaks.
-lower bearing is same story , but this one has this funny labyrinth sealing, positions 44 and 46. I cant figure out what to do with them. I am under impression that ball screw has to be pulled from the right side. Bottom housing is bolted to the carriage and it has two dowels. So it stays untouched as a reference. Top housing can be removed, that will give access to top bearings and let you pull the ball screw and somehow remove bottom bearings. ( again, I am puzzled with the way this labyrinth sealing is done, drawing cant be doggy) Any way, if you do it this way, then when you assemble everything back make sure you put right housing in right position and not bending ball screw ( move carriage up and down and let ball screw find its place). I will have a look and chat to some guy, maybe what I am telling you is absolute nonsense, but honestly, from this picture I cant understand lower bearing assembly.
Wait a minute.... I found drawing for your machine someone sent it to me the other day.