What's new
What's new

Grooving on a T1?

mmurray70

Stainless
Joined
Jan 11, 2003
Looking for some advice on grooving for my QT10 with T1 control. How should I be programming grooves that are much wider then the grooving tool? Should I do a series of grooves and set spacing to overlap or should I be using a bar out (with the box around it)? Will bar out allow me to do a corner rad, finish one side, bottom, other side and another corner rad all in one finish pass?

I dont see anywhere to specify tool width so what am I supposed to do here? Just enter the proper values for Z so it works out based on width of the tool?

Sorry for the basic questions. Im a mill guy, still learning basics on the lathe.
 
I haven't programmed the T1 at work for a while so i'm a bit rusty. There is defiantly somewhere to enter the tool with. I will look at the manual at work tomorrow, and see if i can remember how it is done.
 
Looking for some advice on grooving for my QT10 with T1 control. How should I be programming grooves that are much wider then the grooving tool? Should I do a series of grooves and set spacing to overlap or should I be using a bar out (with the box around it)? Will bar out allow me to do a corner rad, finish one side, bottom, other side and another corner rad all in one finish pass?

I dont see anywhere to specify tool width so what am I supposed to do here? Just enter the proper values for Z so it works out based on width of the tool?

Sorry for the basic questions. Im a mill guy, still learning basics on the lathe.

Its been a while since I have been on our T1 but IIRC you have 2 options on the type of groove (type 0 and type 1). You will want to use type 1 for a groove wider than tool. You will input the tool width on the same line as you input the grv width in the program on your grv process along with your finish allowance. As long as you want the same size fillet radius on both sides of groove this will work for what you want to do. I have never put a radius comp in the tool data but instead compensate for it in the program for edge breaks and such. If I want a .02 fillet rad and I have a tool with a .007 rad Ill program the final cnr to be .013.
 
Looking for some advice on grooving for my QT10 with T1 control. How should I be programming grooves that are much wider then the grooving tool? Should I do a series of grooves and set spacing to overlap or should I be using a bar out (with the box around it)? Will bar out allow me to do a corner rad, finish one side, bottom, other side and another corner rad all in one finish pass?

I dont see anywhere to specify tool width so what am I supposed to do here? Just enter the proper values for Z so it works out based on width of the tool?

Sorry for the basic questions. Im a mill guy, still learning basics on the lathe.
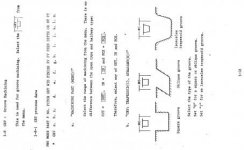
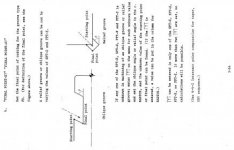
This is the Grooving section from the T2 Manual.
Hopefully enough of this applies to the T1 control that you can get the hang of grooving.
If the photos aren't clear enough, let me know and I can e-mail you a PDF.

Grooving_T2_01.jpg
Grooving_T2_02.jpg
Grooving_T2_03.jpg
Grooving_T2_04.jpg
Grooving_T2_05.jpg
 
I looked again and I dont see anywhere for tool width on my particular machine. Not in program or tool data. Looks like the T1 is a little further behind other controls when it comes to grooving. In the manual program examples they use multiple overlapping grooves to create a single wide groove. For example cutting a 3/16 wide groove with a 1/8 tool they would program 2 grooves with a pitch of 1/16th. Looks like it will just plunge twice, no finish. Seems kinda crude. And I dont think there are any options for rads or chamfers.

Bar out (with box around it) does work, and seems to do fairly well for my needs. I ran the small batch of parts I had to do this way. I just have to program it with the tool width in mind, specifying exactly where the left corner of tool needs to go. Corner rads work at the bottom of the groove. Doesnt work for the burr at the top of the groove, but I bet i could program a taper within the bar out cycle to get that too if i had a big run of parts to do.

Thanks again, if anybody here has a T1 and knows for sure of a better soloution please post it.
IMG_1026.jpg

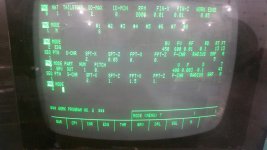
This is from our T1 control. Im not sure if there were different versions of the T1 or if your just missing a parameter. process #5 is what we have for grooving
 
Thanks for the picture Kevin, yours is different then mine. Not sure if its a parameter or different version but yours is different for sure. What year is your machine? I think mine is an 82 or 83. I attached a pic of mine with no mention of tool width or groove width. Pretty certain at this point that my machine simply does not allow for the tool in grooving cycles. Cant find anything on the controller about it anywhere and the origional book of part examples all show a note of tool width and program multiple grooves with a pitch that overlaps.

Not really a big deal for me anyway. I can use overlapping grooves for rough stuff, and also Bar out works fine as well and allows a finish pass, i just have to program it with the width of tool in mind which isnt the end of the world for most stuff. Thanks for the help again guys, at least I know now that I wasnt missing something obvious.
 

Attachments

  • 20180723_214952.jpg
    20180723_214952.jpg
    93.5 KB · Views: 177


Back
Top