What's new
What's new

Preparing for turret hydralic seal replacement on 1989 QT8N

carbonbl

Cast Iron
Joined
Apr 15, 2016
I have about a week of downtime between jobs on my 1989 Mazak QT8 and would like to replace the hydraulic seals on the turret shaft assembly during this time. I have a steady hydraulic fluid drip on the turret side that flows from between the turret housing and the rotating assembly, so I am assuming these seals are the culprit. I have pulled the rotating turret disk and curvic couplings off before for alignment but have never gone any deeper into the hydraulic piston and motor assembly. After looking through the parts diagrams it seems fairly straightforward, but I wanted to double check a couple things and see if any PM members have advice to make the process go smoothly.

Questions:
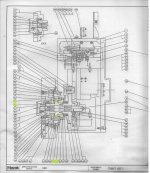
  • It looks like I need to replace a total of 4 O-RIngs to restore the seal. These are parts 74, 78, 79, and 83 highlighted in the diagram attached below. Is there anything else as far as seals or wear items that should be replaced while I am in there?
  • It seems like this can all be done from the turret/shaft side once the rotating assembly is removed. Is there any need to enter from the backside of the turret or remove the gearmotor assembly?
  • Since all the JIS sizes of these O-Rings are listed in the manual, I was just going to order the necessary sizes in 70 durometer Buna-N material to avoid the Mazak mark-up. Is there any reason to order a different material/durometer or to order the OEM Mazak parts instead?
  • When I remove the rotating part of the turret, I have unclamped it while the machine was running. I'm assuming the procedure to access the seals will be to unclamp and remove the turret while the machine is on, then turn the machine off to depressurize the hydraulic system, and finally disassemble the piston and replace seals. Is there anything else, process or preparation, that I am missing? Is there any adjustment to the hydraulic piston/motor assembly that must be done upon reassembly?

I know these are basic questions for anyone who has done this job before, but the single drawing of the turret innards only helps so much for someone who hasn't done it before. Since the machine needs to be making parts again soon, I'm trying to plan ahead so I don't get any surprises during the maintenance. I would really appreciate anyone with the experience on a similar machine to let me know if I am on track here, thanks!
 

Attachments

  • QT8 Turret Diagram_highlighted.jpg
    QT8 Turret Diagram_highlighted.jpg
    94.2 KB · Views: 1,885
  • QT8 Turret Parts List 1_highlighted.jpg
    QT8 Turret Parts List 1_highlighted.jpg
    85 KB · Views: 384
On my QT-10, there's a big 8" dia rubber wiper that keeps chips, coolant and junk out of the cervic-coupling behind the turret.
Your QT-8 probably has a similar wiper. I believe it is part # 51 in your drawing, but it's hard to tell.
I replaced that with a fresh one from Mazak since mine was ancient and very chewed up.
They are proud of that thing, It was about $105 plus shipping.

I wouldn't replace it if it's in good shape, and you only have to pull the turret to switch it out later.
(None of the hydraulics or the shaft need to come out, it's just pushed into a groove in the ID of the back of the turret).
 
More than likely it is the piston o-rings that are leaking, as they abrade with the action of the piston motion.

While you are in there, it is probably a good idea to pull the entire cylinder out, to replace the two little o-rings between the cylinder body and the turret. You would hate to replace all the big o-rings, only to find out it was one of the little ones behind the cylinder body.

Mark your cylinder radially, as you definitely have to re-install it in the correct orientation.

And no, you don't have to remove the rear turret plate to access what you need.

Be sure to use a high-quality, long-life grease on the main shaft, where it rotates inside the cylinder piston.

And be sure to thoroughly clean both halves of the curvic coupling, and grease the hell out of them before reassembly.

Good luck with it!

ToolCat
 
Thanks for the suggestions guys.

cnctoolcat, is the O-ring between the cylinder body and the turret the one labelled #79 in the drawing? I can't see any other O-ring that would fit that description.
Thanks for the heads up on cylinder orientation, I will be sure to check that. I have some Kyodo Yushi LRL No. 3 grease I'll use on the shaft and coupling.

cwtoyota, I already replaced that wiper when I pulled the turret for aligment, but yeah this job would have been a great time to do that. The previous owner ran it for a long time with a destroyed wiper and I had a hell of a time cleaning all the sludge out of the coupling area.
 
It looks like the small o-rings between the cylinder body and turret base are parts 26 and 27....?

They seal off the transfer of hydraulic fluid from the turret base into the cylinder body itself.
 
It looks like the small o-rings between the cylinder body and turret base are parts 26 and 27....?

They seal off the transfer of hydraulic fluid from the turret base into the cylinder body itself.

I tore into this job yesterday, found these. They are #77 on the drawing, P7 size. I had some 6.6x1.8mm nitrile O-rings on hand that worked great.

It's all pretty straightforward once you are in there. As you said the cylinder must be oriented correctly for the hydraulic oil passages to be lined up. Same thing with the turret shaft, it comes right out once the cylinder is removed but one of the spline teeth on the end is not full length and must be oriented correctly on reinstall to line up with a pin in the internal spline of the rotating turret assembly.

Anyway it's all back together now and working properly with all O-rings replaced. The oil leak has been cured so I'm happy. When I first removed the turret rotating assembly I could see oil being pumped out of the outermost cylinder seal every time the turret clamped so that was definitely the problem.

Thanks for the help!
 
Hi I wonder if anyone could help me out here. I have a Hyundai quick turn 18n with a Mazatrol t32b control. My turret was sounding and turning terribly noisy. Figured it was bearings or something, so we removed the turret and then the back cover. I took the sensor off and the coupling that the back of the shaft sits in. Only to discover its quite a job to get to the bearings and because of workload we decided to do it another time. I proceeded to assemble everything exactly the same way I stripped it. But now my machine will only do one tool change then after a little while I get a 272 turret index exceed time alarm. Any advice would be greatly appreciated.
 
Hi I wonder if anyone could help me out here. I have a Hyundai quick turn 18n with a Mazatrol t32b control. My turret was sounding and turning terribly noisy. Figured it was bearings or something, so we removed the turret and then the back cover. I took the sensor off and the coupling that the back of the shaft sits in. Only to discover its quite a job to get to the bearings and because of workload we decided to do it another time. I proceeded to assemble everything exactly the same way I stripped it. But now my machine will only do one tool change then after a little while I get a 272 turret index exceed time alarm. Any advice would be greatly appreciated.

Welcome to PM. First of all, you will get better replies if you start a new thread with a title describing your machine and problem, rather than replying to an old, unrelated thread.

That said, I dont have experience with that machine but one possibility is the turret position sensor (encoder) got knocked out of position. On my QT8, once the back cover of the turret is removed you can loosen one or two bolts to rotate the sensor and clock it correctly. The light on the back of the sensor should illuminate when the turret is in position one (on my machine anyway). In my experience a very small adjustment of a couple degrees can be the difference between it indexing correctly or not. If you search the forums for "mazak turret position sensor" there are a few threads discussing this.
 
Thanks carbonbl I actually couldn't figure out how to make a new post, I suspect its my stupid phones browser, I'll get better at this lol.

And it turns out that was exactly the problem, I just set the encoder a few degrees till led was on when on tool 1 and everything sorted.

Thanks a million for the reply. Happy Friday and have a great weekend


Back
Top