What's new
What's new

Granite surface plate lapping

FransdeHaan

Plastic
Joined
Jun 19, 2021
Hello everyone,

I bought this granite surface plate from a bidding. I know I take a litle risk with this because the condition of the surface plate might not be completely flat. I was already thinking on lapping it by myself, but I need some guidance on how to do it. Futher I need tools and abbrecives to achieve this. Can someone help me.

Surface plate.jpg
 
You need something to check local flatness. I made a basic repeat-o-meter in a couple of hours and used a 1um dial indicator I got used. Then you need something to check global flatness, typically an autocollimator and a mirror or two. These cost money unless you get lucky on a deal. There is software you can download to interpolate the readings and it's free for the use you're putting it to. You could use a surface gauge and straight edge up on parallels instead of the autocollimator but it would be less sensitive and of course will carry watever errors are in th straight edge down to the plate. Finally for lapping you need some diamond dust (or silicon carbide lapping grit). I use diamond dust 10um, 20um and 50um. I made a hardened roller to embed the dust into an old iron surface plate and use the plate as a lap.

Or, you could pick up the phone and call someone in to re-finish your plate, which would be far cheaper than collecting the above I should think.
 
Pics of my home-made repeat-o-meter (a.k.a datum gauge). I milled a 1/2" slot in one end then sliced off the lower section and milled the two parts square. I drilled 4 holes for carbide feet made by cutting off broken endmills and fixed the feet into the blocks with loctite. I used a .030" slitting saw to cut four slits for the hinge which is simply a piece of stanley knife blade. Drilled some holes for set screws to use as pinch bolts to clamp the hinge.

repeatmeter 2.jpg

Once the frame was made I put a 8mm hole to hold the dial gauge and fitted a fine-threaded adjuster wheel on the moving shoe (which consequently I never needed to use). Overall length is 8".

repeatmeter 7.jpg

It's pretty basic but very easy to make. It reads the movement of the shoe since the indicator is directly above the foot but might equally be reading movement of the middle two feet (which would affect the relative position of the shoe). If you make one of these simple devices it will at least allow you to assess the quality of the surface of your plate. If it shows little or (unlikely) no local deviations you can be pretty sure that globally it will be flat too. What you cannot do is use it to re-assess your plate after doing remedial work without some kind of global checking system because inexperienced lapping will invariably produce a dished surface plate which you must either measure and correct or avoid happening in the first place.

Here's my home-made unit in action:

Dropbox - Repeat o meter.mp4 - Simplify your life

And here is the same plate (last in that video above) after lapping:

Dropbox - Plate lapped 01.mp4 - Simplify your life
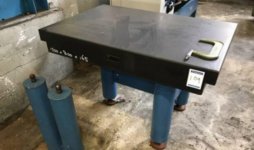
 
First thing is to buy two more plates the same size.

I think you are referring to the The Whitworth Three Plates Method.
There are other methods I know by doing it with a smaller iron plate and a diamond abrasive.
I'm more focusing on that manner, because I only need a smaller iron plate instead of two more granite plates.
 
You need something to check local flatness. I made a basic repeat-o-meter in a couple of hours and used a 1um dial indicator I got used. Then you need something to check global flatness, typically an autocollimator and a mirror or two. These cost money unless you get lucky on a deal. There is software you can download to interpolate the readings and it's free for the use you're putting it to. You could use a surface gauge and straight edge up on parallels instead of the autocollimator but it would be less sensitive and of course will carry watever errors are in th straight edge down to the plate. Finally for lapping you need some diamond dust (or silicon carbide lapping grit). I use diamond dust 10um, 20um and 50um. I made a hardened roller to embed the dust into an old iron surface plate and use the plate as a lap.

Or, you could pick up the phone and call someone in to re-finish your plate, which would be far cheaper than collecting the above I should think.

Thank's I have seen on this website they do it with a precision level instead of autocollimator:

Highprecision inclination measuring instruments WYLER AG

I have one that's accurate up to 20um a meter. I don't know of this is a newer or better way than with a autocollimator but I can at least do it with my tool. The ones from wyler are more accurate up to 1um a meter. But I think 20um a meter in my workshop is already very accurate.


Where did you get the dimond dust and is it possible to buy the hardened roller somewhere to. I don't have the tools to made a hardened roller for myself.
 
Pics of my home-made repeat-o-meter (a.k.a datum gauge). I milled a 1/2" slot in one end then sliced off the lower section and milled the two parts square. I drilled 4 holes for carbide feet made by cutting off broken endmills and fixed the feet into the blocks with loctite. I used a .030" slitting saw to cut four slits for the hinge which is simply a piece of stanley knife blade. Drilled some holes for set screws to use as pinch bolts to clamp the hinge.

View attachment 323250

Once the frame was made I put a 8mm hole to hold the dial gauge and fitted a fine-threaded adjuster wheel on the moving shoe (which consequently I never needed to use). Overall length is 8".

View attachment 323251

It's pretty basic but very easy to make. It reads the movement of the shoe since the indicator is directly above the foot but might equally be reading movement of the middle two feet (which would affect the relative position of the shoe). If you make one of these simple devices it will at least allow you to assess the quality of the surface of your plate. If it shows little or (unlikely) no local deviations you can be pretty sure that globally it will be flat too. What you cannot do is use it to re-assess your plate after doing remedial work without some kind of global checking system because inexperienced lapping will invariably produce a dished surface plate which you must either measure and correct or avoid happening in the first place.

Here's my home-made unit in action:

Dropbox - Repeat o meter.mp4 - Simplify your life

And here is the same plate (last in that video above) after lapping:

Dropbox - Plate lapped 01.mp4 - Simplify your life

Thank's, I will try to make one to at least I know of there are little deviations in the plate.
 
Thank's I have seen on this website they do it with a precision level instead of autocollimator:

Highprecision inclination measuring instruments WYLER AG

I have one that's accurate up to 20um a meter. I don't know of this is a newer or better way than with a autocollimator but I can at least do it with my tool. The ones from wyler are more accurate up to 1um a meter. But I think 20um a meter in my workshop is already very accurate.


Where did you get the dimond dust and is it possible to buy the hardened roller somewhere to. I don't have the tools to made a hardened roller for myself.


Yes you can use a level to map the plate globally the main difficulty with using a level is that moving the level about the surface will affect the level of the surface as a whole. What I mean is, if you took a plate that was already very flat (say a AA or 00 grade plate) and put the level on the left side it would read low on the left, put it on the right side it would read low on the right, simply because of the weight of the level. You can mitigate this somewhat by usng an identical-weight mass and moving it to a position on the plate opposite the level. Robin Renzetti covers this in one ofhis videos.

If your plate is sitting on cork feet then you will find that moving the level about compresses the cork somewhat. I had this difficulty when trying to use the autocollimator set up off-plate for a small plate. Moving the mirror about the plate caused it to tilt on it's feet and upset the reading.

I can't help you with the diamond dust I got mine through a supplier from work. If you're going to get one grade I would say get 20um or as close to it as possible. As I said I have 10, 20 and 50. The 50 cuts very quickly but the 20 is easier to control but gives good cutting rate still.. The 10 I only use for finishing it cuts much more slowly and the fine dust it raises makes the lap stick very quickly. You need only a couple of grams to do your size of plate plus a couple more. Use it sparingly, roll it into your lap then tip the lap out onto a sheet of paper and pour the remainder back into the pot.

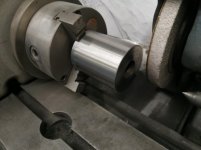
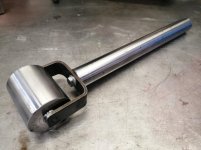
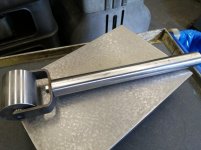
To make a roller is easy. Get a morse taper sleeve from an old capstan lathe, bigger the better. Cut the back end off it with a mini-grinder so it's a couple of inches wide. Find on old MT3 reamer or drill and cut the tang and cutting end off. Hammer that sucker hard into your roller, put in in your lathe and turn it into an axle. Make a yoke and handle and you're set. An hour's work.

Here's how I made mine but you don't need to grind the OD, just make sure it's cleaned of rust etc.

Grinding outside of rusty sleeve before cutting in half

Roller 1.jpg

Clean up ends (optional)

Roller 2.jpg

Hammer in sawn-off old reamer and turn ends for an axle

Roller 3.jpg

Bend up a yoke from flat bar and fit heavy handle.

Roller 4.jpg

Roller and (small) lapping plate.

roller and lap.jpg
 
Is it possible to buy the hardened roller somewhere to. I don't have the tools to made a hardened roller for myself.

I'm doing the same thing as you, getting ready to lap a granite surface plate. I'm making my roller from a 3307 2RS 35x80x34,9 mm = 5307 2RS ball bearing plus a 280mm long shaft as a handle. The bearing races are made from hardened SAE 52100 steel, and the rubber seals should keep the diamond dust away from the balls. In Germany these bearings cost about 16 Euros delivered and are easy to find -- it should be the same in the Netherlands.
 
I like your design! You said that the overall length is 8", what's are the overall width and the center-to-center foot spacings?

One foot at each end and a pair in the middle. I'm not sure what width it is I think about 22mm. This was a compromise because I happened to have that size piece of iron handy. I wish it would have been thicker to space those two middle feet apart a bit. I t works just fine but you have to be a bit careful to keep it standing up stright when sliding it sideways.


Back
Top