What's new
What's new

10ee painting/filler question

Brandenberger

Hot Rolled
Joined
Sep 19, 2017
Hi,

Slowly making progress on a 10ee, have several assemblies (tailstock, apron, saddle, ELSR) stripped and cleaned and ready for paint. On the fence about spraying vs brushing, but for now still working on prep:

Two questions particularly from those of you who have done nice paint jobs on these types of machines--

1) how do you mask the various screw/dowel holes for masking and painting? Are there disposable foam or plastic plugs you use for that?

2) how do you apply body filler to complex surfaces like the ELSR bracket? Also relevant to various other machine parts that have inside corners that are usually partially filled to give a smooth and easy to clean profile. I don't see very many formed spreader tools.

Thanks,
Phil
 
What I have done for holes and such is ball up a small wad of masking tape and stuff it in with tweezers ..etc. Body filler application can be an art, using cutoff pieces of flexible plastic (store bought plastic bondo spreaders will do) to serve as special spreaders. I have recently gotten introduced to a Evercoat product called Slick-Sand. Its just a thick sprayable filler but works quite well. One trick when doing larger flat and curvy stuff too, is after sanding thinking you are done, spray a fog/thin coat of black lacquer out of a spray can(called guide coat) over the surface and then with about 400gt., wet sand the lacquer off. It will show you the high and lows of your filler and if it needs more attention.
 
I've also rolled masking tape up before and also used those expanding foam ear plugs to fill small holes for painting.

Jeff

Sent from my SM-G998U using Tapatalk
 
1) how do you mask the various screw/dowel holes for masking and painting? Are there disposable foam or plastic plugs you use for that?

2) how do you apply body filler to complex surfaces like the ELSR bracket? Also relevant to various other machine parts that have inside corners that are usually partially filled to give a smooth and easy to clean profile. I don't see very many formed spreader tools.

1. When I had powder coating done they used foam plugs. Problem is that they make their own guesses into which hole they should go. And they never listen to you.
Masking tape is all I use.

2. Autobody shops have those spreading wedges. Or make your own.
 
Hi,

Slowly making progress on a 10ee, have several assemblies (tailstock, apron, saddle, ELSR) stripped and cleaned and ready for paint. On the fence about spraying vs brushing, but for now still working on prep:

Two questions particularly from those of you who have done nice paint jobs on these types of machines--

1) how do you mask the various screw/dowel holes for masking and painting? Are there disposable foam or plastic plugs you use for that?

2) how do you apply body filler to complex surfaces like the ELSR bracket? Also relevant to various other machine parts that have inside corners that are usually partially filled to give a smooth and easy to clean profile. I don't see very many formed spreader tools.

Thanks,
Phil


A couple of things I will mention about what I do… On really complex shaped parts, sometimes I will apply the filler with just a disposable glove using my finger. It is also important which filler you use. I use Ever Coat Rage Gold filler which is easy to sand. I also use feather fill and high build primers. I believe Ever Coat sells high build primer in an aerosol can which is nice for machine tools when you have a lot of small parts done at different times.

For sandpaper I really like Indasa Rhynostick rolls which I get from Eastwood. It is easy to fold over and hold. Or you can just use one layer and let the sticky back adhere to you fingers to get to small areas. Don’t be afraid to go with an aggressive grit like 80 at first to just shape the part.

For plugging holes, I keep a bucket full of rubber and cork taper plugs from about ¼” to 2” and the round foam weather strip which can be cutoff flush with a razor.

One other thing that really helps with painting is a pallet jack and a couple of pallets. These can be covered with poster board to spray parts on. And you can rig yardarms to hang parts from.

You mentioned you were on the fence about spraying or brushing. The past couple of years I have used a 3M Accuspray spray gun. For general painting I use the 1.4mm head and larger heads for the feather fill. The heads are plastic, come in different nozzle sizes and are disposable (i.e. pitch instead clean). The gun also has liners with a strainer built into the disposable cups. This makes clean up very easy, requires very little solvent and allows for quick color changes. The gun is very simple to adjust. It has a fan control which I use one turn open; fluid control with 3 turns open at 20 PSI trigger down and hold. It does a remarkably high-quality job for being mostly plastic and disposable.
 
I use both a gun and a brush to paint. Some surfaces I think you are better off with a gun as your overhead lights will make it the first thing that draws your eye, once the machine is complete. Example being the headstock, its closer to eye level, plus the rounded nature will always have spot that catches light as you walk around, so you'll see any errors in paint, or where filler was not exactly even.

But a good portion of machine is not that way, and can look great either way. One thing I like about using a brush, i can touch up and or redo spots and it blends better than spots shot with a gun. Especially if you are actually going to use the machine. Things get nicked, chipped or scratched during work. I like using 1" fine hair paint brushes from an arts store like Michaels and the like.

On bolt holes, unless you already cleaned and tapped them, they are dirty. And I like clean looking bolt holes, even if not in use. I shoot paint first, then well after paint is hard, I run my taps through the holes. Usually comes up looking freshly machined.

In some cases I have hardware I'm willing to throw away. I'll screw them into holes, and shoot right over them. Then throw them away later.

On parts not fully disassembled, that still have cap screws. I use a small screw driver to pick debris out, but I leave the bolt in and uncovered. I hate painted over bolts, but I'll remove them and wire wheel them one at a time after the paint, and after paint is hard. Its what I did on the headstock spindle bearing cover cap screws here:

424.jpg
 
For masking holes, I make round pieces of masking tape, using round hole punches and a punch similar to this one: link. The trick is to stick the masking tape to a piece of wax paper before you try to punch it. I slit the wax paper with a razor, then apply the tape over the slit. That way, it's easy to get the was paper off of the round piece of tape. Tweezers will help you get the tape in place, then you can use a toothpick to tuck it in around the ends of bolts:
IMG_2934.jpg

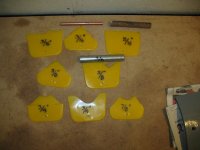
I made up concave and convex radius spreaders from disposable plastic putty spreaders, as well as using scrap dowels and tubing for smaller radii:
IMG_2796.jpg

Cal
 
If you need round foam plugs like earplugs you can get rolls of foam filler rod at the big box stores. They are available in all different diameters from 1/4" up to 3/4" or maybe larger. Just cut off however long you might need.

If you need larger use foam pipe insulation with a piece of foam filler rod stuck in the middle hole.

I use
 
For plugging holes I used pieces of dowel from the scrap bin wrapped with a ring of masking tape. Fast and easy. I never use filler, can't stand a finish without some texture. I like the looks of painted iron castings. If there is good finish left, I feather it and sand it well. If there is poor finish, I scrape it off with a carbide scraper, then clean with a surfactant, rinse with the hose, do a final sanding, mask, prime and paint. Its a machine that is going to get used. For paint, I use 2k epoxy primer ($30 a can!) and for final finish I use Krylon, since it is so easy to touch up. The key is good masking and very clean prep work.


Back
Top