What's new
What's new

10ee tachometer repair

ee_chris

Aluminum
Joined
Apr 9, 2003
Location
Derwood, MD
Hi all,

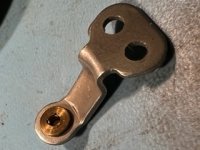
I have a 1946 square-dial with a non-functional tach. I removed it and think I found why it isn't working, but I'm not sure of the exact problem or what to do about it. The spindle on which the needle mounts has a pin-shaped end to the rear that pivots against something inside a small brass cup on a support arm. The front (needle end) has a shoulder that rides in a plain-bearing collar, and the collar is threaded to permit adjustment in thrust. I can get the back of the spindle to stay on-center in its little cup by finding the spot where the pin "likes" to sit and snugging up the collar, but if I make tight enough for the pin end to stay put, there is too much friction for the hair-spring and aluminum disc to move the needle freely. If it is loose enough for the spindle assembly to turn with a light touch and spring-return, the back end of the spindle quickly falls out of position.

With the support arm removed and looking inside the little cup, I see a tiny white cylinder in the bottom of the cup. I can't really see a divot in the middle, but with a pin probe I can feel where end of the spindle must sit.
- Is the white part a hard substance the spindle is supposed to directly contact?
- Should the white part be a tight fit in the hole, or does light pressure keep it in position? It appears to have a tiny amount of wiggle room.
- There is lots of extra depth in the hole in the brass. Is there supposed to be another part (like a guide bushing of some sort) above the white part in the cup?
- Is the spindle supposed to be sharp on the back end, or rounded? The end is ~0.030" diameter and is fairly flat with a rounded edge.

TIA for any help,

Chris

IMG_4706.jpgIMG_4707.jpgIMG_4708.jpg
 
I had a tach fail due to my clumsy attempt to reinstall the needle after painting. I had broken the balance staff pivot, which is the fragile end of the balance shaft (by pressing the needle on with too much force). I found a watch/clock repairman who re-pivoted the shaft and got the tach working again. My guess is that you have a broken pivot, but it could also be an alignment issue.
 
The tach is a Stewart-Warner model 522. Here is a 1931 catalog showing the type. And here is a War Dept. service manual covering many makes of mechanical speedometers and tachometers, including a Stewart-Warner that looks very similar.

After making a brass replacement for what I assume to be a missing jewel with a hole in it supporting the rear of the staff, I found that Bird Precision (and probably other suppliers) make an "olive-hole ring jewel" that should probably fit (0.080 OD, 0.020 ID). If I can obtain a couple of these I may try one out as a more permanent fix. The brass isn't as durable and low-friction as synthetic sapphire of course, but it seems to be working fine. We'll see how it holds up.

To make the brass replacement, I faced the end of a brass rod and turned the OD to fit the bore of the little brass cup that holds the jewel(s) supporting the rear of the tach staff. I polished it until is was a snug slip fit into the cup. Then I used my smallest center drill to start a hole in the end, and almost parted the piece off. At 0.080" OD and only about 0.060" thick, this is way smaller stuff than I am accustomed to dealing with! I cut the part off with nippers and mounted the rough-cut end in a small unmounted chuck, carefully filed it flat, then reversed it in the chuck with the drilled side facing out. I used my sensitive drill press (a restored High-Speed Hammer Company R-53) to drill a 0.022" hole through the rest of the brass. One note: My smallest center drill (which is pretty dang small) still didn't make a sharp-enough hole for the 0.022" bit to self-center. I had to press a sharp scribe the right size to self-center into the existing hole in the brass to make the end of the hole vee-sharp, and then the small drill worked fine.
IMG_5244_small.jpg

I should also mention that I had already polished the end of the staff earlier, trying to get the staff to stay put on what I now think is just a flat "end jewel" in the bottom of the holder. I mounted the staff in a 5C collet on my lathe and fiddled with how it was clocked until it indicated in at ~0.001 TIR. I cable-tied my Dremel to a tool holder, and using a mounted stone just sparked off the end of the shaft to round it. Then I polished it with a hand stone and finally a block of rouge. Please note that I'm not a clock/watch guy and am just making this all up as I go along. ;)
IMG_5243_small.jpeg

With the brass bushing in the rear jewel holder, it wasn't hard to adjust the mechanism so the staff turned freely. During disassembly, I had lost the stake that holds one end of the hair spring. It launched across my office at about mach 2. I ground a new one out of a steel rod and re-staked the hair spring in its original spot.

The calibration adjustments aren't accessible with the guts of the tach inside its housing, so I used my Sherline lathe as a calibration fixture. It needed it to turn in the reverse direction, so I unbolted the DC drive motor and flipped it around using some cable ties. The tach mechanism was held at the correct center-height by a scrap of aluminum, and against the side of the tool post by a big spring clamp. The tach dial was taped at the correct height to a bent piece of sheet aluminum and clamped to the bed. The staff passed through the center hole, but the face couldn't be allowed to touch the front jewel holder. The needle was lightly pushed on the staff at the zero position. The tach input shaft was driven by a short length of vinyl tubing held in the lathe chuck. When calibrating, remember the bevel gears that drive the input shaft in the Monarch reduce the speed by 1/2.
IMG_5257_small.jpeg

Zero is fixed where a neck on the rotating aluminum cup hits the front jewel support arm, and the needle just has to be installed pointing to the correct spot. Besides factory selection of a hair spring with the correct spring rate, there are two very fiddly adjustments for calibration. There is an adjuster on the bottom that provides an offset of plus/minus a few degrees by moving the "fixed" end of the hair spring. The other end of the hair spring is crimped into a brass sleeve on the staff.

The second adjustment controls the strength of a driving magnet. The input shaft spins in a bushing, and has a square-shaped end that pretends to be the end of what in a car would be a flexible drive cable. This drives a hub carrying a flat donut-shaped permanent magnet with a small tapered gap in it. The magnet spins inside but doesn't touch an aluminum "speed cup" mounted on the staff. The magnet's field generates eddy-currents in the aluminum, and these currents generate a field that opposes the magnet's field and produces a torque that moves the needle in opposition to the hair spring.

There is a movable "magnet regulator" that slides to cover part or all of the tapered gap between the magnet ends. This concentrates the magnetic field through the steel of the "regulator", weakening the external field to an adjustable extent. I think the shape of the cup and a little added sheet-copper part are designed to make the movement of the staff precisely proportional to input shaft speed.

Using a non-contact digital tach on the Sherline spindle, I walked the magnet regulator and offset adjustments around until I got pretty close to accurate readings over the entire tach range.

Chris
 
Last edited:
A bit of a tangent: I looked through the 1931 catalog. Fascinating reading. I noticed
a device called a "vacuum tank" and I could not figure out its purpose. It seems to
be some sort of a float bowl type of device, but not a carburetor. Does anyone
know what it does?
 
Another update: The tach has been re-installed and is working, but I had to work through some issues.

When I went to reinstall the tach, I slipped the die-cast neck on the back of the tach through the bore in the tach mounting bracket (EE3486, I think). When I slipped the polished trim ring around the captive mounting bracket on the tach body, it wasn't even close to lined up with the counterbore in the headstock casting where it goes. It was well over 0.1" to the left of where it should be. These are the same parts that came out of this lathe, so I was scratching my head (and swearing).

I put a shaft through the tach bracket in place of the tach, and measured to the inside edge of the headstock pocket. Vertically it wasn't far off, but horizontally the shaft was pointing well to the left. But it didn't look far from center where it goes through the seal. I double and triple checked the mounting bolts and taper pins on the bracket, and everything seemed to be in order and not changeable (because of the taper pins). I did a test run with the trim rings off, and my calibration was a little off too.

So, for about the sixth time, I dismantled the tach. The sheet metal in the back of the housing was a little depressed around the right side mounting hole for the tach mechanism, which would make the whole tach point a little to the left. Not as much as I needed to make up, but it contributed. I dimpled the mounting hole area to tilt the front of the tach housing slightly to the right. You can't move it much or the needle will hit either the face or the glass, or the staff will hit the side of the center hole.

After this adjustment, I was able to just barely get everything to go together. I did another round of calibration in my test fixture, and then reinstalled in the lathe. I had the brass bushing part that threads into the back of the tach installed in the tach bracket ahead of time. With the gasket in place in the headstock pocket, I threaded the tach body onto the brass bushing, and there was only one place it wanted to sit depth-wise. Then I installed the trim ring screws and made sure the gears still had a little clearance.

The tach was so misaligned, I have to think someone must have replaced the tach bracket at some point. Being off by so much seems very un-Monarch-like. But, the tach is back in and working now, and the calibration is pretty close.


Back
Top