What's new
What's new

1969 10EE Cross Slide & Taper Att. Removal & Radii Fixture Mounting Project

Mac007

Aluminum
Joined
Jun 7, 2009
Location
Kentucky USA
I’m working on mounting my Holdridge 4D Radii Fixture to my recently acquired 1969 10EE, and to do so I am removing the Cross Slide and to do that I’m removing the Taper Attachment. I have wanted to remove these items anyway to inspect and clean them so I thought I would post the pictures of their current state prior to cleaning. I will update this thread as I have more pictures as well as pictures of the process of making an adapter to mount the Holdridge 4D Radii fixture.

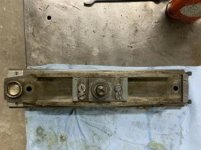
Here are pictures of the Cross Slide and the Taper Attachment before cleaning.
6FC7EB1F-6586-4BA7-A947-807883B64CE7.jpgBottom of Cross Slide. I Was Pleased to see the original Flaking pattern.
979287E7-B737-4C07-A23A-1B9C84AD63C4.jpg Cross Slide Lead Screw Cavity.

48C8C576-4147-429C-994A-76C7741510AE.jpg 75C7E381-81AA-4BE0-8E5B-73C6E5FD593D.jpg 37E28F50-E53A-42E9-AE46-CED4ACD27147.jpgSeems like Taper Attachments get pretty dirty from pics I have Seen.

I will update with pic’s of the Adapter Plate and mounting of the Radii Fixture to the Cross Slide and Cleaned up parts. I found it interesting that the bottom of the Cross Slide had different “Z” Oil Groove patterns.
 
That bolt is used to lock the cross slide down when using the taper attachment.

So, should it be installed ONLY when using the Taper Attachment?
OR, does it not matter if the Taper Attachment Slider Shoe is not anchored to the bed?

Thanks for the reply.
 
If there is no taper attachment that bolt is not there but if there is a taper attachment there is a shoe that would be running around loose if the bolt is missing.
 
As above the bolt clamps the taper attachment bar, the recessed socket cap holds the cross slide nut and the recessed slotted head is the backlash adjuster for the cross slide nut.
 
I replaced mine. But I am pretty sure I had to order them from Monarch as they are a non standard size.

Thanks for the Reply, Yes they should be for a 3/8 shaft, but the shaft section on my 10EE is .3765, so standard 3/8 x 11/16 won’t work unless you get lucky on the over under tolerance.
 

Thanks for the Reply, Yes they should be for a 3/8 shaft, but the shaft section on my 10EE is .3765, so standard 3/8 x 11/16 won’t work unless you get lucky on the over under tolerance.

The center isn't a precision hole so far as I know, you should be able to open it up a bit with a die grinder or dremel.

The hole in the side of the cross slide is a coolant drain hole. Just rod it out so it's clear.

The 'backlash adjuster' just cants the nut a bit on the screw, tightening up the ends. When you find that necessary it's likely time to replace the nut.
 
I have always thought that crosslide screw backlash adjuster to be rather primitive for Monarch. Some sort of adjustable or split nut would have been more appropriate. I replaced both the screw and nut in the original configuration and all is fine, so maybe I answered my own concern. Something you may wish to consider is drill a small hole thru the nut in that adjuster cavity, so you can squirt some oil to lube the screw. More elegant would be to also modify the bolt, maybe with a hole and spring oiler button on top, so oiling could be done in situ. Overkill.:crazy:
 
The hex head bolt that you refer to at the top of this thread is in fact a socket head bolt that is recessed like the others on my 1956.

Also, relative to the thrust bearings, mine were good so I did not need to replace, but as I found out in the friction stems, if the bearing you need is no longer made, it is possible that a metric thrust will work if both ids are too large. I used 2 metrics in my friction stems, I turned a brass insert for the larger id side to turn it into the snug fitting race, and then the smaller id side became the loose fit race.
 
Latest Progress & Pic’s of Holdridge Radii Fixture Mount to 10EE:

1.25” Thick Aluminum Adapter Plate to Cross Slide:
0B09E994-CE77-46BB-9E42-993DE08EA652.jpg I milled the Front Edge to minimize Fixture Overhang.

Holdridge 4D Radii Fixture and 1” ThickSteel Base That Bolts to my Larger Lathe:
92D7D0A7-82E8-445B-BFC6-707A785151E8.jpg

In total I need just shy of 2.25” From Cross Slide Top to Align Fixture to Center of Spindle Axis.
 
Regarding the thrust bearings: after a thorough cleaning, inspect the groove-race in the washers. And also inspect each individual steel balls..
I use a magnifying glass to see better. If the groove-race is in good shape, and the balls n poor shape, I'd measure the diameter of the balls and buy a box of them.. Usually a box of steel balls is much less than even one bearing. The exact size is not important. You can even enlarge the holes in the race to use a slightly larger diameter ball.


DualValve
 
Completed Radii Fixture Mounting Adapter

Pic’s of Completed Holdridge 4D Fadii Fixture Mounting Project:

Aluminum Base Adapter Plate Bolted to Cross Slide:
1B33A2D0-D852-4716-B918-9E419098B1B0.jpg

Steel Adapter Base Plate Drilled and Mounted to Aluminum Plate:
FB6B430B-CAD1-4330-9057-CB19E12DC581.jpg

Holdridge 4D Fixture bolted to Steel Base:
8EA09167-2034-4742-95ED-F69A58FF9B20.jpg 02974F12-06BF-44CD-8199-63F9491D42F2.jpg EE7028A1-8695-45BE-A7AC-4CAA2707353F.jpg

I have to Mill a Pocket in the bottom of the Aluminum plate for the head of the bolt you tighten when using the Taper Attachment.
I don’t plan on leaving the Aluminum Adapter Plate on the Cross Slide when not using the Radii Fixture. I will install Button Head Cap bolts in the Cross Slide Aluminum Mounting plate holes to protect them when the fixture is not installed.
 
Here is a pic of the bottom side of the Aluminum Adapter plate with the milled Relief’s for the Taper Attachment Draw Bar Locking Hex head bolt & the shallow relief needed for the Socket Head bolt that secures the Cross Slide Acme nut.

DBC42F66-D593-48E7-AAE5-4147C0DC2DD5.jpg 2196F6F7-6970-4013-B447-E05FFD957ADA.jpg


This completes the project to mount the Holdridge 4D Radii Fixture.
I was able to successfully use it yesterday :)


Back
Top