What's new
What's new

Directions on apron removal

gleek

Aluminum
Joined
Feb 28, 2012
Location
cookeville,tn
While cutting a part I hit the stop, and the feed handle did not kick out and I got a "pop".
I know I should have disengaged the feed prior to the stop,but it would only be excuses from here.
Now when I engage the feed in either direction I get a skip in the travel.It seems to be in the apron and was looking for the thread or sticky on "apron removal"

Thanks
Gleek
 
Before removing the apron determine if the rotation of the feed rod coming out of the gearbox is steady with no "skip" in it's rotation. Many years ago I saw a 10EE crash that broke a tooth off the gear which drives that shaft inside the right output cover of the gearbox. If the rotation is not steady there's no need to remove the apron, the gearbox needs attention. Another possibility is the taper pin which drives the feed rod from the gearbox has sheared.

If both the above check out OK, then the apron is the next thing to look at.
 
I checked for the feed rotation fwd/rev and no skipping in the feed rod,smooth.But the crosslide and traverse skip about 180 every rotation.
 
What feed were you using when you hit the stop? Carriage feed or cross feed? Which direction were you feeding?

I forget, do you have a square-dial or a round-dial machine?

Dave and I have been working on a procedure for removing the apron, saddle, etc. It's one of those things that sort of fell off my radar. I just need to put the finishing touches on it. I'll try to do that in tomorrow.

Cal
 
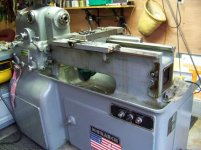
051812161217-1.jpgIt's a square dial,using the carriage in belt drive cutting the diameter towards the chuck.

Gleek
 
Last edited:
You've isolated it to the apron and your observed behavior further isolates the problem within the apron. Since both cross and traverse act the same you can be fairly confident the problem lies within the drive from the feed rod to the separate input gears which drive each clutch input in the apron.

A long key provides drive from the feed rod to the worm which drives the worm gear on the back of the apron. The shaft of the worm gear enters the apron gear case and drives the gear chain that provides input to the individual input gears on the two clutch packs. Most likely the problem is between the feed rod and the input gears of the clutch packs.

The first thing you'll be able to examine is the fit between the feed rod key, the feed rod and the worm gear. This is accessable as you remove the feed rod, one of the steps required to remove the apron. Take the opportunity to have a look at it before you take the apron off. It's not a likely culprit but it could be severely worn and have failed.

Not too many folks have completely disassembled the apron, the internals are somewhat of a jigsaw puzzle. Good luck with it.

I'll defer to Cal on the apron removal procedure, he has put substantial effort into developing it.
 
10EE Leadscrew, Feed-Rod and Apron Removal - DRAFT

This is part of a procedure that Dave and I have been collaborating on. I've edited out most of the round-dial related stuff. At some point we'll post the full carriage and apron removal procedure. Dave will need to add corrections and comments. If anyone else can help with this, please do so.

The most difficult part about removing the apron is getting the leadscrew, feed-rod and leadscrew reverse control rod (if present) disconnected. Beyond that, the apron is removed by unbolted and lowering it.

Dave has provided me with a series of photos showing the process of removing the apron on his machine, which has electric leadscrews reverse (ELSR). I uploaded the photos to photobucket. Here is a link to the album:The photos are fairly self explanatory. The titles and descriptions should provide additional information. Hover your mouse over the thumbnails in the album to see the titles. Open the photos to see the descriptions.

The procedure for both round- and square-dial machines is basically the same—however, the differences in how the leadscrew, etc., are attached at the gearbox preclude a single, detailed procedure. Below are the basic steps for a square-dial, with discussion of some of the differences.

  1. Remove the socket head cap screws (SHCSs) that hold the leadscrew/feed-rod right bearing support casting. On square-dial machines with ELSR, disconnect the wiring. (Dave?)
  2. Remove the taper pin from the left end of the leadscrew (see Notes on removing taper pins, below).
  3. Disconnect the feed-rod.
    Note: 10EEs were available with and without safety disconnect clutches on the left end of the feed-rod. If there is no clutch, disconnecting the feed-rod is simply a matter of removing a tapered pin. Some clutches had plates with 3 screws that hold the two halves of the clutch together; in that case it is simply a matter of removing the screws so that the halves can separate.
  4. Use the carriage to jack the leadscrew and feed-rod free: Move the carriage until one of the lines on the thread dial lines up with the index and close the half-nut. If you have a feed-rod clutch, the feed rod should already be free. If not, you may want to install a two-piece shaft collar or soft-jawed clamp on the feed-rod, against the right side of the apron. Now use the apron feed hand-wheel to move the carriage to the right until the ends of the leadscrew and feed rod are free. On square-dial ELSR machines make sure that you don’t damage the wiring in the right support housing.
  5. Remove the leadscrew and bearing-support as a unit. The feed-rod should unplug from the right bearing with ease.
  6. Prepare a support for the apron: Move the carriage all the way to the right and place a 2x6 across the chip pan (you want to block up the rear of the 2x6 to be level so the apron can sit there safely):
    IMG_2493
    IMG_2490
  7. Remove the SHCSs connecting the saddle to the apron by lowering it using some of the screws. I replace 4 of the screws with longer SHCSs (or lengths of all thread with nuts) and washers, as shown in the photo below. I then back the remaining screws out until they are only engaged 3 turns or so and then back the 4 long screws out in sequence to lower the apron. Repeat as required using longer bolts until the apron is resting on the supporting 2x6.
    IMG_2493

Notes on removing taper pins

Monarch used a lot of taper pins to secure knobs to shafts and to pin shafts together. These pins were typically installed during assembly and were hand drilled and reamed on the machine. As a result, the pins are usually off center and at funny angles. Taper-pinned parts are usually not interchangeable without modification.

The fact that the pins were installed on the machine sometimes means that they are difficult to remove since the small end of the pin can sometimes be in a difficult place to access. Any time you find a situation where only one end of a pin is easily accessible, such as the knobs on the round-dial gearbox, expect that the large end of the pin is on the easily accessed side.

It’s critical to identify the small end of a tapered pin before attempting to drive it out; it’s a very good idea to not rely on your eyes and to measure the ends of the pin to verify which end is the small end. Some pins will drive out easily with a punch and a few well placed blows. Often the pins are driven in so tightly that they are difficult to drive out with a punch. In these situations it’s better to press the pin out.

One of my favorite methods of pressing out a tapered pin is to use a bearing ball (BB), a washer, a machinist’s parallel clamp and some hot-glue to make a simple press. I hot-glue the washer to the side of the shaft with the large end of the taper pin (see IMG_2498); a 0.200” spacer from a round space block set works well as a washer. I hot-glue the BB to the tip of the parallel clamp (see IMG_2499c). The clamp and BB are then lined up on the small end of the taper pin and the opposing washer (see IMG_2500c) and the clamp is tightened to press on the pin and loosen it.

Cal
 
Last edited:
Can't thank you enough to get this behind me. although the pictures in the photobucket are to remove the taper attachment.
 
I had a enjoyable time removing the apron(really).Cal and Dave you make it easy ,the pictures and info are right on.Only had to call neighbor once to move apron to worktable.
Now for another question ,What do you think I messed up in the crash? Can I put the feed rod and simulate the skipping or disasemble the back and look for something more obvious. On first inspection it looks great,no chunks,all teeth look present.

Gleek
breakdown apron (20).jpgbreakdown apron (23).jpg
 
Good to hear you got the apron off with no trouble.

No idea what might be at fault, all gear teeth present is a good thing. Testing would be the approach I'd take. Remove the aluminum cover on the back to expose the worm and worm gear. Since the skipping is in both longitudinal and cross feed I'd test the longitudinal feed. It's easier to load the rack drive pinion than the small gear which drives the cross feed. Insert the drive rod for input torque, engage the long. drive clutch and load the rack drive pinion to duplicate the skipping. Observe where in the drive train the motion stops.

If it's difficult to observe the skipping from the top of the apron it might be useful to do the test upside down with the sump and oil pump removed (service the pump while you have the apron off). That way you can more easily see the drive gear train to the clutches.
 
003 (3).jpg

I believe I've found the problem.The brass gear is spent.It's been wearing for a while and my crash put it over the edge.Is it Monarch where I have to get this part (EE1306) or dose somebody want to sell me one , hopefully the latter.

How do I remove the sump and oil pump? it is pumping oil.Is there another post on this?
 
That was an easy diagnosis! Try starting a new thread requesting what you need in this forum with a clearly stated thread title. Someone may have one. I've had good luck finding parts I've needed that way.

This long thread has information about the oil pump and a number of other matters. You may find it useful. The sump is the long rectangular casting on the bottom of the apron held on by SHCS. Remove it and the pump will be the first thing you see. The sump gasket will likely be well stuck, a dead blow hammer will pop it loose.

http://www.practicalmachinist.com/vb/monarch-lathes/help-lead-screw-apron-removel-195175/

Monarch recommends annual pump service intervals, it's a regular maintenance item. The lathe is designed to facilitate sump removal and and oil pump service on the machine.
 
Found SHCS and working on sump and pump. Need the gear for a job so Monarch has it comming,ouch($350.00) I be back up Thursday hopefully.I need some spare parts so I'll post to what I need ahead like C16j's

Thanks
Gleek
 
This thread just helped me remove the apron for a square dial.

I noticed the link doesn't work in post #7, also the pics don't show, but opening the link on each pic shows them. Here they are:

The pics on supporting the apron as you remove bolts from carriage:

220.jpg 221.jpg

Cal's taper pin press:

222.jpg 223.jpg 224.jpg

I saw mention of possibly another thread, not sure if that happened, but this popped up on a google search.
 
Hi Gleek
350 is a great price for that gear. Kieth Rucker paid over 500.00 for his.
That gear by the way is an engineered wear point. At least according to Rucker.


Back
Top