What's new
What's new

"new" spindle/ new bearings, 10EE WIAD old style rear bearing headstock

bll230

Hot Rolled
Joined
Jun 14, 2007
Location
Las Vegas
I decided to pay Monarch to regrind my D1-3 nose as suggested by Cal. Monarch charges $1200 to regrind the nose (and the Jarno inside), and yes, it is a lot of money, but the undersized D1-3 taper on my spindle was going to render my machine marginal at best, and since I had to get new bearings, I decided to work a bit of extra overtime and pay to get the spindle done right...

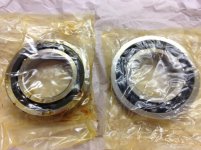
Along with the overtime for the spindle, the new bearings took a couple more days overtime to cover their cost. I got the Fafnir bearings from Robert at General Bearings in Los Angeles for $1200. These are the bearings Daryl used in his rebuild, and the only alternative is $2800 to Monarch for their Barden bearings. Daryl's story is that General Bearing bought 100 bearing pairs in the 70's from Fafnir, custom made, as the front flange bearing is not a stock bearing. I don't know if that is true, but the salesman said they had been on the shelf for many, many years, and they still had quite a few left.

The Fafnir designation is as follows:

2 - 15 degree contact angle

MM - precision between ABEC7 and ABEC9/ISO P4-P2 (original New Departure were ABEC5)

F - flange

212 - size

WI - low shoulder on outer ring (i.e. normal angular type)

DUL - duplex mounting light preload

The original New Departure bearing pair is medium preload, but beggars can't be choosers. Daryl tells me he has has had no issues with his bearings and he got around 50 millionths runout with them

I wish I had taken a picture of my spindle taper before I sent it to compare to the regrind, but I forgot. Steve at Monarch tells me the spindle cleaned up very well. I set it in one of my backplates and there is the slightest bit of light between the spindle and backplate, so that is encouraging. I don't have the cams in it to tighten down, but I would say the gap is between 0.001 and 0.002, right where it should be.

To install the bearings I am thinking about getting dry ice to put inside the spindle to contract it to help get the bearings on easily. Any thoughts on that idea?
 

Attachments

  • IMG_0602copy.jpg
    IMG_0602copy.jpg
    80.9 KB · Views: 460
  • IMG_0604a copy.jpg
    IMG_0604a copy.jpg
    90.7 KB · Views: 254
  • IMG_0605a copy.jpg
    IMG_0605a copy.jpg
    92.1 KB · Views: 264
  • IMG_0606.jpg
    IMG_0606.jpg
    91.4 KB · Views: 267
  • IMG_0607.jpg
    IMG_0607.jpg
    90.3 KB · Views: 241
Last edited:
I would lean toward heating the bearings with a real bearing heater or in a pot of hot oil, rather than chilling the spindle. There’s too much chance of condensation and rust if the spindle cools below the dew point, as surely it must for cooling to make enough temperature drop.


Sent from my iPhone using Tapatalk
 
I just don't remember a procedure for putting the bearings on the spindle. I always use an air heat gun for that kind stuff. I don't remember if there was a high spot mark on the spindle or not. It might behoove you at this point to rig the spindle on some V-blocks to confirm a high spot and install per instructions. My mind at this point can play memory tricks. I sorta remember arranging the inner/outer bearing marks around like a clock face, so that each bearing off set each other, seemed to have worked...for me. Curiously, my bearings where in a plain box, no instructions. I do remember putting a lightbulb inside the headstock cavity for an hour or so. I also had the luxury of having the headstock on a bench with a clearance hole, with the front spindle bore facing up. I just lowered the spindle w/bearings down into the bore. Seemed the headstock literally sucked the spindle in. One thing I failed to do in the excitement of the moment was install the front flange gasket. I was able to cut it at the top and slide it in.
 
Actual install of the bearings doesn't take a lot of time, but good preparation does. Think Daryls method of gravity assist and lightbulb heater is a good one. A written plan with easy to follow steps and all the parts and tools arranged "operating style" can be a big help
Suggest care with the heat gun as its easy to contaminate the bearings. Precision bearings are at risk as soon as you take them out of the wrapper--dust, fingerprints, smoke etc are really bad, best to minimize handling and contact with them as much as possible.

Good reminder to install the gasket first.

Not sure when the change was made, but there is a dog point screw in the headstock. 1960s 10EEs have the screw in the front, above the lower oil sight glass. All the 80s vintage machines I have observed have it in the back, just above the light mount area. There is a threaded hole in the side of the head casting at centerline of the spindle longitudinal axis. Very important to get the corresponding recess in the spindle assembly lined up with the hole before you insert the spindle assembly into the headstock. The front screw is usually called out as part number 1108, the rear shows it as 1285.

Make sure and remove that screw if present before pulling the spindle assembly from the headstock.
 
To install the bearings I am thinking about getting dry ice to put inside the spindle to contractit to help get the bearings on easily. Any thoughts on that idea?

I think that is already off the menu in favour of heating, but just in case.

Chilling is not a good idea, here. Not for uber-precision bearings, not even my cuppa for a chuck to backplate fitting assist.

A problem is condensation of atmospheric moisture for the overnight, fridge/freezer approach, or outright hard freezing, (CO2) or VERY hard freezing (Liquid Nitrogen).

Should be clear a spindle so affected would make handling and positioning of the bearings ...shall we say "challenging"?

:)

Go with differential heat. "Radiant" or conductive source, not convective. A hair-dryer style heat source may as well be a spray-gun for dirt.
 
Again my memory may be playing tricks, but the amount of heat needed was very slight, like not too hot to the touch. It was so slight I don't even remember it. :nutter:
 
I decided to pay Monarch to regrind my D1-3 nose as suggested by Cal. Monarch charges $1200 to regrind the nose (and the Jarno inside), and yes, it is a lot of money, but the undersized D1-3 taper on my spindle was going to render my machine marginal at best, and since I had to get new bearings, I decided to work a bit of extra overtime and pay to get the spindle done right...

Approximately what year is the old vs new style rear bearing? Would my '56 WIAD be old style?

Ryan
 
Again my memory may be playing tricks, but the amount of heat needed was very slight, like not too hot to the touch. It was so slight I don't even remember it. :nutter:

Of course.

Were it to be done with a TIGHT shrink fit?

That could be absolutely counted on to distort the races by more than a super-precision bearing can tolerate and still be predictably within spec.

Finicky as to "clean", but otherwise gentle giants of enduring goodness, these tough, long-lived bearings can be.

:)
 
Advice taken on chilling the spindle. Any thoughts on wrapping the bearings in clean aluminum foil and setting them on an electric griddle set to 200 degrees. That is well within the temperature range that the machine oil is good for.
 
You can go a little hotter - say 250F. I would put a beaker of oil with a thermometer in it on the hot plate and use that to dial in the control to give the temperature you want. Only after you guarantee you won’t overheat the bearings should you put them on the hot plate in foil. I prefer heating in clean oil, but your scheme should work.


Sent from my iPhone using Tapatalk
 
Advice taken on chilling the spindle. Any thoughts on wrapping the bearings in clean aluminum foil and setting them on an electric griddle set to 200 degrees. That is well within the temperature range that the machine oil is good for.

Electric heating units we Chickn's can easily afford are switched devices. To hit any given temp, they go full-on to somewhere ABOVE the target 'til a thermal trips, cool down a tad 'til it goes back on, Repeat.

Use of a mass of clean oil helps smooth out those peaks and valleys better than just the mass of the element and its cladding.

Absent the oil, you would want at least a mass of metal, similar to a copper disk on a good stainless skillet's bottom. Bearing or oil won't hurt the skillet beyond ordinary clean-up. DAMHIKT, it would piss-off the Wife.

Keep in mind that by the standards of a precision bearing, all the air around us is terribly filthy, and that we humans constantly shed outrageous amounts of new debris into it as well.

All that said, they last a very long time in service under imperfect conditions, so it isn't quite semiconductor wafer fab clean room stuff here. Planning ahead and being as careful as we can be seems to work well enough.

That all goes pear-shaped if we fumble-f**k and DROP the bearings, of course. If your "method" is not one you have already done several times, practice of it by handling the OLD bearings before you do it "for a grade" might be a good idea.

:)
 
WRT rear spindle bearings:

These must be allowed to float.By exp and cont with temp on outer race in headstock bore.

Has anyone installed a precision roller bearing in this position?
 
Update on the spindle. I took a year off, not really planned, but life works out that way, but I recently got off my ass and started working.

I heated up the bearings in oil to 200 degrees in the oven, and then sprayed a can of R-134 down the inside of the spindle for some more Delta-T. The bearings slipped right on the spindle with no issues. Then I heated up the headstock with a 200 watt bulb for a day, and right before installing the spindle heated up the inner race of the rear bearing with a 150 watt halogen bulb. The spindle assembly slipped in easily to the rear bearing surface, and then I used a threaded rod to push the rear bearing to fully seated.

I had left the bearing lock ring slightly loose, and then tightened after the spindle was fully in, while the headstock was still heated. The SKF HN 12-13 wrench has to be purchased for this as the hinged type won't work.

The next morning after all the temps were back to normal I checked the runout and my test indicator needle moved about the width of a line on the dial, so I am going to say on the order of 20 millionths runout. Big "whew" here as I was paranoid about my $2400 of stuff!

Now on to tuning my Parker 514 and 507 drives. Life is looking up.


Back
Top