What's new
What's new

What is this thing on the left end of my spindle?

focusrsh

Aluminum
Joined
Jul 30, 2018
I am preparing to remove the spindle on my 1942 EE10 so I can get to the fwd/rwd clutch shift fork. First step listed in all the "spindle removal" threads is to remove the pulley. Right.

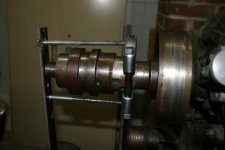
So have this this...thing...on the spindle. No idea what it is. I don't see it in the Monarch manual. The part pointed to by the arrow slides back and forth.
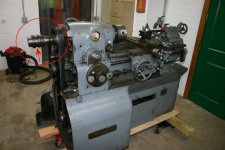
spindle left end.jpg

Here is a close up with it all the way to the left.
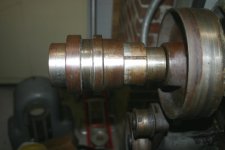
IMG_6134.jpg

If you push it to the right far enough, three roller-finger spring out. (There are set screws that limit how far you can normally move it but I have them out, so normally you couldn't move it enough to expose the fingers.) Notice that the end is threaded.

IMG_6132.jpg

All of this stuff has to come off the spindle BEFORE I can pull off the pulley. The entire contraption seems to be pressed onto the end of the spindle, although there are some set screws too, which I've removed of course. I've shot Blaster all around it and tapped on it, but nothing budges.

So I thought maybe I can take off the afore-mentioned sliding part and see if there is something under it holding the inside part to the spindle. The problem with THAT idea is that the outer sliding tube is keyed to the inner tube, and the groove for the key doesn't run the length of the tub, so the key has to come out before the outer tube can be slid off.

tight key.jpg

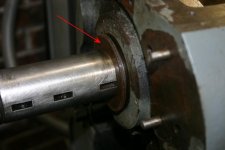
The key, as shown here in the circle, appears to be a press-fit. Taping on it, or sliding the outer tube to the end of the groove and then taping on it in hopes the key would lift up, didn't work either.

So, I'm stuck. Any ideas?
 
I have that style collet closer for my Square Dial. I’ll look to see how it’s attached and post back.

Ryan
 
Thanks, that explains it.
I searched for how to remove the collect closer, and the only success story involved a 5lb brass hammer. Maybe Ill try to make some kind of puller instead. (I've already removed the two set screws that are suppose to fix the closer to the spindle.)

In this photo, is the part I've labeled "spindle?" actually the spindle or part of the deceased collect closer?
collect closer parts.jpg
 

Had a look at mine. When in the position pictured there are two threaded set screws that are revealed. The set screws are directly opposite each other. I can just see one of the threaded holes in your pic. If those are removed the unit should be removable unless someone has modified it.

May need to work it a bit depending on how long it’s been installed and there is a chance the set screws caused local damage on the shaft and the closer assembly rotated and jammed on the raised damage.

Ryan
 
Perhaps this image will help. There are two guides, the key and a set screw with a reduced tip. This image shows mine with the set screw and key removed and slid back to reveal the threaded holes for the set screw that hold the closer to the spindle.

511E5A5C-14E5-44EA-8C96-B094B2437C3C.jpg

The diameter you have labeled “spindle?” Is still part of the closer.

Ryan
 
I believe that there are actually two of the dog-point set screws, 180 degrees apart.

Here's a thread that discusses the closer: lever collet closer

This thread discusses removing the collet closer body: Collet Closer assembly - round dial - how to remove

You don't need to remove the sliding collar to remove the closer body, as shown in Ryan's picture. You just need to remove the two large set screws and the body will slide off the end of the spindle. Make sure that you're putting your penetrating oil in the right place. Make sure that you spay it right next to the hub on the drive belt pulley. You definitely DO NOT need a hammer to remove it. If it doesn't slide off, you'll need to rig up a puller. A large bearing separator is probably your best bet. Chuck up a length of pipe, with the end sticking through the spindle so that you'll have something to pull against.

You can probably make up the missing parts to get the closer working again, but you're missing about half of the parts. If you decide not to go that route, I would really like to see if we can work out some sort of trade for your closer parts. The body of my closer is pretty badly busted up.

Note that the closer body serves two additional purposes: 1) the drive belt for the QC gearbox feeds runs on the small part of the body, next to the main pulley; 2) the closer body holds the main pulley in position. My old, beat up closer body would work fine for that.

Cal
 
I bought the bearing separator you recommended and a 36" piece of 1" (1.3 OD) black pipe. Tightened the pipe in the three-jaw chuck as much as I could and hooked up a puller as shown here:
IMG_6152.jpg
Tightening the bolts simply pushed the pipe out of the chuck and didn't budge the closer.

I then tried working in the other direction. I loosened the pipe in the chuck, pushed it up against the puller and hit it a few time with a mallet from the chuck end. I didn't want to hit I very hard for fear of damaging the spindle bearings. Again, nothing moved.

Both set screws are out. I've been spraying Blaster in the set screw holes and also around the space between the pulley and the closer.

Next up: I can remove the puller bar and simply thread the bolts in until they press against the pulley. I'm a bit scared of doing that for fear of cracking the pulley.

If that doesn't work, I'll try applying heat to the closer. Perhaps someone put it on with Loctite?

--------

Cal, when I get this off, you can have it in exchange for your old one. I'm a bit confused, though. You say the closer body holds the main pulley in position. I see a set screw on the pulley. Isn't that sufficient to hold it in position on the spindle?
 
Make that black pipe the correct lenght that the end of the pipe sits against the closed jaws
Cant slip that way
Use a piece of thicker stock to make your puller from
This one will bend

Peter
 
Success! In the picture I showed previously, I had a puller pulling against a pipe held in the chuck. What worked was to remove the puller bar and just run the two long bolts in against the pulley so the bearing separator was being pushed against the collet closer. I used an impact wrench to work the bolts in a few turns at time on each side, but a large ratchet would have worked just as well.

There were no signs of damage to the spindle or that anything was holding the collet onto it. It was just stuck tight!

The pulley was also a bit of a bear to get off but gentle taping worked it off.
 
You literally posted one minute before I was done with mine. Glad it worked, but I would not recommend others doing it that way. Here are my thoughts:

My thought was similar to Peters. I was thinking using a coupler fitting and a short nipple, with the coupler behind the jaws. Also use a 4-jaw chuck if you have one, they can apply a lot more pressure to the jaws than a scroll chuck. You can also bring the tailstock up for additional support. My only concern about pushing on the back side of the jaws is that you might spring the jaws, but I don't know if that's a real issue, others may know. I don't think that pressing against the drive pulley is a good idea.

If you want to try heating it, run the spindle as slowly as possible and play a heat gun on the body of the closer until it's too hot to be able to hold your hand on it. Don't use a torch. The body is cast iron and you can bust it up if you get too crazy.

If the puller and perhaps some judicious heating don't work right away, just leave the puller tight and go away. Maybe tighten the bolts a bit every day. It'll move eventually.

You're probably right about the setscrew. It's on the back (headstock) side of the pulley, hidden from view, right?

Cal
 
Cal-
I sent you a private message via this website about swapping this closer for the other one you have. I'll try to email you, too.
 
I found one more piece that had to come off the left end. It is some kind of a flange. It too was stuck tight but the bearing spread/puller did the trick.
IMG_6163.jpg
Spindle is now out!
 
That's part of the oil slinger for the left end of the spindle. I sent you a headstock drawing that shows it.

Did you get my reply to your e-mail about the collet closer body?

Cal


Back
Top