What's new
What's new

Need to touch up 60" camelback straightedge with 36" references. Best way???

J_R_Thiele

Stainless
Joined
Jan 22, 2003
Location
Columbia Missouri
Need to touch up 60" camelback straightedge with 36" references. Best way???

I have a 60 in B&S camelback I got off of ebay- and want to true it up for use. I have a 36 X 24 in granite surface plate- and a 36 in B&S granite straightedge (neither calibrated).
I have tried spotting with both- and have not been satisfied yet with either. I am open to suggestions. I have found it physically easier to use the granite straightedge.

I am sure Connelly adresses this someplace- but I have not found it.

SURFACE PLATE

I know it is best to not have any overhang off the surface plate when spotting- but I cannot avoid this. I have tried going diagonally across the plate- but I am not strong enough to hold it extended and have the cntrol needed. I can get consistent markings when the camelback is centered on the plate with equal "hang-off". When I have all the "hang-off" to one side the strightedge marks up at the edge of the surface plate where the weight is concentrated. This is with the medium (Canode) on the plate.

Possible solutions to when I have the overhang
1 Add weight to the end on the plate to provide better balance. If I try this I need to come up with a way to attach it so it does not distort the casting- and there is no risk of something falling off onto the plate. Another possibility would be to use a weight and pulley or spring to help lift the overhanging end.

2 Use a thinner layer of marking medium and manually push down on the end on the plate. If the layer of medium is very thin it should mark up more consistently regardless of the pressure

GRANITE STRAIGHTEDGE

The granite straightedge is the same width as the camelback- and has no provisions for handles. I have used wood clamps as handles, and to add stability when putting on marking medium. It seems unlikley I distort the granite- but to keep from slipping the clamps are very tight...

I have actually found it easier to lift and manipulate the granite straightedge than the camelback.

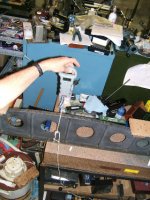
I have the camelback inverted and held in a B&B Workmate. The back of the camelback rests on the rails- which are 24 inches apart. (To be at the airy points it should be 33 inches apart.) I have it clamped at only one point in the center to try and reduce any stress or twist.

Though the granite straightedge is easier to manipulate, it is harder to get consistent markings with. I suspect part of this is related to the difficulty of getting an even coating over its length.

In using the granite straightedge I have the camelback upside down- so there is no overhang. This also leave the camelback in the position for scraping- but not well enough supported to actually scape unless addition support were added.

Possible solutions.

1 Add second Workmate and relocate clamping points for scraping.
Add second Workmate and use one for each airey point.
Both depend on my other two model workmates matching...

2 Abandon the Workmate and build a dedicated frame to hold it on the airy points, with one clamp to hold vertical without imparting twist


Comments or suggestions on any of the above?
 

Attachments

  • DSCF3981-1.jpg
    DSCF3981-1.jpg
    69.6 KB · Views: 908
  • DSCF3980-1.jpg
    DSCF3980-1.jpg
    77.5 KB · Views: 1,269
Last edited:
First of all, don't worry about the Airy points. They apply only to homogeneous beams, which a camelback is not.

I have a couple of SE just like yours and I made a buck to hold them at a good height for scraping. I made the buck so the SE would rest on the pads that are cast on the back and used a loose wedge to hole them snug in the saddle. The whole buck arrangement was to flimsy for scraping, so I anchored it to the side of a table. Then it worked great.

I did all my bluing with the straightedge upright on the master. This takes the deflection out of the equation for the marking.

I have a 66" parallel SE you could come up and use as a master, but I'm 300 miles away.
 
It has been a bit of a frustrating day.

I modified my set up and now have two metal sawhorses under the handles, with clamps to the handle to keep it upright.

Tried some more "marking" using the granite straightedge, and the markings suggested the camelback was slightly convex.

I spent the afternoon using levels and parallels to try and measure how convex it was. I did this several times using different levels and span lengths, and came out with a rise and fall of about .002 to .0025. Levels used were a starret 199, a Hilger and Watts adjustable level, and a french level whose name I cannot recall at the moment.

I then went back and put the granite straightedge on top of the camelback, supported by two small granite parallels- and measured the distance between them. I could come up with less than .001 difference- and probably less than .0005. The spacing of the handles is about 36 inches apart- so the weight of the granite would not be flattening the camelback.

Will give it another go tomorrow.
 
Went back this AM and recalibrated the Starrett level, readjusted the strightedge, and used rubberbands to hold the small parallels to the level and tried again. I also used some plastic .0005 shim stock to double check things.

See picture below for what the set up looks like.

This time I got a hump of under .001

Back to trying some markings and correlating them and my readings with the level.
 

Attachments

  • DSCF4033-1.jpg
    DSCF4033-1.jpg
    67.4 KB · Views: 475
You're worrying about the right things but I'm curious about your leveling technique. Are you uing two levels at once? It makes sense if you do. Levels are a little heavy and the Workmate is limber for this class of work. The weight of a single level will make it droop enough to make it impossible to separate the droop from the actual error..

I suggest you prove and calibrate your levels first. Then use one as a reference level which stays in one position and another you move around as the "difference" level to detect the error. You use the reference level to give you a sense of whole part movement and the difference level to determine the departure of any one portion of the work from the reference level reading.

IOW read the ref and add or subtract the diff to detemine the error. This is called differential leveling. Working the level lengthwise and crosswise using reversal techniquel will detect error of 1/10 the level graduations or 1 arc second in the case of a Starrett 199. This requires the most excruciating care with handling and preventing localized heat from affecting the readings. Even the heat radiating from your bodly has an effect.

Federal made a dandy electronic differential level for just this situation but simple spirit levels will do the job with only a little more hassle.

You can generate long accurate flats using too-short references and a couple of good levels but it will require a lot of patient, exacting work and careful checking. It will be frustrating and you will make mistakes. Just so you know. The experience will be good for your spiritual growth.

A thouand years ago, there were nutcase holy men who spent 30 years living in the weather on top of a column of a ruined temple. They could have accomplished the same spiritual growth in a month of scraping one cast iron straightedge with less than minimum equipment thus avoiding rainstorms, pigeon poop, and rotton apples thrown by jeering kids.
 
Last edited:
I have abandoned the Workmate to actually hold it.

I for using the levels I eventually ended up with a metal sawhorse under reach end- under the handle. on one end I clamped peices of wood which come up high enough to touvh the side of the camelback "foot"- but do not go above it. These prevent tilt. The "cross" angle (level) is adjusted by tapping the wooden foot back and forth with a small hammer. The camelback is leveled lengthwise by a wooden shim under the wooden handle- which is tapped in or out to vary the height on that end. This also often shifts the cross level adjustment- so it takes a bit to get it adjusted.

I believe the errors I was getting before were due to shifts in the setup. It was very easy to tap one of the legs with a foot or brush against it with clothing. I initally had it set up in the middle of the sawhorses- but shifted to the end to limit this contact.

I have been using just one level at a time. Next time I will try using two.

I have a Berger level 8" long- which is rated at .00012 per foot. It is so sensitive it has very limited usefulness. If I were to rubberband my little granite parallels to it- and space them 6 inches apart- each level graduation is measuring .00006" difference between the parallel contact points.
 
Have you measured for twist (cross levels) yet?

I say this because I discovered that my 48" camelback had taken on quite a severe twist (0.0005" in 2" end to end) that was more of a problem than the hogging that it also had.
 
.RC.

Thanks for that link. It gives me some more ways to check things.

Mark.

I have not checked for twist, as at this point I know it needs to be rescraped.

I am being very careful to make sure I do not intoduce any twist.
 
I wanted to update this thread what I have tried and learned.

Believing I was getting consistent readings with the levels I decided to start scraping the center of the camelback, using the granite straightedge to mark the inverted camelback. This would have the camelback supporting the shorter granite straightedge. After getting the center scraped to consistent marking I went back to the levels.

Using two levels I found I was not getting consistent readings. I thought part of the problem was related to the wooden handles as one had part of one end had split off before I acquired it. They were also too short to support the camelback on a flat surface. I replaced both handles with plywood ones and tried again.

What I found by using multiple levels was that I could not get consistent readings- as the weight of adding a level would change the reading of the other levels. I could also get some change by putting a level on the sawhorses the camelback was resting on. This setup was not going to work.

Now that I had handles of sufficient height in the handles I could set up the camelback inverted on my 24 x36 in surface plate. The surface plate has a study metal stand- and a lower shelf with several hundred pounds of surface plates, squares, etc. I found that I still had changes in level readings as additional levels were added, though less than before. By using different levels and locations I determined that there was more of an effect with heavier levels- though location also made a difference. I considered several options at this time. I could make a series of dummy levels weighted the same as an actual level, and remove the individual dummy to take a reading. I could try replacing the plywood handles with metal ones threaded for adjusting screws for leveling. I also considered getting an un-mounted level vial and making my own ultra-light level from aluminum.

I next tried bluing up the camelback using the surface plate- and found I had actually scraped it more concave than it had been when I started.

I decided to try and measure the concavity by another method and set up the camelback on two granite parallels on the surface plate and used a mechanical (.0001) and electronic (to .00002) indicators to measure with. Because the surface I am measuring is inverted it is not possible to use a slip to bridge the dips from the scraping and it is a challenge to measure. I believe that the concavity is about .0002 to .0003 high.

I decided to abandon using the granite straightedge after finding the above.

I then confronted the difficulty of using the surface plate and dealing with the significant overhang. I know that I need to have the “light” end contact the plate first- but even with this the bluing was increased with the greater weight at the other end.
My solution has been to use an elastic cord to add “lift” to the overhanging end. I vary the lift such that I have about equal downward force on the surface plate at each end. I initially attempted to make this adjustment by measuring the force required to pull a strip of paper trapped under the straightedge. This is a version of the 3 paper test- but with only two papers you are looking for movement. I was using a fishing weight scale to measure the pull needed- and had to find some heavy card stock to prevent the paper tearing. I then switched to a loop of cord and used the scale to directly measure the lift needed at each end- and this was easier to do and eliminated any questions about even bearing on the paper.

I am about to resume scraping. It is much easier for me to manipulate the straightedge with the overhanging end being supported. The bluing is much more consistent.

Two other additions have helped with handling the straightedge. I have clamped a strip of wood to the surface plate frame at the overhang end of the surface plate. This is beyond the area which is being blued. This gives me a place to rest this end before and after the bluing while attaching or detaching the elastic cord. At the other end at the handle location I have a cast iron square with a strip of metal clamped to the top. The strip of metal goes under the wooden handle, and holds that end above the surface plate before and after bluing.

Below are pictures showinG the attachment to the ceiling, the paper test, and checking the weights directly.
 

Attachments

  • DSCF4035-1.jpg
    DSCF4035-1.jpg
    77.5 KB · Views: 409
  • DSCF4036-1.jpg
    DSCF4036-1.jpg
    66.2 KB · Views: 400
  • DSCF4043-1.jpg
    DSCF4043-1.jpg
    84.7 KB · Views: 466


Back
Top