What's new
What's new

What do I need to measure a bore with +/- .0002 tolerance?

Edster

Diamond
Joined
Feb 8, 2003
Location
Illinois
I need to make a bore with a +/- .0002 tolerance. I was planning to buy a class xx ring gage from Meyer Gage, and use a dial bore gauge. I only have 6 parts to make, so I need an economical way to measure this. The company I'm making this for has a fancy cmm so that is probably how they will measure it. Will the dial bore gauge work for this? Any other options I should consider?

Thanks in advance :cheers:
 
Depending on size and budget.......

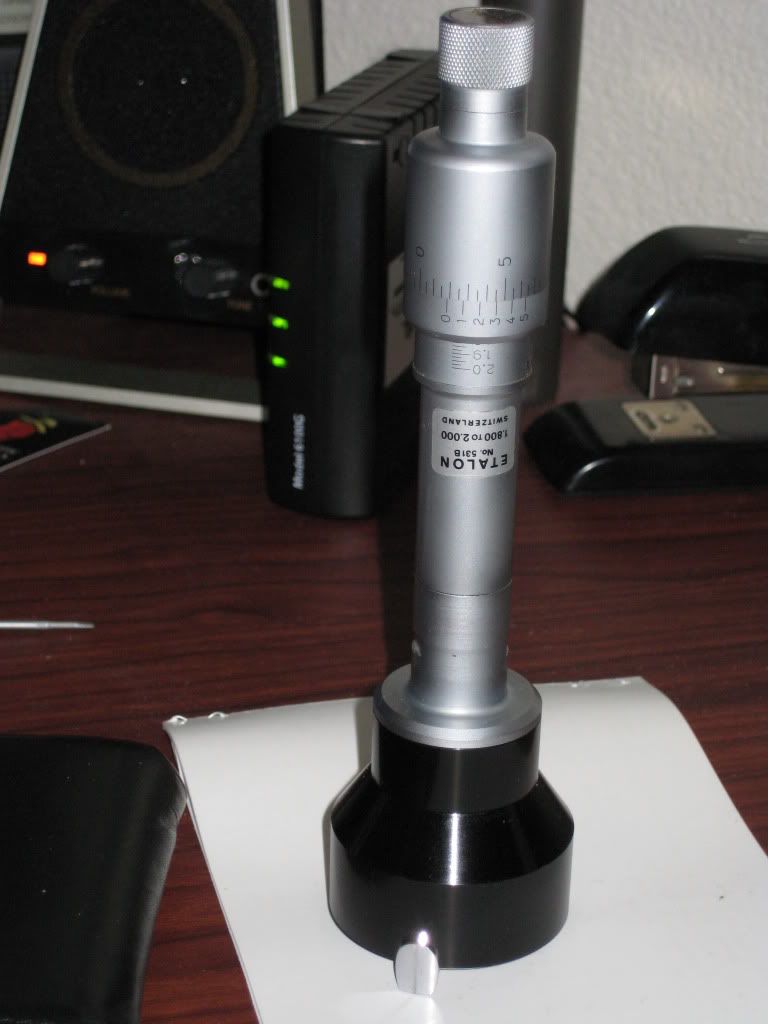
Deltronic pins for ranges +/- .0012 around a nominal size, or one of these Etalon 531B direct reading Ingages with .0001" resolution:
IMG_0002-2.jpg
 
I use the Etalon 531B tri-point gauges like the one aerodark posted, but even those are only rated to about a 0.00008" limit of error, depending on size.

That would eat up your entire part tolerance just in gauge error. And it certainly doesn't meet the 10x accuracy factor commonly required for measurements.

I'm afraid you're looking at an air gauge for anything this tight.

As Gordon said, we really can't make a good recommendation without knowing the diameter involved.

- Leigh

Leigh,

I would not hesitate to confidently measure bores with .0004" total tolerance with an Ingage properly calibrated with a Master Ring Gage. 10x rule or not.

Would you?
 
Ingage rocks

I would not hesitate to confidently measure bores with .0004" total tolerance with an Ingage properly calibrated with a Master Ring Gage. 10x rule or not.
I tend to agree, but it depends on the desired end result.

If the customer required certification and traceability, then no. It simply won't meet that tight a spec.

For personal use, of course. The Etalon Ingages are extremely accurate and repeatable.

I have a project of my own that requires some 2.3800" bores. I ordered a master ring gage from Meyer at the tightest tolerance they make, and the Ingage reads it dead on, not even a line-width error (stabilized at standard temperature, of course).

- Leigh
 
Last edited:
The diameter is in mm and I can't remember it off the top of my head. I can post it tommorrow after I get to work.
 
If its a bearing size, ideally check it with the bearing :)


I always found between pin gauges and measuring gauges, by the time the pin goes its a few tenths big according to readings, and yet... if you make it right to the readings, the pin, or generally their bearing will be too tight. It's a PITA, and making 1-10parts definitely doesn't justify 20K in gauges to "show off" to the customer.
If you can have the drawing of the mating part to see the tolerance/diameter on that, you can at least make a matching pin, or buy one and go from there. Quite funny when they have .002" clearance between parts on a .0001" diameter.
 
I need to make a bore with a +/- .0002 tolerance. I was planning to buy a class xx ring gage from Meyer Gage, and use a dial bore gauge. I only have 6 parts to make, so I need an economical way to measure this. The company I'm making this for has a fancy cmm so that is probably how they will measure it. Will the dial bore gauge work for this? Any other options I should consider?

Thanks in advance :cheers:

Foist...... HOW do you plan to make this hole?...
..............on a Bridgeport?... or a chink copy of one???
..............or maybe ona chink lathe???
..............or maybe in a old well broke in American Machine?...
( remember, broke in is really only a stage of WORN OUT ) :D

You'l stand a chance of actually doing this if you're using a ID Grinder....

Think I'll get the popcorn and sit back a watch this show.....

ohh.... and your shop is Air Conditioned and Temp and humididity controled ??????

and you believe the CMM? maybe, if it's been calibrated with the same ring gage your going to use as a standard
 

1. what is the diameter?
58.35mm or 2.2972"

2. what is the tolerance?
+ / - .005mm or + / - .0002"

3. how acurately do you wish to measure or is inspection (pins/gages) OK?
As accurate as I can without spending a fortune on measuring equipment specific to this job. I don't mind buying a good quality measuring tool if I can use it on other jobs. The customer has a nice cmm, don't know the brand or model, so if I can fool their cmm I think I'll be ok :)

4. how much are you willing to spend?
Depends on if I can use the measuring tools on other jobs or not. I doubt I'll be able to use the $200 ring gage on another job, but that's no big deal. Just don't want to spend thousands for a one time job.

5. how many do you think you'll be making?
6 pcs.
 
If its a bearing size, ideally check it with the bearing :)

It's not a bearing size. I don't entirely know how they are going to use this, and even if I did I can't say. I do know it's going to be an inspection fixture for parts they make.
 
Last edited by a moderator:
Foist...... HOW do you plan to make this hole?...
..............on a Bridgeport?... or a chink copy of one???
..............or maybe ona chink lathe???
..............or maybe in a old well broke in American Machine?...
( remember, broke in is really only a stage of WORN OUT ) :D

You'l stand a chance of actually doing this if you're using a ID Grinder....

Think I'll get the popcorn and sit back a watch this show.....

ohh.... and your shop is Air Conditioned and Temp and humididity controled ??????

and you believe the CMM? maybe, if it's been calibrated with the same ring gage your going to use as a standard

I do have a few old broken in american machines, but I wasn't planning to use them :) My machine choices are a Haas TL-1 lathe, Haas SL-10 lathe, and an Okuma Captain L370 lathe. All in good condition.

My shop is sealed well and insulated well. I have heat which I keep at 68 and a/c which I try to keep 72. It's not a tempreature controlled inspection room by far, but it's probably better than 90% of the shops out there.

I was hoping if there was a problem measuring with the customers cmm I can at least measure the ring gage with it to see what's what.
 
Why would a company that can measure something like that even send it out to be made?

They are mainly into injection molding, they outsource their machining.

I think there is some wiggle room with this tolerance. The first time I quoted it there was no tight tolerance specified on the bore. After I got revised prints with the new tolerance I told them I would have to buy inspection equipment for the job. They said they could make the tolerance a little looser if that helped. The surface finish requirement is "a very smooth surface" :)
 
On a tangent, but how much affect does humidity have on measuring steel. We keep the toolroom at 68-70 for measuring .0001. with Sunnen bore gage. reality is probably +- .0001.

Dave
 
Back in the day when I was wearing an inspector's hat I used to certify 0.0002" on bores and OD's ranging up to 10" on a regular basis. Of course, I didn't do this lightly. Certifying measurements this close in the open shop required suitable equipment and technique. I took along a Federal dial indicating bore gage reading in 0.0001" graduations, a setting ring or a stack of Jo blocks, white cotton gloves, and a thermometer. I also took along a sheet of aluminized bubble wrap as an insulating blanket. Even if I was working off a pallet in a quiet place, I could set up a little temperature controlled environment - not measuring room controlled but a setting where the work and the meaureing equipment were in thermal equilibrium. If you know the temp you can comp back to 20 degrees C standard conditions.

The people who had to put up with my fuss and bother were skeptical but when I rejected a few parts and the requesting shop sent them to the metrology lab for a second opinion my readings were confirmed to 0.0001".

At the minimum you have to have good comparative equipment, calibrated references, use repeat zero technique, set up conditions of thermal equilibrium, be hyterical about keeping thremal equilibrium under control, and make the necessary mathematical adjustments for thermal expansion (white gloves). Do all these things and you can work to 0.0002" out in the open shop or on site as reliably as you can in the measuring room. On the down side, it will take a bit longer and your condition setting if undertaken without tact may promote harsh feelings and disruption of work flow.

So far as I know non-condensing humidity has zero effect on mechanical measurement. But relative humidity over a certain amount promotes rust on sensitive gaging equipment.
 
"They said they could make the tolerance a little looser if that helped. The surface finish requirement is "a very smooth surface"

A

VERY

SMOOTH

SURFACE?

??????????????????????????????

OK, if these folks were sending me this work, I'd ask them seriously, to pull the other
one because it's got bells on it.

This sounds like a shop where somebody's got the number of digits on autocad turned
up WAY far too high. They seem to have no idea what they're asking for.
 
Here's an update.

I ran the job on my 2005 Haas TL-1 lathe. I roughed the bore and did a finish pass in one op. I shot for .010" undersize on the diameter so I could measure the bore and adjust the tool offsets and run another finish pass. Ran the second finish pass without disturbing the tool in the dorian toolpost. I left .010" for the finishing pass on the initial rough and finish op so the tool pressure would be the same for the final finish pass.

I used a sunnen dial bore gage with a setting fixture that I borrowed from a friend. It came with a ring gage, but it wasn't the size I needed, so we measured the ring gage with the dial bore gage and made sure the setting fixture was calibrated correctly, and it was. We set the setting fixture to the correct dimension and measured the bores.

The six bores measured between .0000" and -.0001" with the dial bore gage.

The customer picked them up this morning. He said they were going to measure them with their CMM. I asked him to let me know what they measured when he found out. A few hours later he emailed me the results. The bore was supposed to be 58.35mm. The one they measured was 58.352mm. We had +/- .005mm to play with, so I guess we fooled the CMM :)

Thanks for all the help guys :cheers:
 
Last edited by a moderator:
I'm hoping that either the 5.35 or the 58.532 is wrong (typo error and either 53 or 35) or you could have measured the hole with a caliper :)

What I mean is that if it was a typo error then you were only 0.002mm off and that's excellent. Don't know how that's "fooling" the CMM though.

How abouth "smooth"? Did they measure surface roughness?

Yup, I mixed up the numbers. Should read 58.35 +/- .005mm and ours measured 58.352mm. Glad I did that here and not on the cnc control :)

He said they were smooth enough when he picked them up, so they passed the finger Ra test :)


Back
Top