What's new
What's new

13" threading engagement points.

Just a Sparky

Hot Rolled
Joined
May 2, 2020
Location
Minnesota
Forgive me if this is a noob question. Does anyone have any information on what points the threading half-nuts can be engaged for a given thread pitch on the 13"? I've heard tell that certain thread pitches can be engaged on something along the lines of 1, 2, 3 or 4 on the threading dial, others on 1, 3, some on only 1, etc. because of the mathematic relationship between the lead screw gear ratio, lead screw pitch and workpiece thread pitch.

Is there information out there in the form of a chart or some math that I can use to determine which thread pitches can be engaged when? Understanding the math would be preferable so that I can forego having to keep another piece of reference material in my tool box. :reading:

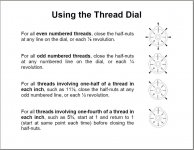
Here's what the HTRAL says:

attachment.php


It works for my H10 - it should work the same for your 13".
 

Attachments

  • Using the Thread Dial.jpg
    Using the Thread Dial.jpg
    88.5 KB · Views: 45
There is so much to learn to even be a lathe hobby guy you should have your own hard copy of
How to Run a Lathe by South Bend.

Here is a source of it for your computer.
http://vintagemachinery.org/pubs/1617/5795.pdf

But you need your own copy so you can read it cover to cover.
With not reading it you will be handicap in running a lathe.

The other thing to have is the drill tap drill size wall chart.

next a bench grinder.

For a thread practice task you might design a special thread, perhaps a 3/4-12 thread, figure out the correct diameter, the root diameter, how much in feed at straight in and at compound 30^. That is a project to understand a screw thread.

We are so fortunate nowadays that you/we can go to the computer and find most anything, but often not learning much.
 
Also of note: if the thread pitch is a multiple of the lead-screw pitch (i.e. 24 TPI and a 6 TPI lead-screw) then engage it wherever you want. You don't even need the thread dial.
 
Understanding the math would be preferable so that I can forego having to keep another piece of reference material in my tool box. :reading:

It's actually a really simple concept, and very easy to apply, it's just hard to wrap your head around at first, and a bit difficult to explain with only text, but here I go, this is how I look at it anyway.

Imagine if you were to lay the lead screw of your lathe and the work piece you are threading side by side on a bench comparing the threads' pitches. Obviously, if they were both the same pitch, all the threads would line up perfectly. If they were different pitches, you could line up one thread, but the next thread would be some amount off. But, because our thread system is based on number of threads per inch, as long as both threads TPI is a whole number, the threads will again line up exactly one inch from where you started.
For example, if your lead screw is 4 TPI, and the part your making is 5 TPI, center one thread at a zero mark, for the 4 TPI thread, the next thread will be at 1/4", the next at 1/2", then 3/4" then 1". Also for the 5TPI, the first at 0, then the next at 1/5", 2/5",3/5",4/5", and then at 1", the two threads coincide perfectly again. They will at every inch mark.
If you were cutting 6TPI instead, the two threads would coincide even more often. The first thread is at 0, then 1/6",1/3",1/2",2/3",5/6", and 1". So these two threads coincide every half inch as well as every inch.

The way this applies to your thread dial is in the idea that a thread dial is really nothing but a travel dial, except instead of showing your tools position relative to the bed of the machine it shows it relative to the lead screw. Most thread dials have the largest lines numbered, often 1,2,3,4. These USUALLY indicate one inch of relative movement of the tool to the lead screw per line.

First, check out your lathe. With the spindle off, move the carriage noting the distance it moves between lines of the thread dial. We need to know exactly how YOUR dial is graduated to understand exactly how your's is going to be applied. Most lathe makes use a similar system, but there are odd balls, so actually check it out on your machine!
Next we need to know how many TPI your lead screw is.

Once we have those pieces of info, we can determine what threads can be picked up at what positions.
 
For a thread practice task you might design a special thread, perhaps a 3/4-12 thread, figure out the correct diameter, the root diameter, how much in feed at straight in and at compound 30^. That is a project to understand a screw thread.

Funny enough I spent all morning practicing threading. Had to remake the same part three times thanks to learning mistakes.

Lessons learned: don't try to cut threads using a 2A collet. They don't hold up well to the pressures of thread cutting. A 30* approach angle and a dead center will end up pushing the work into the collet until it slips off of the center and crashes - shattering a precious 2A collet in the process. Many light cuts are better than fewer heavy ones while threading. Spring passes and very light final cuts help to smooth out roughness. UNC root depth = pitch * 0.866. Compound feed at 30* angle = root depth / cos(30).

I've got a bench grinder but I'll be honest in saying that grinding bits by hand is annoying. I've gotten very good results but they are imprecise and not at all repeatable. I'd like to build a tool grinder at some point so I can achieve precise, controllable grinds. Forming and honing radii is the biggest pain without some kind of a jig. With big bits it is very useful to leverage the radius of the grinding wheel to create two raised edges along each cutting face for easy, repeatable honing.

I don't have wall charts but I do have the black book with all the charts inside of it. Huot indexes make it easy to find the right bit for tapping.

The understanding thing is a big sticking point for me. Knowing the rules of thumb without understanding the reasoning behind them is a major peeve of mine. It's the same reason I've struggled with algebra all my life; no one I have encountered has ever been able to explain the hows and whys of it. "Put gas in the car to make it go" vs having a genuine understanding of reciprocating engines.
 
It is mostly trig that is used for angle and thread stuff.

Still one can avoid even that with drawing a something with a sharp pencil and a protractor. A 60* triangle is even better. One can easily see .002 with a 10X hand made drawing.
Yes, you draw 1" as 10" in your drawing.

You need a thread 60* fish gauge to make a decent thread tool bit. Whole classes of school teens learn to make a good thread tool bit in a day or two, so nobody is excused from being able to do that.

https://www.amazon.com/Brown-Sharpe...ords=Thread+fish+gauge&qid=1613068007&sr=8-16

https://www.amazon.com/Taiga-Now-Tr...13068104&sprefix=triangle+set,aps,193&sr=8-18

*Learning Trig you can test your angles figures with drawing an angle a 10x and the measure to find size.


Back
Top