What's new
What's new

1929 9" Junior-Advice on Where to Start?

jmills

Plastic
Joined
Apr 22, 2013
Location
Charleston, SC
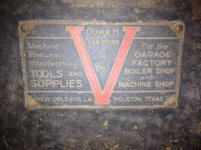
New member here who is also new to lathes. I have, what I believe, is a 9" Junior lathe. It's serial number is 44073A, which from what I have read, puts it in the ballpark 1929 manufacture date. The lathe is been in the family since new and I have had possession of it for the last couple of years. Ever since I have had it, I have wanted to get it up and running, but it has taken until now to get to where I can focus on it. I feel like I owe it to the latch to get it back in operation after is has been sitting for the last couple of decades.

As much as I admire the complete restorations of lathes on this forum, at this point, I am just looking to get it up and running. As I said earlier, I am new to lathes and would like to be able to start to learn what all I can do with it and then slowly go through it more thoroughly one part at a time.

I am a lifelong tinkerer and am normally playing with cars, so taking things like this apart (and getting them back together) doesn't scare me. I have a feeling that once I have this up and running, it will turn out to be one of the best tools I didn't know I needed.

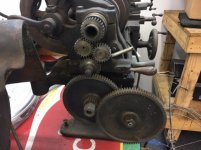
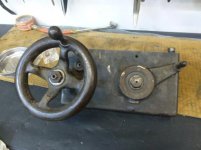
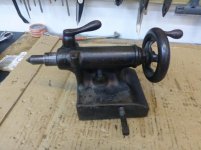
I am looking for some advice as to where to start. As far as I know, the motor works, the belt is in place and everything spins by hand. I am missing all the change gears and I believe there are some parts missing from the apron. There are no gears connecting the apron to the lead screw. Eventually, I would like to be able to cut threads, but getting the rest of it in operation is my priority at this time. Below are a couple of pics.

Lathe7.jpgLathe6.jpgLathe5.jpgLathe3.jpg

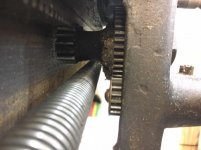
Here is a picture of the back of the apron.
IMG_8913.jpg
 
I am also not convinced everything is correct here. Then again, I don't know exactly what these gears are supposed to look like.
IMG_8911.jpg

The reason I don’t think things are correct is that there is a very slight rubbing where the arrow is pointing.
IMG_8912-2.jpg

Any advice on where to even start? I think once I have some direction, I will be ok, but I am sort of at a loss right now. Any assistance would be greatly appreciated. I am really anxious to dig into this antique! :)
 
I have answered one of my questions and can shed some light on another one. I was able to loosen and rotate the gear that was rubbing out of the way. No issues there other than no change gears. I have also been watching some Youtube videos on the apron. It looks as if the half nut assembly is completely missing. That would explain why that portion isn't working.

I may have posted my original thread a little prematurely, but I'd still like some feedback from the experts.
 
I am also not convinced everything is correct here. Then again, I don't know exactly what these gears are supposed to look like.

The reason I don’t think things are correct is that there is a very slight rubbing where the arrow is pointing.

Any advice on where to even start? I think once I have some direction, I will be ok, but I am sort of at a loss right now. Any assistance would be greatly appreciated. I am really anxious to dig into this antique! :)

IMHO, that lathe would benefit greatly from a complete take-down, a thorough cleaning, and re-felting (if applicable). It's even possible that it has never been apart or
maintained for nearly 90 years. The rubbing shaft on the fwd/reverse tumbler is totally wrong, and you need to move or remove that big gear immediatly until
you get this lathe worked out. If you absolutely have to run this lathe to play around with it, you really need to thoroughly oil EVERYTHING with whatever you
got sitting around like 3-In-1 oil. You should see little oil ports with flip-up caps, make sure these get a lot of oil and especially on top of the spindle.

In the meantime, get yourself a rebuild manual on that lathe from Amazon or Ebay.
A Guide to Renovating the South Bend Lathe 9" Model A, B & C Plus Model 10k: 9781482364880: Reference Books @ Amazon.com

I really don't know if this book covers your very early lathe...probably not....but it will at least give you a guide on what to look for.
You should probably start doing some research on that early lathe to learn what's right and what's wrong. You may even have
a hard time finding apron parts for it. It looks as though the worm gear is missing from the apron. This gear envelopes the lead screw
and provides power to the saddle assembly via a key that rides in the leadscrew keyway. (photos below) You should not be able to move the saddle outward at all, so be careful!

Since you are a good tinkerer, this will and can be a fun project as long as you take your time and go through it methodically. Take photos of
everything as it comes apart for later assembly reference. There are also some decent videos on YouTube on the disassembly of a 9" lathe
that you should watch first.

I'm not that familiar with the early Junior lathes, but there are folks on this forum that are, and I expect they will chime in.
(My 9" are 1946 and 1958). But looks like you have very cool early lathe that requires some TLC!
(I restored classic cars myself).

PS: As per your additional info, I would think that you need a worm gear as well as the half-nuts. The half-nuts are used when making threads.

PMc

View attachment 316548 View attachment 316549 View attachment 316550 View attachment 316551
 
looks like you're missing the halfnuts too.

It'll do just fine for a regular turning lathe and you can use dies for most of the threads you'll need to cut. Just oil the crap out of every single thing you can find before you use it much.
 
other then half nuts there more then likely no other power feed / take off for the cartage as you don't see any casting bosses on the apron for them and from that side of the pic its hard to tell if the half nuts are there or not
 
Playing devils advocate, I'm wondering if sometime in this lathes's life those parts wore out or went missing, and replacements
were not available or purchased (no internet either).

Does the lead screw have a keyway cut down it's length? Hard to imagine the apron without any support other than the traversing rack and gear,
but I guess that's how they were made back then.

Actually, some more close-up photos of the apron face and the other side would be helpful. Or even better, remove the apron altogether and
photograph the backside of it. It should only be held to the saddle by a couple of 3/8" machine screws...if you can get them out.

PMc
 
Thank you for the responses. Mcload-what a beautiful setup! I'm envious.

I made some good progress today. I decided to take your advice and have my enthusiasm take a back seat. The more I thought about it, a good cleaning really is the best idea and I can get a sense of what all is working and what is missing. I started with the apron and found the oil feed line completely clogged. That reinforced that it needs to be gone through prior to firing it up.

What I have found is that it appears to have been used more to cut wood than metal when it was last in use. I have found very little metal chips and such but lots of wood sawdust. The dust has done a good job of clogging small holes. In any event, I was able to disassemble the apron and tail stock, clean and reassemble. I now have the cross feed disassembled and will work on that when I have a little more time later this week. I also have a better sense of what all is missing on the apron and the tail stock is as smooth as butter.

I'll get some pics posted when I have a little more time.

Thanks again.
 
For what it's worth, I think you made the right decision. The 9" SB is not a complicated machine to go through,
tho very small pieces can easily get lost if you don't tag and bag them. (Don't ask me how I know).

I recommend you go by a smoke/vape shop and pick up a bag of pipe cleaners with bristles; they work great for
cleaning out the small holes.

Thank you for the compliment! But it's nothing that hasn't been done by many dozens before me; I just copied them.
Just another damn gray lathe! :cool:

That is the 1946 SB Model A lathe that I inherited from my Dad too. I think he bought it from some guy in Dallas
in the late 40's or early 50's. I'm glad I was able to hold onto it for so very long. (Unfortunately I let a taper attachment
slip through my fingers back then. I didn't know one from a 10" would also fit a 9"). Damn!

I've just about finished a 1959 SB Model B (below) that I've upgraded to a Model A by adding a quick change gearbox. I only
need to build a new cabinet to start final assembly. Easier said than done, but not difficult. It has been a good project during
the lockdown. Too much time on my hands I suppose.

Good luck; and we look forward to more pics!

PMc

View attachment 316605 View attachment 316606 View attachment 316608 View attachment 316609 View attachment 316610
 
That is impressive too. I am in awe every time I see one of these old lathes looking so nice. Maybe one day, I will go through the effort of bringing it back to its original visual glory. Speaking of that, I haven't searched yet, but I'm curious as to how you polish the dials to make them look as good as new? Mine are a little hard to read, so I might clean them up a little.

I am glad I made the decision to go through this lathe on the front end. I have been surprised as to how entertaining it has been to take it apart so far. Everything is pretty straight forward. I am used to taking cars apart and this has been a much easier process. I will say that the cross feed did have me scratching my head for a few minutes. but I figured it out. :D

Here are some pics of the apron. All the parts cleaned up.
P1140539.jpg

Pic of the front.
P1140545.jpg

Pic of the back. There is a part missing where the red circle is. I assume it is a mirror image of the rectangular part to the right. I would think these hold the half nuts. The holes (red arrows) are not threaded. I don't know if the holes themselves were threaded or if there was a threaded insert. It appears as that this may have been the demise of the half nuts and threading capability. The question is what to do about it. I'll continue cleaning and figure it out as I go.
P1140544-2.jpg
 
Ok. You need a 16 tooth gear on the reverser to complete the gear train for turning. You will also need a set of half nuts. A fellow on this forum has brand new ones for a junior lathe. He goes by Jayhawkman or something similiar. just search for him using SB halfnuts for sale. That machine uses the half nuts for all horizontal power feed work i.e. threading and turning. No power crossfeed. I am almost sure that those gears are 16DP but you will have to figure that out through some measurements and counting the teeth. They could be 18DP but the junior I had were 16DP. THis is one of the simplest lathes South bend made and there are many around being used everyday by hobbyists. Stuff is still around and found on ebay and marketplace. That lathe will turn metal right now without any additional gearing. You will just have to hand crank the saddle.
 
Well I was typing when you added the pics of the apron. Yes you need the halfnuts and a gib. I have a complete apron on ebay although the halfnuts are worn some but will bolt right on. You will have enough stuff to get you going. I may even have the gear that you need so the halfnuts will work. Check the DP.
 
And some pics of the tail stock. Evidence of dirt daubers under the tail stock. Yuck!

P1140553.jpg

Disassembled and all cleaned up.
P1140568.jpg

All back together and super smooth operating.
P1140569.jpg

Back with more when I have more to report.
 
Thanks for the info! I have a long day tomorrow of hurry up and wait killing time with the iPad. I will do some additional research.
 
That is impressive too. I am in awe every time I see one of these old lathes looking so nice. Maybe one day, I will go through the effort of bringing it back to its original visual glory. Speaking of that, I haven't searched yet, but I'm curious as to how you polish the dials to make them look as good as new? Mine are a little hard to read, so I might clean them up a little.

I am glad I made the decision to go through this lathe on the front end. I have been surprised as to how entertaining it has been to take it apart so far. Everything is pretty straight forward. I am used to taking cars apart and this has been a much easier process. I will say that the cross feed did have me scratching my head for a few minutes. but I figured it out. :D

Here are some pics of the apron. All the parts cleaned up.
View attachment 316623

Pic of the front.
View attachment 316624

Pic of the back. There is a part missing where the red circle is. I assume it is a mirror image of the rectangular part to the right. I would think these hold the half nuts. The holes (red arrows) are not threaded. I don't know if the holes themselves were threaded or if there was a threaded insert. It appears as that this may have been the demise of the half nuts and threading capability. The question is what to do about it. I'll continue cleaning and figure it out as I go.
View attachment 316625

i did not think it had a worm gear [power to the cross slide and carriage by way of a worm drive ] but i was holding out hope that it had half nuts hopefully they went to keep another one going and not it the trash
 
Speaking of that, I haven't searched yet, but I'm curious as to how you polish the dials to make them look as good as new? Mine are a little hard to read, so I might clean them up a little.

Looks like you got some great responses from your photos. I learned a lot myself about your old lathe.
You asked about polishing dials, so thought I would respond with the short answer, lest I bore the forum (again) with yet more
text on the subject. I did respond to a similar question on another post, but I can't find it. They are so sick of seeing my photos.

The best way to polish parts is to have another lathe. Failing that, all you need is a working headstock with a chuck on it. You don't need
any of the dials or an assembled apron, which is actually a good thing since almost all the items to polish are located on the apron or saddle.
(Yes, if need be, you can use a drill press too).

But basically, (for dials), use a piece of a bolt or threaded rod to hold the dial away from the chuck. Generally, I would start with a 600 grit wet/dry
sandpaper wetted with WD40 or light oil, and lightly clean off the surface rust. Keep at a low to medium speed as the oil will sling straight onto you;
I even put a sheet of plastic behind the lathe to keep this swarf off the wall behind the machine. Once you get the rust off, wipe it off, and do another
pass with 1000 or even 1500 grit. After that, finish with Mothers Aluminum Billet Polish (white cream) using a cloth rag.

This is also a good time to cleanup the hand wheels and handles. I found that the handles will easy come off the wheels by clamping the handle in a vise (with soft jaws, of course), and using a soft mallet to strike the wheel, thereby separating the two. However, the handle stubs will NOT come off of the smaller "feed" handles; you have to do these in sections. (I should have had my brass soft jaw covers on for most of these photos).

You gotta be real careful not to get injured spinning these oddball shapes. If you need to reach in to a little spot, use a popsicle stick or tongue depressor wrapped in wet/dry to do this. The lathe will not care if your fingers are in there or not! Having a spinning chuck is also good to clean up some misc sub-shafts for an easier slip fit. Ultimately, this is also how to clean-up the offset step pulleys too. Just do one at a time; move the belt over and do another,
etc.

If you prefer to do this after the lathe is back together, that's okay too as most parts are easily accessible. Anyway, you get the picture.

You might also look into this discussion about the cross-feed nut NOT getting any oil where it needs it the most...where the threads go through.

  • 9" Cross Feed Nut Replacement

Good luck!
(Feel free to PM me with any questions)

PMc
View attachment 316771 View attachment 316772 View attachment 316773 View attachment 316776 View attachment 316775
 
Thanks for the details on polishing things. I figured it was a multi-step process, but wasn't sure what you used as an abrasive and how you actually polished them. Looks like another reason to get this lathe up and running.

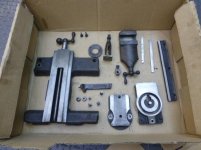
More good progress this afternoon. I got the cross-feed cleaned up and back together. It probably still needs some tweaking, but at least it's clean and works better. Here is the disassembled cross-feed with all the parts cleaned up.
P1140599.jpg

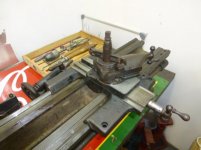
And back together sitting on the lathe.
P1140602.jpg

I did have one question...Seems like I have seen mention of little felt pieces that sit on the ends of the cross-feed. I didn't see any evidence of anything like this. Am I completely off base here? If not, did this lathe not have them? Here is a profile pic of the end of the cross-feed. All four corners look like this.
P1140600.jpg


Back
Top