What's new
What's new

75% more 9N/10K/10L tailstock spindle travel available

jockofthelowveld

Hot Rolled
Joined
Jan 25, 2008
Location
Blythewood, S.C.
I posted some lines and photos several months ago about my work on designing and building a a tailstock spindle assembly modification to increase the travel of South Bend Lathe model 10L. Several people asked if I had built an extended tailstock for South Bend 9N and 10K model lathes. I have now completed work on increasing the travel on South Bend Lathes model 9N (A,B & C) and 10K.

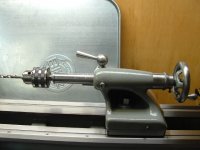
The modification increases the travel from 2 inches to a bit over 3 1/2 inches. I am attaching photos that show the extended tailstock modification for these lathes.

I am offering a service to modify the tailstock spindle and associated parts for the above South Bend lathes for a cost of $150.00 plus shipping and insurance cost, currently. To have the modification done to your South Bend lathe will require that you ship to me your lathe's tailstock spindle, and the complete tailstock spindle feed screw assembly as shown in the attached photo.

By return shipment in approximately 2-weeks I will send back to you your original tailstock spindle as modified, and engraved with the additional 3 1/2 inch marks to match what was originally engraved on the spindle. Also shipped back to you is a longer tailstock spindle feed screw and a new tail piece to add length to your tailstock. And of course, I will ship back to you the remainder of the tailstock feed screw assembly you sent me i.e. threaded bushing and tailstock feed screw handwheel. I fit each tailstock spindle individually that I modify, so I need all the described parts in the third paragraph above.

I have decided NOT to offer this modification as a kit because the modification turns out to be more complex in building than I thought and requires the use of an additional lathe and a mill. I think it unlikely that most South Bend lathe owners wishing to have this modification, have two individual lathes and a mill.

if interested in this modification for your South Bend lathe, please send me a PM or e-mail me via "lowveld at hughes dot net" (convert this to shortened web e-mail address) to arrange for shipping your tailstock spindle and feed screw assembly and to indicate how you want the return shipped to you(express or standard) and how much insurance. I believe that you should have $200.00 to $400.00 insurance as if the shipper loses your shipment, these parts are not easy to find at low cost in the market place today.

Attached below are photos of the modification to a 9N and 10L, plus a photo of what I need you to ship to me.

Best Regards;
Steve Howell
 

Attachments

  • SBL 9N extnd tailstock full view.jpg
    SBL 9N extnd tailstock full view.jpg
    59 KB · Views: 4,046
  • SBL 9N tailstock extnd spindle view.jpg
    SBL 9N tailstock extnd spindle view.jpg
    54.9 KB · Views: 3,278
  • SBL 10L tailstock extend full fiew.jpg
    SBL 10L tailstock extend full fiew.jpg
    54.1 KB · Views: 2,365
  • SBL 10L tailstock extnd view.jpg
    SBL 10L tailstock extnd view.jpg
    60.7 KB · Views: 2,507
  • SBL 9N 10K &L  tailstock spindle asmly.jpg
    SBL 9N 10K &L tailstock spindle asmly.jpg
    60.6 KB · Views: 13,349
Steve;

Nice looking work! The price is more than fair. I imagine you'll get a number of them to modify in short order.

craigdonges @ yahoo.com

Craig;

Thanks for your kind words.

It takes more than 1/2 day to machine one of these modifications and I wanted to be fair on the price. As I am retired it is something to keep me busy in my hobby machine shop.

I originally wanted to offer to modify the tailstock spindle and feed screw assembly of one of the members of our South Bend site for free if that person would write a review of the modification and post it back to the site. I know that I would be reluctant to hand over my tailstock spindle and feed screw assembly and some cash to someone who I did not know and do not know the quality of the work to be provided back to me. However, I do not know how to offer this without causing some discord, as well as how to offer it to a person who opinion is considered well by the members.

I am open to your suggestion as well as suggestions of the South Benders on this site on how properly and prudently do this.

Best Regards;
Steve Howell
 
Steve,

Just curious; why do we need another 1.5" of tailstock quill travel? And, if useful, why didn't South Bend give it to us?

Very nice work! I wish I could do all that in 4 hours.

Sincerely, John.
 
Steve,

Just curious; why do we need another 1.5" of tailstock quill travel? And, if useful, why didn't South Bend give it to us?

Very nice work! I wish I could do all that in 4 hours.

Sincerely, John.

Honestly I was wondering this myself. But I guess if you are drilling with the tail it may be handy.
 
Steve,

Just curious; why do we need another 1.5" of tailstock quill travel? And, if useful, why didn't South Bend give it to us?

Very nice work! I wish I could do all that in 4 hours.

Sincerely, John.

John;

Tailstock travel of only 2 inches of course limits drilling and reaming using the tailstock. You can drill or ream deeper by moving the tailstock towards the headstock after you drill/ream 2 inches. However, in order to clean the chips from the drill/reamer, you have to move the tailstock to the rear pulling the drill/reamer out and clean away the chips, then move the tailstock back forward again and so forth until you have a hole deeper than 2 inches.

The 13 inch SB lathes have more than twice the tailstock travel than the SB 9's and 10's so that you do not have to move the tailstock when drill deep holes.

I suspect that SB only gave us 2 inches of travel to limit the cost of production of 9's and 10's, although at the time these lathes were introduced it may have not been common for hobbyist to have access to good drills and reamers at such a low cost as we have today.

Best Regards;
Steve
 
There is a lot easier way to fix a problem that doesn't exist. Put a # 2 MT tool block in your quick change and you can drill under power if desired. Most of the time I push with the tailstock and since you have to clean the hole and keep some cutting oil in there anyway, just turn the tailstock back, pull your drill out by moving the saddle back. Next time you push the drill in stick a piece of 2x4 between the tailstock ram and the tool block. Next time put the 2x4 edgeways, next time endways. Next time you need more lumber. Drill a foot without moving the tailstock if you so desire. Even though I have loads of travel I do the same with my 14.5. Kenny
 
Kenny,

Great idea. Never thought of it exactly like you explained.

One question, when using the # 2 MT tool block in the QCTP, you need to center the chuck in the tool block with the headstock. Exactly how do you do this? I assume you have a really fast and easy way.

Thanks, John.
 
I set the block square with the world with a small machinist square off the chuck face. I usually spot with the tail stock and then a center in the tool block. I also have # 3 tapers for my big drills. Kenny
 
Mark;

Thanks for clarifying that you were asking about tailstock wear. In my experience if the clearance between the spindle and the tailstock hole is more than 1 thou., then you will have a lot of problem with keeping the spindle in proper alignment to the lathe center line when you tighten the spindle lock. I have made several new South Bend tailstock spindles to correct this, however I also need to re-bore the tailstock hole in order to really correct the issue. To do that properly I need to make a "perfectly" centered bushing to place in an extended bushing holder at the rear of the tailstock and use the headstock to drive a boring bar through the tailstock casting, while the tailstock casting is locked down. I am in the process of contemplating how to do this. It is really overkill on my part, but I want to do just to see if I can do it correctly.

I want to ask Ted Pflugner how SB bored the tailstock castings before I go any further.

Even with only 1 thou clearance the tailstock sindle will move the opposite the tailstock lock by 1 thou when you tighten the lock. I have drilled and tapped the tailstock casting (opposite the tailstock spindle lock) and installed a brass tipped 1/4 machine screw. When I am doing very precise work I have a dial indicator positioned against the front of the tailstock spindle so that when I lock down the spindle, I also turn the machine screw to obtain a locked spindle with Zero movement.

Another way more simple way to handle the problem is to offset the position of the tailstock by the one or more thousands of an inch that the tailstock lock moves when it locks down. I have done that as well as have thousands of other lathe operators have done the same with SBL's. In my opinion a proper design of a tailstock spindle lock should place the locking device more to the rear of the tailstock.

I come up your way to buy tooling at the Travers warehouse in Duncan, SC.

Best Regards;
Steve
 
Finish boring was done after the top was fit to the base. They used a special fixture machine to line bore. At assembly, the spindle was fit to the tailstock. the larger ones were honed, the smaller ones(9,10K,10") were hand reamed.
Slip fit, no shake.
Ted
 
Finish boring was done after the top was fit to the base. They used a special fixture machine to line bore. At assembly, the spindle was fit to the tailstock. the larger ones were honed, the smaller ones(9,10K,10") were hand reamed.
Slip fit, no shake.
Ted

Thanks Ted. I suspected that South Bend must have done something like that. How was the line boring device held in place in the headstock to get it on dead center? Then when the South Bend craftsmen reamed the 9, 10K & 10L spindle/quill bore, how was the reamer held in line with the dead center of the headstock as the reamer was turned by hand? Maybe incremental size reaming is what I need to do to achieve an accurate fit and them make a new spindle/quill to fit the reamed bore. I think I can have reamers made in 0.001" increments of size, at least I have seen firms advertise that they can do this.

Best Regards;
Steve

The fixture machine was special made South Bend Lathe with a fixture on the carriage that had bushings to support and locate the boring bar. The headstock was only used to drive the bar.
In assembly they used an expansion hand reamer to fit the spindle. Height and alinement with the headstock was accomplished in final assembly by scrapeing.
Ted
 
Steve, give me a yell next time you are going to Travers, I am just a few miles away.. Good folks at Travers, I am friends with most of them.. You need to come up in the fall for their Customer Appreciation Day, Usually on a Friday in Oct. Huge BBQ lunch + a huge warehouse surplus sale.. Guys are waiting at the door for the sale to open, just like folks at the mall on Black Friday.. LOL...
 
Steve, give me a yell next time you are going to Travers, I am just a few miles away.. Good folks at Travers, I am friends with most of them.. You need to come up in the fall for their Customer Appreciation Day, Usually on a Friday in Oct. Huge BBQ lunch + a huge warehouse surplus sale.. Guys are waiting at the door for the sale to open, just like folks at the mall on Black Friday.. LOL...

Davis;

I will take you up on your kind invitations.

Regards;
Steve


Back
Top