What's new
What's new

Another CL145C 13" headed for restoration in the coming weeks/months

jmofr

Aluminum
Joined
Sep 29, 2014
Location
Springfield Mo. area
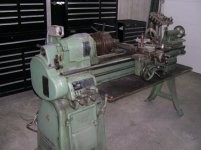
I purchased this lathe a month ago and have been getting ready to began the restoration. I have been getting my basement workshop organized to have the space, tools, workbench area etc. to make the work a little easier since this will be my first lathe restoration. My inspiration for this restoration is Brad Jacobs 13" I think his is perfect.

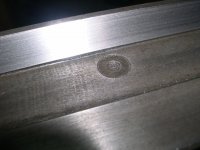
I found this lathe on Craigslist and drove 850 miles round trip to pick it up. The lathe came out of a Chattanooga Votech school, so it has a couple of battle scars on the compound as you can see in the photo. The serial number says it was manufactured in 1982 so it is fairly new in terms of this style of South Bend. It does have quite a bit of backlash in the cross feed and compound and some wear on the half nuts. I've been buying new parts from Ted for the last couple of weeks. The ways have a slight ridge but not terrible.

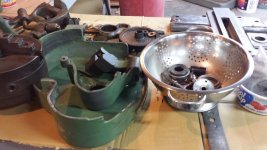
I got several collets and a couple of live centers, 8" 3 jaw chuck and a steady rest. What I did not get and want is a follower rest and the collet closer which went somewhere else I guess.

Anyway here are a few photos:
 

Attachments

  • 004.jpg
    004.jpg
    43.6 KB · Views: 804
  • 005.jpg
    005.jpg
    51.2 KB · Views: 1,004
  • 006.jpg
    006.jpg
    57.4 KB · Views: 747
  • 008.JPG
    008.JPG
    96.4 KB · Views: 713
  • 010.JPG
    010.JPG
    94.1 KB · Views: 708
Looks nice..are you going to document the rebuild, here?

I'll give some periodic updates and ask questions about how to do something as I need information. I've studied Brad's documentation extensively so I really don't have any questions about how to clean up the parts. It would be real difficult to equal his documentation.:)
 
I've studied Brad's documentation extensively so I really don't have any questions about how to clean up the parts. It would be real difficult to equal his documentation.:)

Could you please post a link to Brad's build you are referring to. I am interested in checking it out.

Thanks, Dan
 
Could you please post a link to Brad's build you are referring to. I am interested in checking it out.

Thanks, Dan

Dan, Brad Jacobs is the moderator of this South Bend forum.:D He provided us with a "sticky" at the front of this forum that lists many restorations. His restoration is listed in the 13" group. It is the first one. I would link it if I could figure out how. I know it's easy and I've done it in other forums but I can't figure this one out.:angry:

You can also go to YouTube and search "Basementshopguy" and he has a 40 minute video of his 13" restoration among others. Check it out. It's AWESOME!!
 
Both metric and English - we don't see many of those. Where is the locking mechanism for the dial?

Well, I didn't know the answer, so I went down and checked it out. There are two set screws in the outer collar (180 degrees apart) and if you loosen them up you can move the collar in or out to increase the resistance (friction) of the calibrated rings. There is no thumb screw to "lock" the dial.2014-10-27 10.30.50.jpg
 
Well, I didn't know the answer, so I went down and checked it out. There are two set screws in the outer collar (180 degrees apart) and if you loosen them up you can move the collar in or out to increase the resistance (friction) of the calibrated rings. There is no thumb screw to "lock" the dial.View attachment 120429

I don't believe that is true. The CF dial(which you pictured) has those set screws to position the dial assembly. They are tightened and left alone. There is supposed to be a thumb screw in that taped hole in the face(see the same picture). There is where loosen to rest the dial, and then retiighten.
The compound dial has a spring washer that offers resistance(friction) so that it stays put until you reset it by grabbing the knurled area, holding the ballcrank, and rotate to the desired setting
Brad Jacobs is installing a set on his 13" at this time, and will have a video soon...
Ted

Thanks Ted for this information. It seemed so logical to me at the time. I even loosened them up and pushed the collar in and the resistance increased to I thought I had discovered the reason for the set screws. It looks like i need to get a thumb screw which is missing on my lathe. You wouldn't happen to have one would you?
 
love your tool boxes and mill in the back ground...

Thanks. The mill was acquired from a local machine shop one day before I made the trek to Tennessee for the lathe. The large tool box on the left is nothing but "inch" size tools and the large tool box next to it is all metric. The small tool box in the far end is for my welding tools/supplies.

The Bridgeport is next in line for a rejuvenation. It's 53 years old whereas the lathe is a mere 36 years old.
 
Congrats on the 'new' lathe. I am new-ish here and am also restoring a (1941 10L) South Bend - my first machine teardown and restoration. Brad has set the bar high and I think that is just a great thing. Plus, the photos and all the help here on this forum. A pretty cool and very inspirational place to hang out for sure. The restoration guide book is a great help - you'll want one.

I have gone over Brad's vids and threads here many times - as well as others who have done great jobs. I doubt I will be polishing so hard, but, the end result will certainly be far better for the likes of Brad and the members of this forum. As an aside, I have tried to find somewhere here in Australia that could produce the color Brad got (search "South Bend Color Update"), but alas, each manufacturer has their own system and we don't get those US paints here. The search goes on.

Re your round trip journey - you are about as nuts as I am - I did 2000klms to get my SB. But, in 5 months of looking (in Australia) it was only one of three SB lathes that I saw advertised, and the *only* 10". But ... a man has to do what a man has to do, personally, I blame Mr Pete - youtube nom de plume "tubalcain".

Keep us posted of your progress - we *all* love pics. :-)

I've already got my rebuild books for both the lathe and the mill. They are very well done and will help tremendously.

I've watched Brad's video of the 13" restoration numerous times plus read through the write up several times. They are very helpful. I plan on doing the heavy polishing because it makes the end result look great. I hate to just copy his, but I can't see any way to improve his result. Well maybe one. I'm kind of toying with the ideal of having the chip tray powder coated, at least on top where all of the debris ends up.

As far as being nuts, :) the number of South Bends like seem to be few and far between around my neck of the woods so I had to search a wide area to come up with one that was decent. The guys back east seem to have an abundance of lathes and machinery to choose from.:cool:
 
I finally started to disassemble the lathe. Since this the first lathe that I've ever taken apart I'm going to do it one section at a time. I don't have the confidence that I would be able to distinguish which fasteners/washers/etc. went where. I chose to start with the saddle. I purchased 5 gallons each of Evaporust and Purple Power and some plastic tubs to put them in. So far it's working out fairly well. I'm degreasing first and then I put most of the parts in the Evaporust, then to the wire wheels.

The only thing that has given me any trouble are the two screw gears at the outside end of the gear box. The nut was real tough to get off and I had to use a impact wrench to back it off. There was no washer under the nut AND I had to use a gear puller to get the first gear off. I was not sure if the gear normally comes off fairly easy. Both gears were turned about 90 degrees from lining up the key and there was no key on the shaft. My first thought was that the key had been sheared but that was not the case.
 

Attachments

  • Gear on end.jpg
    Gear on end.jpg
    61.6 KB · Views: 492
  • 2014-11-06 19.06.19.jpg
    2014-11-06 19.06.19.jpg
    97.7 KB · Views: 442
  • 2014-11-06 19.06.27.jpg
    2014-11-06 19.06.27.jpg
    94.5 KB · Views: 430
  • 2014-11-06 19.07.03.jpg
    2014-11-06 19.07.03.jpg
    92.4 KB · Views: 381
  • 2014-11-06 19.08.19.jpg
    2014-11-06 19.08.19.jpg
    99.2 KB · Views: 467
I've been working on my restoration and have hit a serious snag with the paint. I purchased the DTM low lustre Benjamin Moore paint and I'm completely unsatisfied with it. Some of the time it drys to low lustre, but most of the time it drys very flat. In addition to that it was not leveling out to my liking. I've been using some good quality artist brushes that cost me $40 for 3 brushes. For the leveling out problem I tried thinning the paint a little mineral spirits which didn't help. I then purchased some Penetrol additive which states on the container that it's for alkyd enamels among other oil based paints. That did help. I've been mixing the paint very well when I use it and the room temp is probably around 65 degrees so I'm at a loss to understand what's going on.

My parts are clean and I wipe them down with mineral spirits or acetone before I paint.

I'm now thinking about switching manufacturers and going with a semi gloss DTM alkyd enamel. I don't want high gloss but this flat paint that I've experienced is just too flat! So far the only parts that I've painted are the carriage parts so I want to fix this painting problem before I move on to other areas.

You can see the only piece in these photos that has what I would call low lustre is the taper attachment part. I included it so you can see what I've got. The only thing about my paint I can say is, it's just plain ugly!

2014-12-04 08.33.10.jpg2014-12-04 08.32.10.jpg2014-12-04 08.32.58.jpg2014-12-04 08.33.55.jpg

Here is the original factory paint. Maybe I'll just stick to this color?? I've positioned it so you can see how much lustre it has.

2014-12-04 09.08.03.jpg
 
Last edited:
For you guys that are on the edge of your seats I found the problem and it only costs me $20 and a new can of paint. My day was running to Lowes to check out Valspar Alkyd Enamel but no luck there. I then went to Sherwin Williams where I learned that I had to buy a gallon if I wanted their DTM Alkyd Enamel...so no luck there either. So I was back to Benjamin Moore where I learned that the only thing they had is low lustre or gloss. I decided to try the gloss plus I chose a color that I thought I would like. Turned out I don't like the color so that's another quart wasted.:(

But the good news is the gloss looks okay AND it's leveling out just fine because it drys much slower than the low lustre which was drying so fast that the brush marks wouldn't level out. So I'm going back tomorrow and get yet another quart of the original color but in gloss.

Another bummer to all of this running around is things are not just down the street for me. I put over 100 miles on the truck today and I'll put another 70 miles on tomorrow for the new paint. :nopity:
 
Lookn' good..I ran into the same thing you did, about not flowing out. The fine line was thinning enough and then watching out for runs. You will be glad for all the 'paying attention to detail' in the end. Keep up the good work!:)
 
Well, I ended up mixing 2 parts low lustre with one part gloss to come up to the lustre that suits me.

Here's something that may help some of you who are doing a restoration. I couldn't figure out how the spring loaded handles were put together so I did a "google" and found out they are pinned just above the knurled section. The pins are really hard to see but they can be found. I could never find a picture of any that had been disassembled so I'm posting this photo here so you can see. I read that the pins are tapered but I believe they are just straight 1/8". After I was able to find them they came out fairly easily, but the knurled part was hard to remove because of the rust. A little penetrating oil helped.

2014-12-08 12.48.22.jpg

I've continued on with something new. I have the gearbox disassembled now and I'm in the process of cleaning it up and getting ready for paint.


Back
Top