What's new
What's new

Box end wrench for my Aloris CXA toolpost

Kevin T

Stainless
Joined
Jan 26, 2019
I have been doing a fair amount of "decorative" turning where I use "eyeball" angles on my QCTP for the cutter engagement and it's a hassle to grab a big wrench to loosen it and set at the next angle. I am thinking about a custom box end wrench that I can leave up there. Maybe turn a ball and figure out how to attach it to a cutoff wrench? I have watched a hundred (it seems) hours of the BuildFixCreate youtube channel and he has a setup like this. I like it. He has an obviously heat treated and bent chrome wrench he leaves up there and I am thinking I want to copy this idea.

Because I may leave it up there between operations I want the fit to be a good slip fit with little slop and may need to use a metric wrench to achieve this. I am still getting my feet wet on finding the "true dimensions" of a wrench gap but I think I may need a 28mm wrench to fit the 1.11 inch flat to flat measurement on the QCTP nut. A 1 1/8" is too sloppy.

If anyone has a quick ref I can research to help select the right size I'd be thankful but that is the small task. The bigger issue is has anyone bent a wrench? I am assuming lots of heat but can that be done with a map gas bottle or do I need something more industrial? Assuming a high quality wrench is the donor?

I don't know if my "decorative" work questions are appropriate for the general area so I am starting here first.
Thanks for any help.
 
I took the nut off the toolpost and replaced it with a custom nut, one that has a handle sticking out of it so I never have to grab a wrench.
Like this guy

Quick Change Tool Post Lock Nut - YouTube

Thanks for the idea! That may be the better way to go. It seems like I am using my toolpost in so many ways these days that I'm concerned that a nut with handle may get in the way since it's fixed. Have you run into this?
 
Depending on preference and what's most comfortable for most users. Then looking down at the top of the tool post and using a clock face for visualization purposes and 12 o'clock pointing towards the back side of the lathe, you'd want the handle position somewhere around the 3:30-4:00 o'clock position. When it's properly done, the handle is in an indexed position when it's tight so it's not in the way at any time. Build your nut and lever assembly and install on the lathe, fully tighten with what you'd normally use for tightening torque, then use something as cheap and simple as a plastic protractor marked in degrees. Figure out how many degrees to advance or retard the handle to where you want it's fully tight point. Now check what thread pitch you have. Lets use 12 tpi as an example, but any thread has the same method of calculating it. 1" divided by 12 tpi = .08333" of movement of the nut per full turn. Then you take that .08333 and divide that by 360 degrees for the amount of movement the nut makes for each degree of turn. .08333 divided by 360 = .00023" per degree. Now lets say you need to swing the handle 37 degrees to bring that handle into the correct indexed position when tight. .00023" X 37 degrees = .0085" So you'd remove that .0085" from the bottom of the nut and the handle will be exactly where you want it to be in it's operating position. Threads and indexing whatever you want on them are easy to figure out with just some basic math. If you wanted to retard the handles position for some reason then that's just as easy by machining a washer of the correct thickness. If you know the thread pitch in either imperial or metric then it's movement over one full turn can also be calculated. What your really doing is changing the start point where the component begins to engage the very first thread. So it can be done on either the male or female threaded part. For this it's just easier to do on the nut.
 
I use a deep offset box wrench. I get the correct size and cut it in half. Box wrenches come with two different size ends. Sometimes the offset is not deep enough to clear the wedge locking handle. I just heat the offset with a torch and unbend the offset a few degrees so it is angled up and out of the way.
 
I welded a 6pt socket to an old steel bicycle crank. Hands on the small end. It just sits on the toolpost ready to go. You do need a fairly tall nut to keep it there reliably, but the one that came on my Phase II set works fine.

If you weld a handle to the nut itself I guarantee you the handle will be in the wrong place most of the time. If I need to re-index I just lift it up and move it.
 
Well I've gone down the path of making a custom top closer with an arm on it....of course AFTER I ordered a 28mm wrench but it wasn't too expensive. lol
I tried out the threading process from a blind hole with the motor in reverse and the cutter flipped to other side...genius! I would have never known this was possible but it works a treat!

I'll shoot for maximum aesthetics on this since it sits so proud on the lathe.

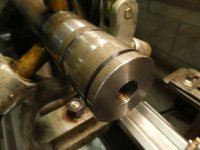
So far the "body" (New Top Closer) is threaded and I've made some parting grooves where I'll saw and clean up tomorrow.

P1080096038.jpg
 
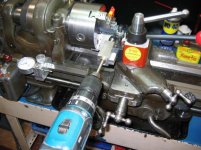
May as well add that the oiler trick worked sweet too on the parting ops. Oiler in the mag base indicator holder and dripping a few drops per turn...

P1080086028.jpg

P1080090032.jpg

P1080087029.jpg

P1080095037.jpg
 
Make one of these from an old 12 point socket. If it gets in your way just take it off.

Resized_20211113_164554.jpg

Resized_20211113_164611.jpg
 
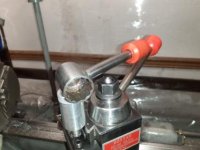
I just chopped off an old wrench I had in my drawer of odds and ends. I cerakoted it with some other parts just because my buddy was doing it when I cut the wrench.

AM-JKLXnTZYJH6rK1gGvsJLf9fGwhh-5F4uA5gdzMiYEypwOWr67VricDjsGLVnn1AjBiC9QbF3CEkw3hWsoMB5_pxbkXUMPs2LiyRsnmL4vnATHWiLlNMrcpHV7fpjWaqYmdBAiYnTi7fF_zVwXWtedDo3g-Q=w1169-h876-no
 
Replaced the nut with my own custom nut and lever. Fun little project and I got to use my ball turner though I am no expert user of it yet. Love the ease and functionality of it and not another loose wrench sitting around.

IMG_0012.jpg
 
I did exactly as GenePoole did in post #10, cut off the open end of a combo wrench. Just leave the wrench on the nut sloping down. Rarely gets in the way. If it does just move it a bit. I'm using an AXA toolpost.
 
Finally done! Man what a project! I made a bunch of mistakes that I learned a ton from but it feels great to be finished.

First order of business when making this for your too lpost is the understanding that you may need to take it part to test fit along the way. Wasted a lot of time trying to be cute and use the threads on the QCTP as my check tool for the threads I made! Big mistake....I eventually started over and made a test thread 3/4-16 so I didn't have to mess with that non-sense.

P1080100004.jpg

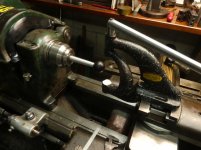
I wanted to match the geometry of the Aloris so I needed a big angle off the scale of my taper attachment. I hadn't seen it done before but went with this setup that worked great.

P1080103007.jpg

Cut the main taper with the added benefit of being able to use my test thread as an arbor! Oh I almost forgot. I threaded the blind hole and got a good fit but the part was very hot when I tested it and fit fine but the next day when I went back and the part had cooled the thread was too tight! I had to pick up the thread and take a few more light passes for the "perfect fit" I was looking for. Whew....

Test fit to see where I am headed...
I actually marked the part so I could plan for where it would close but more on that later

P1080110014.jpg


cont...
 
I knew what I needed to do to make the arm strong so I broke out the milling attachment and got the operation set up.

View attachment 334553

Planning for a threaded hole with a counter bore so the arm will be strong. It was all collet holding for the bits and easy until I got to the counter bore.
I didn't have the part held good enough and the 2 and 4 flute end mills grabbed the material and turned the part. Finally my last attempt which should have been my first choice was a piloted counter bore to stop the twisting! Of course I didn't have the right size pilot so I had to make one.

View attachment 334554

View attachment 334555

Presto!

View attachment 334556

With this part complete it was all down hill...

cont...
 
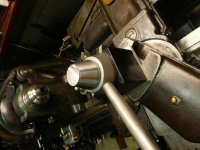
I cut a matching taper to the Aloris arm for my closer.

P1080123027.jpg

Then I swapped on my new radius tool for some cleanup on the top of the main housing and to cut the ball at the end of this arm. I settled on about a 2.75 diameter arc on the top of the nut but I ended up chipping the carbide insert on one of the last passes and it gouged the part! I had to grind it fresh and do some clean up. Made the ball end for the handle.

P1080128032.jpg

Time for assembly!

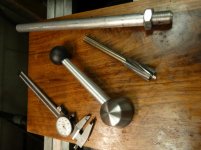
Here are the parts I made for the job...

P1080129033.jpg

cont...
 
Some shots of the work...

P1080130034.jpg

It's hard to see but i also counterbored the Delrin handle to get a better engagement and strength.

P1080131035.jpg

P1080132036.jpg

cont...
 
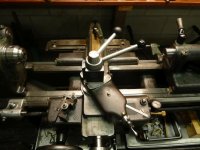
Here she is installed and ready to go!

P1080133037.jpg

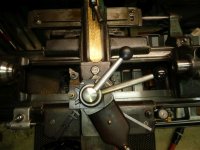
As much care as I thought I took to control where the arm is tight didn't land where I planned. I wanted it to be be back toward me but in front of the dovetail closer. I was shooting for about 4:30 if on a clock face and ended up with it at 1:30! This is loose dovetail and tight closer arm...

P1080137041.jpg

P1080138042.jpg


This is everything tight, tool loaded.

P1080142001.jpg


I am not going to mess with it for now...since it is out of the way but not where I planned. I am going to use it for a while and see how I like it where it is...

Cheers :cheers:
 
Depending on preference and what's most comfortable for most users. Then looking down at the top of the tool post and using a clock face for visualization purposes and 12 o'clock pointing towards the back side of the lathe, you'd want the handle position somewhere around the 3:30-4:00 o'clock position. When it's properly done, the handle is in an indexed position when it's tight so it's not in the way at any time. Build your nut and lever assembly and install on the lathe, fully tighten with what you'd normally use for tightening torque, then use something as cheap and simple as a plastic protractor marked in degrees. Figure out how many degrees to advance or retard the handle to where you want it's fully tight point. Now check what thread pitch you have. Lets use 12 tpi as an example, but any thread has the same method of calculating it. 1" divided by 12 tpi = .08333" of movement of the nut per full turn. Then you take that .08333 and divide that by 360 degrees for the amount of movement the nut makes for each degree of turn. .08333 divided by 360 = .00023" per degree. Now lets say you need to swing the handle 37 degrees to bring that handle into the correct indexed position when tight. .00023" X 37 degrees = .0085" So you'd remove that .0085" from the bottom of the nut and the handle will be exactly where you want it to be in it's operating position. Threads and indexing whatever you want on them are easy to figure out with just some basic math. If you wanted to retard the handles position for some reason then that's just as easy by machining a washer of the correct thickness. If you know the thread pitch in either imperial or metric then it's movement over one full turn can also be calculated. What your really doing is changing the start point where the component begins to engage the very first thread. So it can be done on either the male or female threaded part. For this it's just easier to do on the nut.

So this is awesome thanks. Let's see if I follow...

My thread is 3/4-16 so

16 TPI

1" divided by 16 tpi = .0625 of movement per revolution

.0625 divided by 360 = .000174 per degree

I think I want to move it 90 degrees so.

.000174 x 90 = .015625

If I remove .0156 from the bottom of the part I will get ~90 degrees more turn before engagement right?
 
I like the ideas of a bent combination wrench.

Removable is handy

Mechanics bend them all the time for special cases


High quality ? Snap on wrenches are $40 ish, store brand wrenches are $10 or $15

Store brand wrenches are fine for the purpose.


12 point lets you fine tune the position you will use it in, it can change.

size to fit the nut ?
Take the nut into the store and check fits.


The little propane torches will work if you give them time.
Make a wire template of the bend first.
Red hot heat and bend as you want.

let it cool, no quenching

Example
Just Because It Bothers You! - YouTube


Back
Top